|
|
Messing
Around With Mouseboats
By Ian
Manley
 On
June 3rd of this year my son Daniel and myself, went to
Mystic Seaport, for the John Gardner small boat workshop.
Mainly to show off his mystic jellyfish, which we had
built last summer. It didnt take long to meet Dave Colpitts
and be introduced to mouse
boats, designed by Gavin Atkins. On
June 3rd of this year my son Daniel and myself, went to
Mystic Seaport, for the John Gardner small boat workshop.
Mainly to show off his mystic jellyfish, which we had
built last summer. It didnt take long to meet Dave Colpitts
and be introduced to mouse
boats, designed by Gavin Atkins.
After a couple of hours of small talk, with Dave followed
by an early morning seven-mile river paddle in a skinny
mouse to convince me that mouse boats are great. In stability,
ease of construction and fun to paddle. A project that
both adults and teens could get involved in.
 After
that weekend and some fast reading from the Yahoo Mouseboat
group site to get the plans, a little background and to
check other peoples techniques, construction was eminent.
When one of Daniels fishing buddies, Kevin, saw the plans
and pictures that we took, he was hooked, and they both
wanted to start construction as soon as possible. After
that weekend and some fast reading from the Yahoo Mouseboat
group site to get the plans, a little background and to
check other peoples techniques, construction was eminent.
When one of Daniels fishing buddies, Kevin, saw the plans
and pictures that we took, he was hooked, and they both
wanted to start construction as soon as possible.
I wanted to stay away from epoxy, if possible, and also
keep cost to a minimum. After some experimenting with
Pl Premium, construction adhesive, and Pl concrete adhesive
it proved to be a sound way to construct the boats. The
only other thing that was needed was ¼ inch plywood and
good weather.
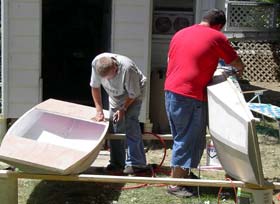
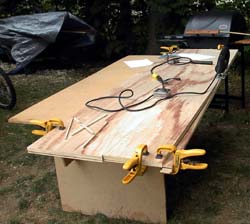 On
July 7th we started construction by laying out the lines
for the boats on the plywood. On
July 7th we started construction by laying out the lines
for the boats on the plywood.
We were using the plan for the original mouse, fraction
version drawn by John bell. Hint on layout cut the plywood
into 2x8 panels and stack and clamp the pieces together.
You only have to lay out the lines once and cutting the
panels as a group is more stable than cutting the ¼ inch
as an individual sheet, also build more than one boat
its twice the fun.
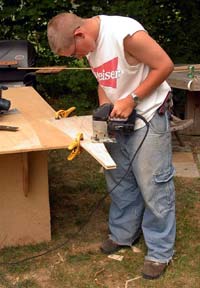
The boys did some of the cutting and drilled all of the
holes for stitching the panels together. I cut a small
scrap block ¼ x 1 x 6, ¼ inch side to mark inset and 6
inch to keep spacing the same between panels. Using nylon
wire ties we assembled the bottom panels and transoms.
Wire ties are a great improvement from the last time I
stitched a boat together, 20 years ago, using fishing
line.
 We
added the sides and adjusted the ties to remove gaps as
much as possible. Since we didnt want full bulkheads,
we installed 1 x 4s at bulkhead locations 1 and 3 from
the plan. Next we applied duct tape to the outside seams
where they didnt get pulled together totally with the
ties. We
added the sides and adjusted the ties to remove gaps as
much as possible. Since we didnt want full bulkheads,
we installed 1 x 4s at bulkhead locations 1 and 3 from
the plan. Next we applied duct tape to the outside seams
where they didnt get pulled together totally with the
ties.
After filling any inside voids at the seams with Pl premium
we applied 2 layers of fiberglass drywall tape to the
inside seams. Pl was then applied over the tape and spread
as you would joint compound or resin. My only advice in
retrospect is to use two thin layers over one heavy layer
it minimized the bubbling in the Pl (no structural loss
though).
In our next session we cut and installed the skegs and
applied drywall tape to the outside seams. These seams
were then coated with Pl concrete adhesive. It takes an
extra day to cure but doesnt bubble. It has a tough rubbery
texture when cured.
 As
every amateur boat builder discovers a designers plan
is only the basic structure and the minor changes are
what makes each boat individual. After adding the gunnels,
we added blocking for cleats on the fore and aft decks.
We also installed rigid foam under the deck area for floatation.
And finally added the 1/8th inch plywood decks. As
every amateur boat builder discovers a designers plan
is only the basic structure and the minor changes are
what makes each boat individual. After adding the gunnels,
we added blocking for cleats on the fore and aft decks.
We also installed rigid foam under the deck area for floatation.
And finally added the 1/8th inch plywood decks.
The next couple of sessions were pretty relaxing for me
as the boys got to shape, sand, prime and paint their
boats. The paddles were constructed while waiting for
paint to dry.
Using scrap ¼ inch plywood and approx. 7 feet of 1 5/16
closet rod. They are loosely based on Greenland kayak
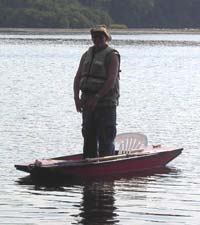
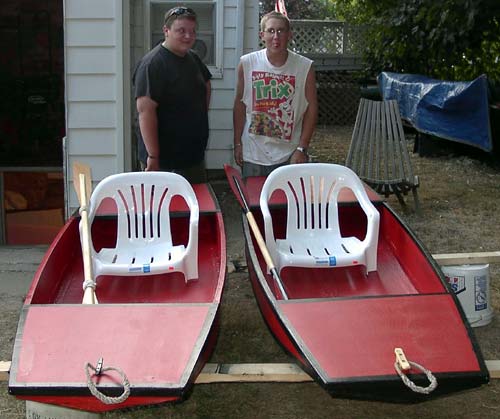
paddles. The seating in the boats are resin chairs with
the legs 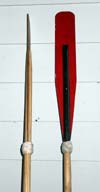 cut
to 1 inch and set on sheets of foam rubber. Makes adjusting
trim easy for different users and large cargo loads (i.e.
tackle boxes, fishing rods, bait buckets, etc.) cut
to 1 inch and set on sheets of foam rubber. Makes adjusting
trim easy for different users and large cargo loads (i.e.
tackle boxes, fishing rods, bait buckets, etc.)
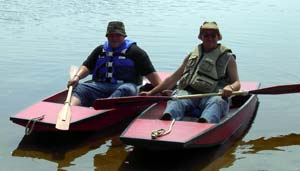
Launching day came on July 18th, 12 days and approx. 28
hours later. With a total cost of $75.00 dollars ($37.50
per boat) it fits the budget of even the thriftiest of
us.
The first paddle got great reviews from both boys and
a few on lookers who had stopped to watch the launching.
In conclusion, if you have never built a boat before this
is a great one to start with, both for its ease of construction
and its low cost. If you are an experienced epoxy builder
its a great way to experiment with alternative adhesives.
If you are like me and will use any reason to build or
start a new project, this is a quick, rewarding and unique
one to undertake. And finally if you have a son, daughter,
niece, nephew, or can find any kid from 8 to 18, this
a great way to get them involved in boat building. If
you build 2 or more at once everyone ends up with a great
stable boat for pond and river paddling or fishing.
|
|
|
|