Birth
of a “Pack Rat”
by Scott
Widmier
I caught the boat building syndrome when I
built “Suits
Us”, a 14' Stevenson’s
designed Pocket Cruiser, 3 years ago. Since then I have built
“30
Grit”, a modified summer
breeze, and a one sheet kids kayak of my own design. I am
also serving as the current president of the BYYB
group dedicated to building and sailing boats of the Stevenson
designs.
 I
would like to tell everyone about my latest creation, a modified
Flying
Mouse I call “Pack Rat”. I built “Pack Rat”
in about 2 weeks of evenings and have already used her once despite
not having finished the interior (fairing and painting the interior).
How is this possible given that I live in Ohio and spent Christmas
in Kansas both of which either have frozen lakes or barely thawed?
No, I am not a member of the polar sailors club. I actually used
my modified flying mouse as a car-top carrier. I
would like to tell everyone about my latest creation, a modified
Flying
Mouse I call “Pack Rat”. I built “Pack Rat”
in about 2 weeks of evenings and have already used her once despite
not having finished the interior (fairing and painting the interior).
How is this possible given that I live in Ohio and spent Christmas
in Kansas both of which either have frozen lakes or barely thawed?
No, I am not a member of the polar sailors club. I actually used
my modified flying mouse as a car-top carrier.
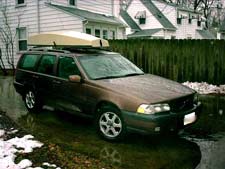 The
whole crazy notion started when I added up all of the stuff (2
adults, 2 kids, 1 dog and a lot of suitcases and gifts) we would
betaking to Kansas City for Christmas in our Volvo station wagon
and came up short on space. I thought about purchasing a Sears
or Walmart carrier (or borrowing my neighbors) but didn't like
the non-aerodynamic looks of the carrier and was concerned about
getting blow around (or going through a lot of gas). I looked
into the fancy coffin-like carriers but they were well beyond
my limited budget especially since I might only be using it once
a year at most. Then it hit me, those fancy carriers look a little
like upside down boats and I know how to build boats! Besides,
if it looks like a boat it can act like a boat when the luggage
is unloaded at the destination. Furthermore, I would never be
caught boat less as long as I needed extra luggage space! So,
I decided to design a dual-purpose car-top carrier/ sailboat. The
whole crazy notion started when I added up all of the stuff (2
adults, 2 kids, 1 dog and a lot of suitcases and gifts) we would
betaking to Kansas City for Christmas in our Volvo station wagon
and came up short on space. I thought about purchasing a Sears
or Walmart carrier (or borrowing my neighbors) but didn't like
the non-aerodynamic looks of the carrier and was concerned about
getting blow around (or going through a lot of gas). I looked
into the fancy coffin-like carriers but they were well beyond
my limited budget especially since I might only be using it once
a year at most. Then it hit me, those fancy carriers look a little
like upside down boats and I know how to build boats! Besides,
if it looks like a boat it can act like a boat when the luggage
is unloaded at the destination. Furthermore, I would never be
caught boat less as long as I needed extra luggage space! So,
I decided to design a dual-purpose car-top carrier/ sailboat.
 Well,
I started looking at designs for inspiration but found most had
shear at the gunwales which wasn't compatible with a flat bottom
(deck) for a cartop carrier. Then I remembered an article I read
in Duckworks about a design for a "mouse"
boat. I visited this site and saw some completed mouseboats on
top of cars and decided this was the perfect plan with some modifications.
Besides, I had never built a V bottom boat. For those of you unfamiliar
with these boats of the rodentia persuasion, they were started
by Gavin Atkin
to get the most boat out of one sheet of plywood. They are originally
8 foot V bottom garveys. You can visit the mouseboats
group or do a search
in Duckworks for several great articles on these wonderful
little boats. Well,
I started looking at designs for inspiration but found most had
shear at the gunwales which wasn't compatible with a flat bottom
(deck) for a cartop carrier. Then I remembered an article I read
in Duckworks about a design for a "mouse"
boat. I visited this site and saw some completed mouseboats on
top of cars and decided this was the perfect plan with some modifications.
Besides, I had never built a V bottom boat. For those of you unfamiliar
with these boats of the rodentia persuasion, they were started
by Gavin Atkin
to get the most boat out of one sheet of plywood. They are originally
8 foot V bottom garveys. You can visit the mouseboats
group or do a search
in Duckworks for several great articles on these wonderful
little boats.
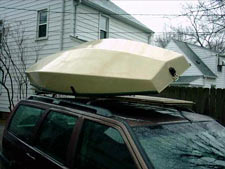
 I
decided to go with the greater freeboard of the flying mouse both
for more packing area (most large suitcases need at least 10"
or more) and greater freeboard for heeling when sailing. I built
the bottom using stitch and glue (very hard in an unheated garage)
and 1/4" luan. I ended up using two solid midship frames
because the hull needed these structural members for shape and
stiffness. I also gave the bow a greater angle for aerodynamics.
I thought about cutting down the interior frames but realized
that when the deck was on these spaces could provide fairly watertight
floatation. I
decided to go with the greater freeboard of the flying mouse both
for more packing area (most large suitcases need at least 10"
or more) and greater freeboard for heeling when sailing. I built
the bottom using stitch and glue (very hard in an unheated garage)
and 1/4" luan. I ended up using two solid midship frames
because the hull needed these structural members for shape and
stiffness. I also gave the bow a greater angle for aerodynamics.
I thought about cutting down the interior frames but realized
that when the deck was on these spaces could provide fairly watertight
floatation.
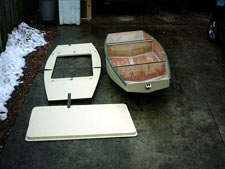
 I
installed exterior rub rails on the gunwales and cut two separate
decks out of 1/4 inch luan, one that would fit inside the hull
and one that would completely deck over the hull. I then sandwiched
1” wood, for stiffeners, and Styrofoam between the two decks
so that the whole assembly would fit down into the hull creating
(with the addition of weather stripping) a watertight seam. I
cut the cockpit out of the deck so that the resulting plug fills
the cockpit opening in the deck but only when the deck is upside
down (being used as the bottom of the cartop carrier). I spaced
two U bolts through the deck to correspond to the rooftop rack
on my Volvo wagon (two was all that was needed) making sure to
go through parts of the deck that had the 1" wood stiffeners
between deck layers. I
installed exterior rub rails on the gunwales and cut two separate
decks out of 1/4 inch luan, one that would fit inside the hull
and one that would completely deck over the hull. I then sandwiched
1” wood, for stiffeners, and Styrofoam between the two decks
so that the whole assembly would fit down into the hull creating
(with the addition of weather stripping) a watertight seam. I
cut the cockpit out of the deck so that the resulting plug fills
the cockpit opening in the deck but only when the deck is upside
down (being used as the bottom of the cartop carrier). I spaced
two U bolts through the deck to correspond to the rooftop rack
on my Volvo wagon (two was all that was needed) making sure to
go through parts of the deck that had the 1" wood stiffeners
between deck layers.
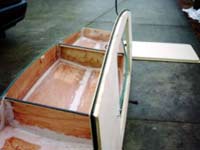
 I
made fasteners for the deck out of leather belts with buckles
used for the bow and the transom (more fastening pressure) and
straps with holes that slipped over bolts for the sides. I also
attached two hasps through which I could run locks (one for each
side). I found that with one sides locking hasp closed and leather
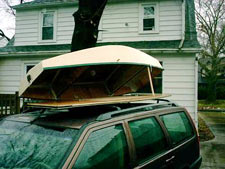
strap fastened, I could prop up the other side for loading. The
only problems I had was a curl that somehow got built into the
forward part of the deck (a lot of pressure on the fastening belt
gets rid of this) and the fact that the deck is fairly heavy. I
made fasteners for the deck out of leather belts with buckles
used for the bow and the transom (more fastening pressure) and
straps with holes that slipped over bolts for the sides. I also
attached two hasps through which I could run locks (one for each
side). I found that with one sides locking hasp closed and leather
strap fastened, I could prop up the other side for loading. The
only problems I had was a curl that somehow got built into the
forward part of the deck (a lot of pressure on the fastening belt
gets rid of this) and the fact that the deck is fairly heavy.
|


