I hate electronic ignition.
Many, many college graduates with marketing degrees have produced
reams of advertising to try to convince me what a great thing
electronic ignition is.
I still hate it.
Because when something goes wrong with electronic ignition, repairing
it is expensive. The parts are expensive; the labor at the shop
is expensive.
And I have seen countless motors come back from the shop with
multiple new parts installed. Now, did the “switch box”
and the “stator” go bad at exactly the same instant,
or did the mechanic guess wrong which he started to replace things
in an effort to fix the engine?
“eannie- meanie-minny-moe?”
I like points and condensers. Yep, just like the ones in Grand-dad’s
Nash (which you wish you had now.) For the reader not conversant
in “low-tech,” points are little mechanical switches
which (in the case of my favorite old OMC outboards) are opened
and closed by a cam on the crankshaft and signal the sparkplug
when to spark. A condenser is a little metal tube with a wire
coming out of it, and it is basically a short-term storage device
for electric current- it stores an electrical charge for a fraction
of a second.
These descriptions are very simplified but the point to remember
is that points and condensers (when they are available) are dirt
cheap., and the points and condensers for the old OMC outboards
that I recommend as good “cheap-power” candidates,
are very available and very cheap. A “tune-up” kit
consisting of (2) sets of points and (2) condensers (a set for
each of the (2) cylinders), will set you back less than 20 bucks.
Which is one reason I love old points and condenser magneto ignition
Changing-out points and condensers is a breeze; merely a matter
of removing some screws and a few wires, and since there are two
of everything on these twin-cylinder engines, you can work on
one “side” while leaving the other as a guide.- like
a “built-in’ parts diagram.
Which is the other reason I love ‘em.
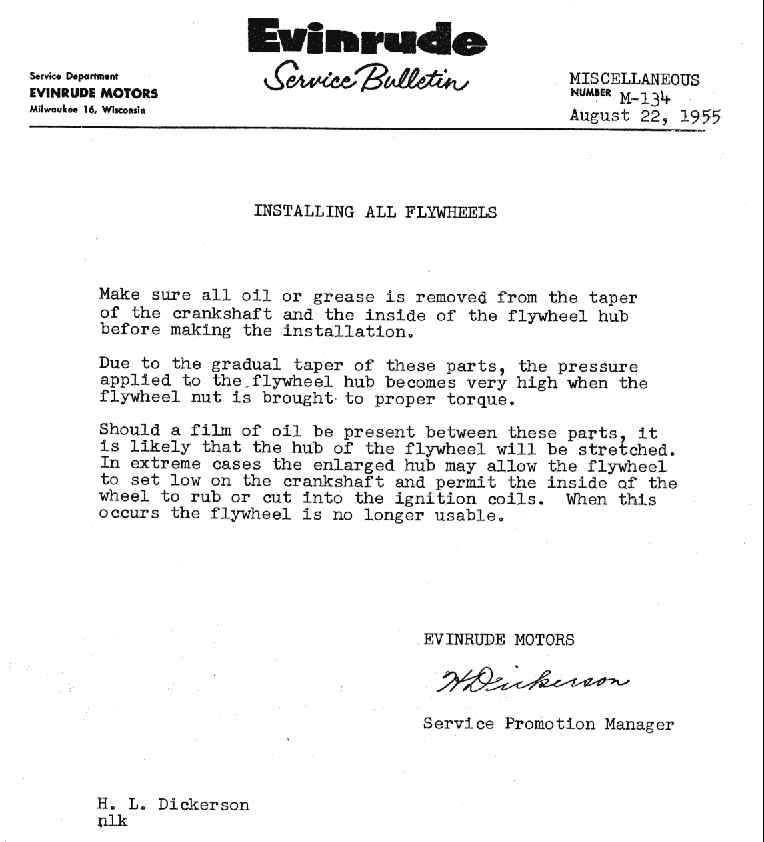
Of course, there are complicating factors, the main one being
that this stuff is located underneath the flywheel, which needs
to be removed in order to replace this stuff. Pulling the flywheel
is not the big deal a lot of people think it is, but we’re
getting ahead of ourselves.
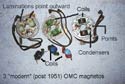
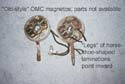
Besides the points and condensers, the magneto (ignition system)
on these engines consists of a “coil,” magnets encased
within the rim of the flywheel, a spark plug wire and a spark
plug. And that is all there is to a magneto that will fire one
cylinder. Since nearly all of the engines we are talking about
have (2) cylinders, this stuff is all duplicated for the second
cylinder.
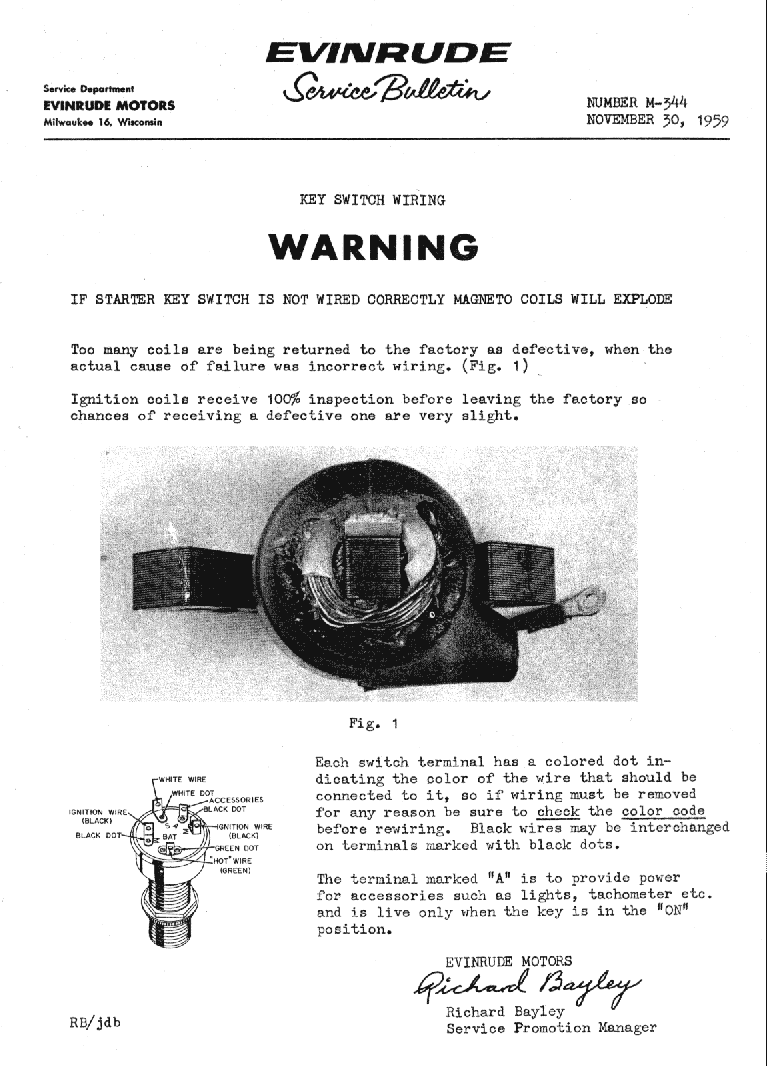
No outside source of electricity (i.e. a battery) is needed for
the engine to run; That is one of the beauties of a magneto ignition
system. In fact, if one has an outboard with electric start, one
needs to be very careful when wiring-up a key ignition switch;
if the wires are connected to the switch wrong and 12 volts (6
volts before 1957) is fed into the magneto coils, they will go
“pop,” and then you will have to “pop”
for a new set of coils.
It should be obvious that there is not a whole lot that can go
wrong with such an ignition system. Couple that with the fact
that OMC used almost identical ignition systems on all of their
2-cylinder outboards from about 1951 until about 1973, and you
have a system that is easy and cheap to fix.
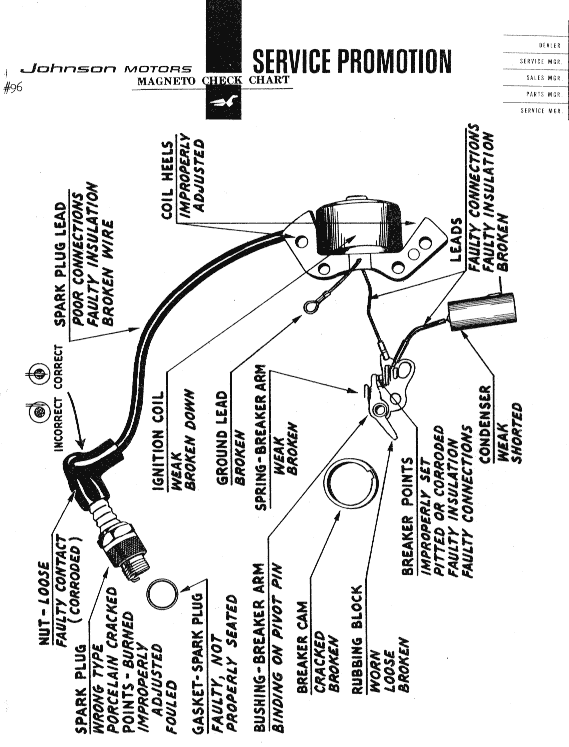
Posted along with this column is an old Johnson Service Promotion
“Magneto Check chart,” which displays the entire ignition
system for one cylinder, And most of the things that can go wrong
with it.
What can go wrong? Well, points and condensers can ‘go
wrong” points can become burned and pitted due to arcing;
condensers can short-out, either internally, or to there outside
metal cases. Insulation on spark plug wires can go bad, or the
inner core may part.
If the old OMC engines I promote so much have one major failing,
it is the ignition coils. To put it quite simply, if the coils
have not been replaced on one of these old engines, you will need
to replace them (one per cylinder,) The coils originally installed
in these engines ALWAYS go bad, usually by cracking. But every
dark cloud has a silver lining, which in this case is that replacement
coils are easy to find, relatively cheap, and not a big deal to
install. (once you have that flywheel off.)
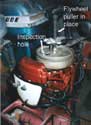
Checking for bad coils is easy enough; remove the cowling and
the recoil starter so that the top of the flywheel is exposed
. Most of these old OMC engines have a small round inspection
hole under a tin cover retained with 4 screws. Remove the screws
and the cover, and slowly turn the flywheel and have a look at
the plastic coils underneath and see if they are cracked. If they
are cracked, they need to be replaced. If there are not cracked,
then they have already been replaced and are probably good, as
long as some moron has not run the screws for a flywheel puller
too far in and skewered the coils.
There are also ways in which one can test points and condensers;
One can use a simple home-made “test light” to see
if the points are making and breaking contact, and the same test
light can be used to check a condenser for a short between the
wire and the case (an internal short requires a specialized tester
to check.)
But why bother? I always replace the points and condensers on
these old OMC engines. Saves time and hassles and cost little.
I recommend that you do too. While you’re at it, would not
hurt to replace the spark plug wires if they don’t look
new. New copper-core plug wire is not too expensive and you only
need a few feet of it. Don’t buy graphite core wire.
Now to removing the flywheel. One of the few specialized tools
one needs to work on these engines is a flywheel puller. The one
that I use was made in China by political prisoners and was sold
as a cheap harmonic balancer puller About ten years ago it cost
under ten $10.00. Often such things as steering wheel pullers
can be used. The main thing to consider is that the puller must
use the (3) threaded holes on the top of the flywheel, and not
lift on the rim on the flywheel. The puller’s 3 legs screw
into the three flywheel holes, and the center threaded mandrel
(rod) bears on the top of the crankshaft poking out the center
of the flywheel.
Loosen the flywheel nut (a big strap wrench helps to hold the
flywheel from turning while wrenching on the nut) and back it
off a few turns but do not remove it. You want the nut to be above
the level of the flywheel and you want the center mandrel of the
puller to bear against both the crankshaft and also the nut. The
3 threaded legs should fully engage the threads in the holes in
the flywheel, but keep in mind that if the screws extend very
far below the level of the flywheel, they may damage the coils.
For that reason it is best not to allow the flywheel to turn while
putting tension on the puller.
Once the puller is on, fully threaded, and square to the flywheel,
you can start screwing-down the mandrel and putting tension on
the flywheel. I use a second wrench on the puller to keep the
flywheel from rotating.
Just how much tension one can safely apply without fear of stripping
the threads out of the 3 flywheel holes is anyone’s guess.
You are going to have to make a judgment. If you strip those holes,
or damage the top of the crankshaft, you have problems.
A little penetrating oil on the crankshaft might help, along
with heat from a propane torch. If one lifts-up on the flywheel,
one will notice a bit of “end-play”; i.e. the crankshaft
moves up and down a very slight amount. One can pull-up on the
flywheel (NOT the armature plate underneath it), and give the
puller a smart and square smack with a hammer. Lifting-up the
flywheel will allow the crankshaft a bit of downward travel which
might be enough to break it loose from the crankshaft taper. DON’T
HAMMER ON THE PULLER UNLESS YOU ARE LIFTING UP ON THE FLYWHEEL
AND MAKING THIS SLACK AVAILABLE, AND DON’T HAMMER DIRECTLY
ON THE CRANKSHAFT. Also, be aware that hammer blows can reduce
the magnetism in the flywheel magnets.
With enough tension and penetrating oil and heat and ‘tapping,”
the flywheel will eventually come loose with a bang that will
convince you that something has broken. Remove the flywheel and
you are now looking at your magneto.
As mentioned, if the coils are cracked, replace the coils. New
ones can be found for under 20 bucks each. It is necessary to
remove the armature plate (round plate the stuff is mounted on)
from the engine to replace coils. There is usually a clip to disconnect
the throttle linkage from the plate, and the armature plate is
held down with (4) screws, two of which pass through the coil
“laminations.”
I suggest replacing those plugs wires as well- just a matter
of cutting replacement wires to the same length as the old wires,
install the boots for the sparkplugs, and installing the wires
in the coils. Incidentally, the wires are attached to the coils
by merely pushing them into the opening and onto a pointed stud.
It goes without saying the the points and condensers should be
replaced. The armature plate does not need to be removed to replace
the points and condensers.
You might want to keep track of which spark plug wire goes to
which cylinder. Usually the upper wire is marked with a small
metal band that says “up.”
As mentioned before, do one cylinder’s stuff and leave
the other intact to act as a guide. Reinstall the armature plate
if it was removed, and then set the points of a gap of .020 Rotate
the crankshaft until the rubbing block for that particular set
of points is aligned with the flywheel key, leaving the points
at their most open setting, and use a feeler gauge to set the
gap. On these old OMC’s, the gap is almost always .020
Set the flywheel and rotate slowly to ensure noth’n is
hitting noth’n I have heard of more damage done to engines
by people who did not pay attention to clearances and then hit
the electric starter. Read thoroughly the service bulletins posted
herein.
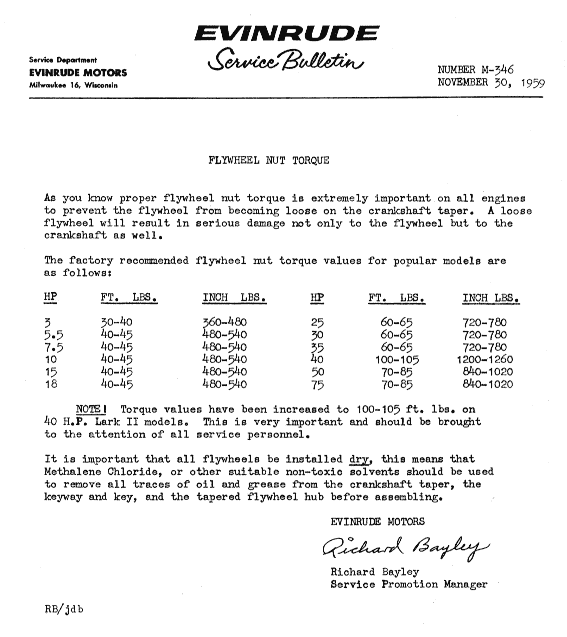
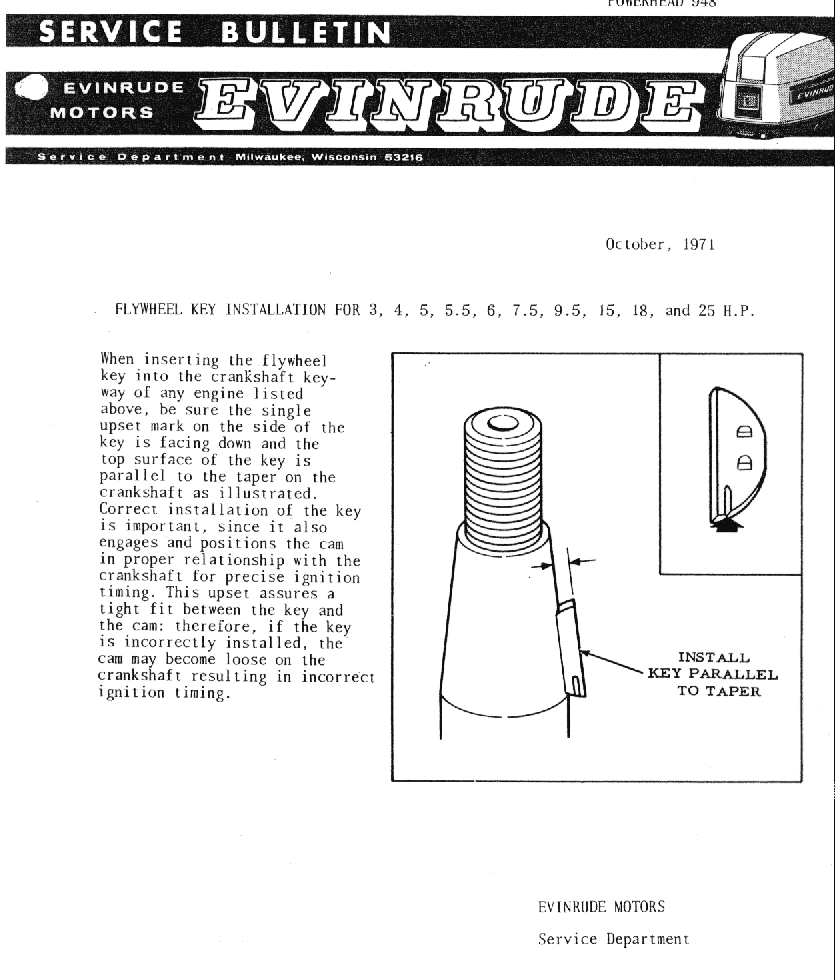
It is important that that the “key” on the crankshaft
be properly Positioned before tightening-down the flywheel nut.
It is also important that one ‘torque” the nut properly.
Reader’s of Jim Michalak’s newsletters may recall
it being mentioned that I ‘”torque” flywheel
nuts but hitting the wrench with a hammer. I aint recommending
that you do that.
Once the flywheel is torqued down, one then has to ‘synchronize”
the carb butterfly to the magneto. On most of the smaller engines,
a sheet metal cam on the armature plate moves a linkage which
opens the carb throttle butterfly. If the butterfly does not open
at the correct time, performance suffers. Usually the mounting
screws for the cam are adjusted so that the slack is out of the
linkage and the butterfly starts to open when the roller or follower
is at a mark on the cam. Nothing complicated about that.
One really ought to have a least a rudimentary service manual
when doing this work, and again I will point you towards the service
manual I reviewed for Duckworks.
One last tidbit in closing; If, after your tune-up, your engines
runs For a bit and then stops cold and won’t restart, check
for a sheared Flywheel key due to a loose flywheel nut.
Later
Max
|


