Stitch and Tape
I see a lot of things in my travels around my clients, some
good ideas and some surprising gaps in what I think is “common
knowledge”. Reminders that common knowledge is no more
common than the fabled common sense which in my experience
seems to be anything but. Common that is!
One of the things that I thought was pretty well known, but
from what I see should perhaps be brought up and aired every
year or so is how to make a stitch and tape seam and hide
the edges.
Now there are a lot of boats around where the builders know
how this can be done, and their boats look the better for
it, but there are a few who have either struggled to actually
sand the edges of the epoxy saturated tapes down to a feather
edge and have made great dips in the plywood along that edge,
or who have just painted over what looks like a strip of sacking
and gone boating.
This is for those who would like have an easy way of hiding
that edge:
Now you will note that I mention WEST System products and
that’s what I use, the guys here at Adhesive Technologies
in Auckland NZ have over the years been very very helpful
to me and I support them in return, but there are many equivalent
products out there and they will, I am sure, do the job just
fine.
I use West System Epoxy resin, with their usual glue extender
and 410 microlite. Sometimes I even go to Microballons if
I need a thixotropic (completely non sagging) mix but usually
put glue mix and Microlite in at a ratio of one glue to three
microlite by volume to just beef the resulting cured filler
up a little in compressive strength and abrasion resistance.
It still sands pretty well and does the job nicely.
I should also put in a plug for Chuck's
Cheap Chuckaway Chip Brushes, (say that one quickly
five times over! See them in his on line “shop”)
as you’ll be throwing away about a brush for each half
hours work.
I have shown the procedure that I use when taping seams
and edges in cartoon form.
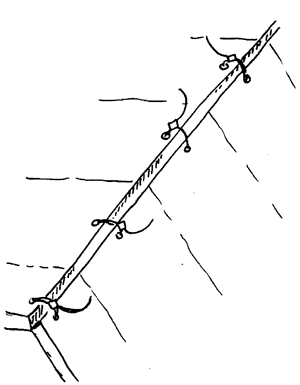
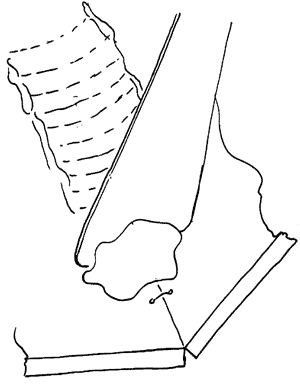
1) Lace the edges of the ply together, use
plastic cable ties, plastic jacketed or plain soft wire (copper
or similar) or even polyproplene string. I have used monofilament
fishing line but that requires some expertise in tying the
knots. Tie at quite close intervals, perhaps 15 times the
thickness of the ply so the edges remain in place when you
are working on the boat.
Keep the lacing close to the edge, no further from the edge
than the ply is thick.
2) An inside view, showing that although the
seam is open on the outside, it is a close fit on the inside
edge.
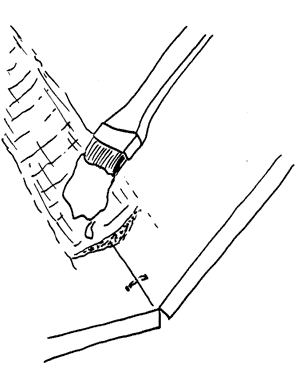
3) Make a nice radiused spatula, I use about
a 30mm radius ( 1 1/4in) for a boat using 1/4 or 3/8 in ply,
a little bigger for 1/2 inch or more . Lay a radiused fillet
of glue mix (no lightweight filler, just glue well thickened)
along the full length of the area to be taped, straight over
the ties and all. Tidy up really well as you don’t want
any leftover bumps in the road.
4) While the epoxy fillet is still wet, paint
on a layer of unthickened resin and hardener in a strip out
to the line where the tape (s) will come to. This is a wet
on wet operation, and on a hot day you need to get the tape
on pretty quickly before the epoxy in the fillet goes off
so don’t try and do each step for all of the boats bottom
before going back and doing the next one. Better to complete
the filleting and taping over a couple of metres then commence
the next section.
Note that the paint brush can be used to give the epoxy fillet
a final smoothing while you lay on the resin that will wet
out the tape.
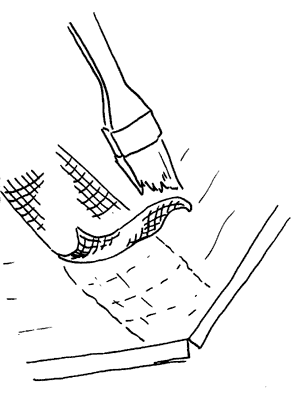
5) Lay on your tape using the paintbrush to
ease the tape onto the resin covered fillet and ply, press
it in gently and smooth it with the brush using more resin
where needed to get full wetout. If you are using multiple
tapes lay them on wet on wet until you have built up your
full laminate, and make sure while doing so that you lay the
tapes up staggered so that the edges do not coincide and build
up a thick edge that will be harder to hide.
Its important to maintain a finish as smooth as possible.
6) A day or two later when the epoxy is crisp
enough to sand* effectively
go through with a sanding block with fairly coarse sanding
paper and knock all the ragged spikes and lumps off the edges.
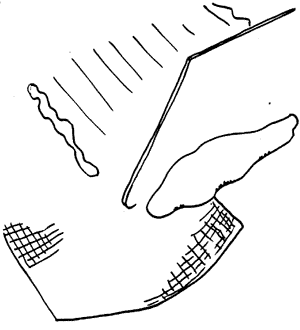
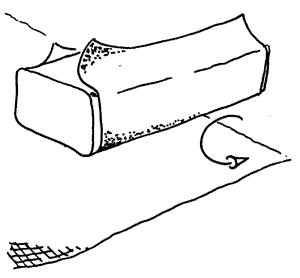
7) With a slightly flexible squeegee, I use
one cut out of the side of a large ice cream tub or similar,
go through and lay a wide and shallow fillet (of low density
filler per the formula above) out from the edge. One layer
of 6oz tape requires a 60mm wide fillet, two layers needs
about 100mm ( 4in) as does a single layer of 10 oz. that fillet
should be layed on a little high, and you can fill the weave
of the tape at the same time. Clean up well to save the sandpaper
time.
8) Sand off and paint. Don’t sand off
too hard or you will be back into the glass and that should
be covered or the weave will show through the paint.
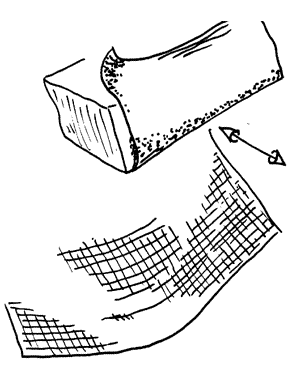
When doing the outside its much the same process, rounding
off the ply “corner” first, and if you’ve
used plastic ties or lacing you can plane it off otherwise
you’ll need to pull all of the wire. Note that if
the wire does not want to come you can heat it with a heavy
soldering iron or blowtorch and the epoxy will let go.
Next, fill the gaps and holes, and away you go wet on wet
with the resin and the tape, when hard then sand the roughies
off and trowel on that wide fillet of low density filler
and sand off.
If you make a tidy job, the tapes will not show, and it’s
a trademark of a professional job that all these joints
will look as though they grew together rather than being
joined by someone as ordinary as a home boatbuilder. Its
not hard.
*A note on sandpapers, and perhaps I
should visit this in the future sometime as it is a very much
more complex subject than most realise. But in the case where
sanding cured epoxy feels like trying to wear away solid steel
with a wet towel, something better than the garnet or cheaper
alox grits that you get from the local hardware supermarket
is indicated. If you ring a car body repair shop and ask who
supplies them you will get a supplier with a range of high
quality flexible abrasives (the stuff we call sandpaper) at
a price that is a lot better than you might think.
Remember that “sandpaper” is a tool, and a tool
that may be very specific to a particular job so you need
to buy the appropriate type and grit. It should be stored
in an airtight container with some silica gel to keep it dry
and crisp, and store it in such a way as to prevent the grit
surfaces from being in contact with anything that might take
the edge off.
In the case of sanding epoxy I use an Open Coat Silicone
Carbide 60 grit cloth backed “paper” of a type
used in commercial panel sanders but this can be hard to come
by unless you have a Plywood or Particle Board mill nearby.
I’d suggest a “Name Brand“ of Aluminium
Oxide (blue or yellow) open coat 60 grit on a heavy duty backing
if you cant get the sort of thing I use.
|