New shape for old boat
design modification by Roger Schroeder
(see story
of original design)
After living with my canal boat
as a barge for three years I began to desire something with better
lines, also the fact that we always felt we were plowing through
the water made me long for a shape that could displace water with
a little more grace. The idea to start new was always tempered
with my hesitation to not create scrap out of my barge boat. It
occurred to me that with some modifications I could make my barge
look and perform better.
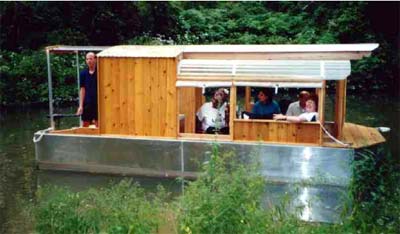
Original look of the canal boat
The design question I pondered
all winter was how to add a more shapely bow. At first I considered
removing the existing bow and replacing it with a new better shape
but that required lengthening the boat and abandoning my current
front. I could of course take the existing bow and use it as a
stern by welding it to the existing transom but that would require
extensive work on both ends. At this point it occurred to me that
I had been looking at this problem backwards ! Why not look at
the current bow as a shapely stern and rebuild the boat backwards.
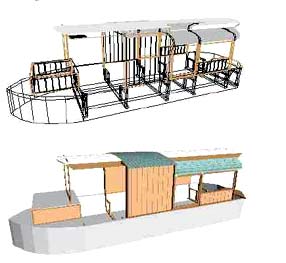
Wireframe and rendered sketches of my ideas
for changes.
Working in Aluminium
One of the advantages of working in aluminum as a construction
material is that changes are relatively easy. While aluminum is
not a choice for most amateur builders it seems to me it should
be an option. While a 1/8” thick sheet of aluminum is approximately
three times the cost of marine grade plywood it can quickly become
a cheaper alternative when paints, and epoxy coatings are considered.
The aluminum oxide that forms on the surface of exposed aluminum
provides a tough barrier to further oxidation so paints as protective
barrier are not required. Plate thickness of 1/8” is easily
cut with a circular saw and carbide blade (noise and hot chips)
or a
reciprocating saw.
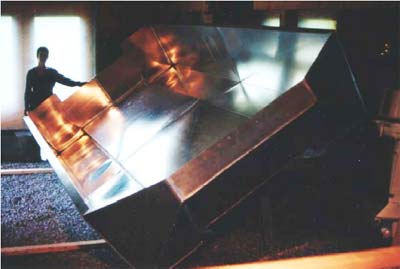
Original hull in process of being rotated
Welding is as a challenge
Welding is the skill that stops most from tackling this method,
but if your can take the time to develop the skill, it can be
an enjoyable process. Imagine making a strong solid finished connection
between two surfaces as fast as you can move the tip of the welder.
I taught myself to weld with enough proficiency to complete a
boat that spent three seasons in the water without leaking (not
a brag if you saw my work up close). The equipment can be had
for less than six hundred dollars spent between Home Depot and
you local welding supply store. Now don’t get me wrong,
welding is more difficult than hot gluing and is at times very
frustrating with wire jams in the machine taking up at least half
of your time, In the end running a good looking solid bead can
feel as good as a long straight drive down the fairway and just
as elusive.
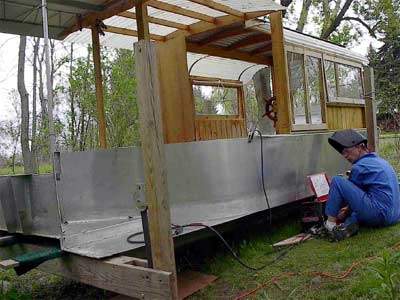
Armed with my recriprocating saw and welder I went to work on
a new look
Back to my project
This hull not being not painted and with removable wood internal
braces changes seem quite doable.
With spring and the purchase of
a reciprocating saw I set to work with some ideas on paper and
more in my head. Cutting the sides free I was curious to see how
easily and cleanly they would curve. I had experimented with 1/8”
x 1 1/2” flat stock but had no idea how a 2’ wide
sheet would bend and as it turns out is bends nicely.
My plan was to free the first
40” of the sides to see how close they could be brought
together and then complete the bow with new aluminum. As it turns
out I could get enough bow of the bow to not need any additional
material and the unsightly welds that would come with it.
This being a flat bottomed boat
the bottom emerged from the sides as they were drawn in and provided
a way to tack weld the sides into position. Once tacked into place
a continuous fillet weld was made on the outside of the hull and
the bottom is trimmed to meet the new bow shape. Water is added
to the hull (overnight rainfall) to expose leaks they are marked
and re-welded. With the hull watertight on the first weld the
interior fillet weld is made.
Allowing the aluminium to take a natural bend the sides were matched,
clamped and tack welded into place.
Reuse and recycle aluminium
Deck surfaces are made using cutoffs from the bottom, in places,
butt welding pieces together to form larger sections. The aluminum
topsides forms watertight surfaces, strengthens hull and reduces
surfaces the require maintenance.

With the exterior trimmed away the internal fillet weld is started.
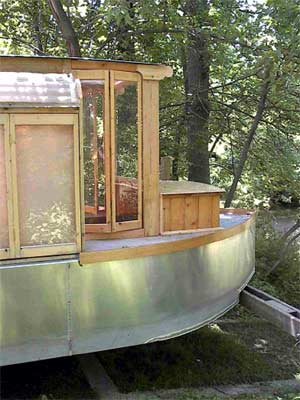
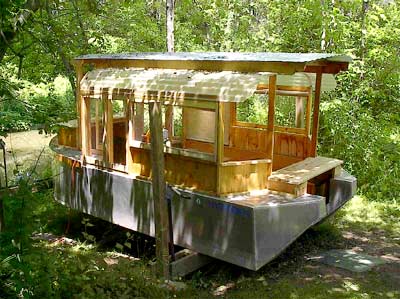
Deck and Pilot house
The deck /pilot house is constructed from the cedar removed from
the boat and all exterior wood surfaces are stained with Cuprinol
in the same manner you would a house. Brightwork is kept to a
minimum since I leave this boat outside all winter in Buffalo,
New York.
The bifold doors are reused from
the old design and provide a way to get the doors out of the way
when open.
The unsightly welded line where
the deck meets the sides of the hull is masked with wood. This
was my first experiment in laminating wood into a curve. Using
scrap luan underlayment three layer were built
up and clamped using those one dollar spring clamps avalible at
Home Depot. The laminate was then varnished and attached with
stainless steel screws on aluminium brackets to allow removal
during the winter.
New Pilot house and trim
A New Roof
The corrugated galvanized metal is cheap, a 14’ long sheet
would also cover the new pilot house.
Transom Reconstruction
To allow for a motor to be attached to the old bow (now a stern)
a cutout had to be made. The cut was made deep enough to allow
a 15” motor to be used and made adjustable if a 20”
motor is found. The adjustment is made by creating an aluminium
slot on both sides for a 2” thick plywood transom to slide.
The plywood is now bolted in place for a 15” (short shaft
motor).
New transom cutout
Testing on a Trolling Motor
Concerned that she might not float right I tested her before I
made the commitment to buy a new motor.
Testing her on a trolling motor
she floated fine and moved better than her original incarnation.

Testing with guests at our Memorial Day
Party
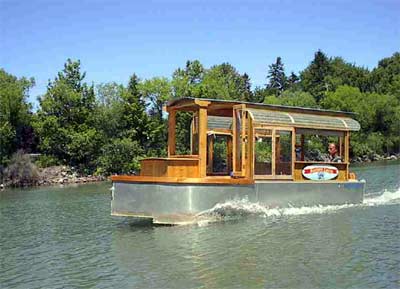
The Big Purchase
With a lot of thought I made the decision to power her with a
9.9 Hp 4 stroke. My decision was based on environmental reasons
as well as a consideration for noise.
I purchased a Tohatsu from a local
dealer and she performed better than expected. She trolls quiet
but can move out quite well when needed.
In a twenty mile round trip to
an Erie Canal Fest in Toanwanda, New York we burned less than
three gallons of gas.
Testing with guests at our Memorial Day Party
Full speed with the new 9.9 HP 4 Stroke
Future Work
Plenty of work awaits, but we can still have fun with her. Windows
need to be designed and made, installation of remote steering
at the pilothouse, the construction of an enclosed head and electrical
wiring.
Like its first life as a
barge boat it may never be completed but change and evolve as
I do.
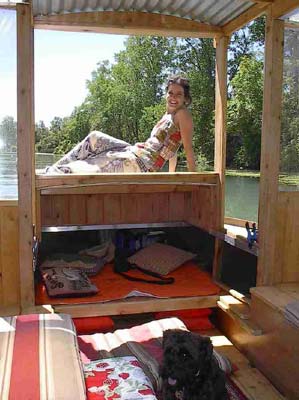
The deck house provides a great perch for sightseeing and sun.
|