Coldmolding
Make your own Plywood
and get a more sophisticated hull shape easily
by Jim Betts
What I really don't like about
sheet plywood is: 1. It limits the shape of the boat: 2. It
is limp as a wet noodle unless you can force some shape into
it. and, 3. It is heavy as hell! A sheet of 4x8 3/8" weighs
38 pounds. Now that wouldn't be so bad if it were a small thing
you could lift with both hands, but a sheet of the stuff really
takes two people to handle. And it gets worse - 1/2" weighs
50 pounds and I" (if you ever needed it) is right at 100
pounds. Even in small pieces it is heavy. It is said that the
only thing that benefits from more weight is a steamroller.
(A designer once said. "Add more lightness.") A lighter
boat moves faster with less sail area or less engine power,
is easier to transport, and costs less to build.
So Make Your Own Plywood
as You Go
Yes, you can make your own plywood
in any shape you need and in small pieces that weight only a
few pounds. This is called COLDMOLDING. (I like this as one
word and will save more time. effort and space by hereafter
calling it CM.)
CM is faster, easier and - thanks
to epoxy - stronger than sheet plywood. It is structurally stronger
because the plys run in different directions and it is ultimately
stronger because the boat will have a monocoque shape.
For those not familiar with
this building method, let me explain. (For you old salts, please
remember that we are reaching a lot of newcomers to the area
of amateur boat building.) CM is simply a method of making your
own plywood by laminating thin strips of veneer. This is somewhat
like using layers of fiberglass cloth, but it is done with wood.
In the Old Days. when glue was made from horse's hooves rather
than modern chemicals, such a process was called "hot molding"
and required heat and pressure. Today, epoxy generates its own
heat and the pressure comes from staples. Besides, epoxy does
not
require pressure because it is gap-filling.
You Build a Boat-like
Mold That You Throw Away
CM boats do not build themselves.
In place of frames, you make a mold over which you build the
boat. This is a sort of chicken coop and can be made of rough
wood. This will be a number of forms, depending on the nature
of the design. Over these, you put stringers spaced as needed
to achieve the desired shape.
Over this, you apply layers
of veneer. These are at 45 degree angles to each other. The
last layer is usually applied parallel to the waterline so any
show through will not look odd.
A Boat So Light (in
parts) That a Child Can Do It
These thin strips of veneer
are cut in various widths depending on the amount of curvature
in the hull shape. These are easy to handle, very light in weight
and can be bent and twisted with little or no effort. Where
you have a need to taper the pieces to fit, you can do this
with a small saw. plane or by double-cutting. This is a method
where you lay one piece over another and cut both with a power
saw set to depth that will cut through the two pieces. Veneer
comes in various lengths. Where necessary, simply butt the pieces
together.
Over your frame, you put plastic
wrap or waxed paper so the layers of veneer do not stick to
the framework. (In some boats, there are parts of the framework
that you want to stick to the veneer, but that's a simple matter
of following the directions.)
After the first layer of veneer
is in place you will want to fair this a bit. Not to a piano-smooth
Finish, but just knock down the high spots. This is time fora
power sanderor power plane. Now vou fit and cut the next layer
of veneer. The best way to do this is piece by piece and number
each piece. (Yes, yes, you could lay them out in order, but
what if someone comes along and kicks the stuff around? Number
the pieces!) You do not have to do the entire boat, just a goodly
area of say six feet or so.
|
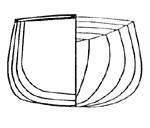
A hull shape such as this
is certainly impossible in plywood. It is also difficult
in frp because of the tumblehome shape. It would require
a split mold that can be opened. So the solution is to build
the boat over a form that can be removed. |
It is best to do both sides
of the boat as you move along. That is. do say three feet on
one side and then three on the other. The reason is that there
is always the danger that you will put more pressure on the
hull if you do one complete side. This may pull the hull a bit
out of shape. And it is better if you start in the middle and
work toward the ends. For one thing, the middle is easier to
do and will give you some learning time and practice.
Now you actually start to CM.
Brush on epoxy and make it fairly thick. You can wipe up any
that squeezes out, but you cannot put it into places that didn't
get enough.
You will use a power stapler.
There is no manual staple gun that will give good results. (Besides,
you'll be using hundreds of staples - maybe thousands - and
you will wear out your arm.)
Now comes the debate: Leave
the staples in or pull them out? There are two sides to this
question and I'll address both. You may leave them in if you
use stainless steel that won't rust. Or pull them out. Even
regular staples that may rust are not a big problem because
the epoxy and paint will cover them. It's up to you.
How to Remove Staples
the Quick and Easy Way
Way one: Put strong string under
each staple. This is a long piece of string that will be under
maybe 50 or so staples. When the epoxy has dried (see drying
time on the can), you pull the string and at least part of each
staple will come out. You can get the rest of the staple with
pliers.
Way two: Use very strong cloth
(old auto seat belts from the junkyard are very good) and when
you pull this the entire staple will come out. (On the downside
- you will have to use a new piece for each application or spend
time pulling the staples out of the belts.)
Speaking of staples, you will
want them with legs long enough to almost go through both layers
of veneer. If they are too short they will not have enough holding
power. If they are too long they will protrude inside the boat
and you'll be cut to ribbons when you rub up against them.
And So On and So On
Until You Have a Boat
It depends on the hull thickness,
but you just keep doing this until it is finished. On small
boats, use thin (1/8") veneer. On bigger ones, use thicker.
(The designer will tell you what to use.) Much will depend on
the complexity of the hull shape. When it's all done, sand the
hull fair. Use body putty (like used on cars) or epoxy thickened
with sawdust or other Filler to till low spots and the good
old belt sander to knock down the high ones. Then fiberglass
the hull if you wish and paint the boat. All done!
A Few Tips and Cautions
Epoxy may cause allergic reaction.
Do your building in a well ventilated area. Use fans to exhaust
the air from the building. Apply barrier cream and wear plastic
gloves and eye protection. If epoxy gets on your skin, wash
off immediately with soap and water. White vinegar is also said
to be good for this. Do not put brushes and such with uncured
epoxy on them on surfaces. (You'll never get them off) Wipe
off any epoxy that squeezes out of the work. If you let it harden,
it's hell to sand or scrape off. Put drop cloths under the project
to protect the floor. See curing time on the epoxy container.
It is best not to move the boat for several days during the
cure time.
Jim
Betts