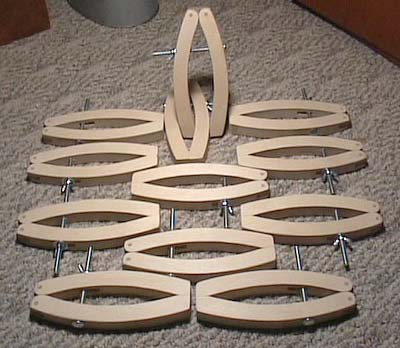
Here are some photos and a drawing of some planking nippers
I made recently. The drawings are for clamps with a 6 inch
throat although I think they could be easily scaled to any
desired size. Below is the text I wrote for a friend who was
interested in making some for themselves.
Making the Plank Clamp
Materials
12mm (1/2") Baltic Birch Plywood
1/4" x 3/4" Hardwood (I used walnut)
1/4" dowel
5/16 x 5" carriage bolt
5/16 flat washer
5/16 wing nut
1 each of the bolt, washer and wing nut is required for each
clamp.
For a dozen or so clamps rip two pieces of plywood 9"
wide from a 5'x5'sheet. Rip the plywood so the face grain
runs across the short dimension of the piece. Cut a 1-5/8"
piece from the end of one of these pieces to use for a template.
Set it aside.
After you have these pieces cut, setup the tablesaw to cut
the 5/16" dado. The dado should be 5/32" deep. Cut
the dado in the piece that will be used for the lower jaw.
The fence should be 2-11/16" from the blade. Reset the
fence to 2-5/8" and cut the other piece for the top jaw.
Then move the fence as needed to widen the dado to 1"
Cut each piece of plywood in half. Actually, for a dozen
clamps I needed two pieces 21" long for each half of
the clamp.
Glue the two pieces face to face so the dados you cut form
mortises. For the lower jaw, I used a couple of the carriage
bolts in the dados as alignment guides. For the upper jaws,
I used a couple of scraps cut to fit tightly and waxed the
heck out of them. Clamp securely
After the glue is dry, cut the grooves for the hinge. Since
the plywood is actually 12mm thick and I didn't feel like
working too hard, I set the fence about 1/2" from the
blade and ran the boards on edge. Then turned them end for
end and ran them again. I increment the fence over a little
and repeated the cuts. I did this until the groove was about
1/4" wide. Then I planed the hardwood stock to fit snuggly.
While the glue is drying, make the template. Drill the hinge
pivot hole before cutting to shape. I clamped a couple of
scraps of wood to the drillpress table to act as a guide for
drilling the hole. Leave the guide set up for drilling the
jaws.
Cut the template to shape and clean up as needed.
Once the glue has dried, cross cut the plywood into pieces
1-5/8" wide. Drill the pivot holes. Trace the shape of
the profile on each blank. I stuck a 1/4" machine screw
in the hole of the template to aid in locating the template.
A nail driven through an undersized hole in the other end
is helpful, too. Just drive the nail so the point comes through
the template. Bandsaw just outside the lines.

Using the template as a guide clean up the sawn blanks with
a table-mounted router and a flush-trimming bit. The template
can be located as before with the machine screw and the nail.
I quickly cut a cradle from a scrap of 2x6 to hold the jaw
and template for routing the inside curve.
Sand the jaws and break the edges so they aren't sharp. Insert
the carriage bolts in the lower jaw aligning the shoulder
on the bolt with the hole. Tap the bolt home with a hammer.
Add the top jaw, washer and wingnut. Snug up the wingnut to
align the jaws.
Cut 1" long pieces of 1/4" dowel. You'll need 24
for a dozen clamps.
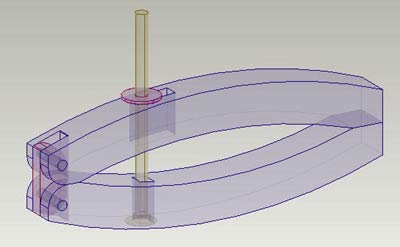
(click image above to enlarge)
Although my drawing shows a shaped and drilled piece for
the hinge, I ended up making it differently. I clamped the
assembled clamp to the bench. Then I spread a little glue
in the slot of one of the jaws and inserted the hinge stock.
(This piece started out about 48" long.) I let the end
of the hinge stock extend just beyond the jaw with the glue.
I drilled a 1/4" hole using the hole in the jaw as a
guide. The hinge stock was adjusted so there is a slight gap
between the hinge and the bottom of the slot on the unglued
side before drilling the first hole. A dowel was inserted
into each hole as it was drilled. The fit should be tight
enough that you won't need glue on the dowels.
Trim the hinge piece close to the clamp. Set that clamp aside.
Move on to the next one. Sand the dowels and hinge pieces
flush with the clamp jaws. Finish with poly or oil or leave
them unfinished.
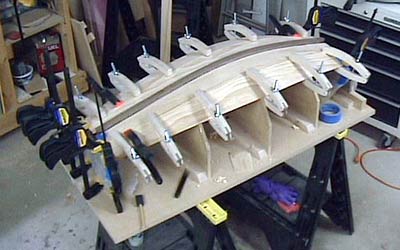
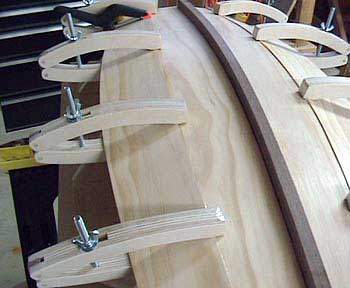
Here is a shot showing the clamps in use. They are holding
the second plank in place on the cradle and these clamps are
working out great. I covered the jaws with packing tape to
keep from gluing them to the boat.