My little boys like to help me with some boat building tasks, like stitching panels in stitch and glue construction, painting, driving screws, etc., but I keep them away from epoxy due to toxicity concerns. No fiberglassing work, no encapsulation work, no fillet work, and no sanding of epoxy surfaces for them. They’d like to do more, and I’d like them to do more because the three of us enjoy the boat building process.
Thus, there is a need to find an acceptable epoxy substitute. As mentioned below, encapsulating fiberglass in a few thin layers of Titebond III seems to work to an acceptable degree for doing fiberglass encapsulation on small craft. We’ve also painted on a couple layers of Titebond III to seal the inside of compartments. Test panels show this kind of encapsulation protects nicely against water intrusion and it remains to be seen how well it actually works for a boat used on the water, as our boats are too young to be rotted presently. But what about those chine and bulkhead fillets?
Can an inexpensive concrete composite material be used in place of an epoxy composite to make chine and other fillets for small boats . . . and still provide an acceptable level of performance? An initial test panel about two feet in length supported about 220 lbs of weight (a larger friend happily stood and then jumped up and down on the test joint) without noticeable movement or failure of any kind. No frames or bulkheads supported the test joint as would be the case in an actual craft. The composite material incorporates pre-painting the fillet area with Titebond III to enhance bonding with the plywood, Titebond III as a polymeric reinforcement mixed with the concrete, galvanized steel wire reinforcement, and fiberglass tape overlay (using Titebond III as the “resin” to saturate the tape and fill its weave). The composite structure seems to grip plywood panels pretty tenaciously.
These results indicate that the approach should be suitable at least for small boats such as canoes, pirogues, etc. A pirogue is under construction, and as long as the Minnesota winter stays as mild as it has been, an on-the-water excursion with the craft could be forthcoming before spring.
Of course, this does not mean that the concrete composite joint is equivalent to an epoxy joint. It just means the joint could provide an acceptable level of performance in small craft, and the use of less toxic ingredients allows my boys to do more building tasks with me. In other words, in terms of providing the same level of performance, it is difficult to find a material that is a true substitute for epoxy. However, in some applications, the performance of epoxy so far exceeds demands that a lesser substitute might still be acceptable. That is the concept at play here.
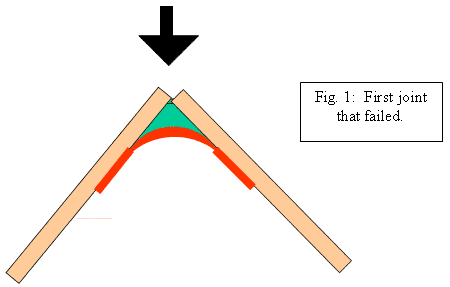
The current joint evolved in three steps. The first two joints failed, but the third joint is very strong. I’m not a draftsperson, so the following illustrations are a little crude. The first joint tested is shown in Fig. 1:

The green fillet is a cured concrete made from a just-add-water concrete mix and a mixture of 50:50 Titebond III to water. Each of the two tan panels is ¼” ACX Supeply plywood about two feet long. The red tape is a 6” wide length of roofing fiberglass material painted onto the wet concrete fillet with Titebond III glue (As an aside, Titebond III appears to bond fiberglass to plywood panels nicely. Painted on thinly, the weave fills in 3 or 4 coats. It dries pretty smooth. I’ve waited ½ day to a full day between coats. My little boys can help me do this, which is not an option with epoxy. The coated glass cures reasonably hard in about a week. I have not done boil tests, but I have soaked test panels in water for a few days without delamination). The fillet itself coated on a little rough, but the fiberglass overlay smoothed out the fillet quite nicely. The joint was allowed to cure for about 30 hours.
Note that no reinforcement of any kind appears on the outside of the joint, which would be present in actual practice to complete the joint.
To test the first joint, I placed the panel on the ground in the orientation shown in the figure. I stepped on the joint, and it supported my weight (force shown by the downward, black arrow). However, when I stomped down on the joint, it failed immediately. The concrete fillet cleanly delaminated from one of the plywood panels. The fiberglass stayed firmly bonded to the fillet, though. This indicated that the interface between the concrete and the plywood was too weak.
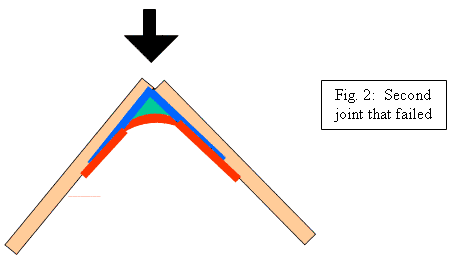
Thus, the panel shown in Fig. 2 was created and tested. This test panel is similar to that shown in Fig. 1, except the chine area of the joint was painted liberally with Titebond III glue before applying the concrete fillet. The blue lines show the underlying glue painted on the joint.

This joint was stronger but failed, too, after the third stomp, but the mode of failure was completely different. In this case, the fillet itself failed along the entirety of its length. This indicated that the weakest aspect of the joint was no longer the plywood/concrete interface, but now the composite concrete fillet itself. The fiberglass tape and plywood remained firmly bonded to the split fillet sections, indicating the pre-painting with glue (blue line in Fig. 2) was helping out nicely.
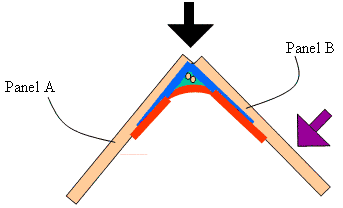
Thus, the third joint was created and tested. The joint is shown in Fig. 3. This joint is identical to that shown in Fig. 2, except now 2 lengths of 16 gauge galvanized wire are embedded in the concrete portion of the fillet. The wire is shown schematically by the two, small yellow circles. The wires were helically wrapped around each other along the length of the joint so as to be physically intertwined.

This joint was allowed to cure for five days before being tested. The joint was additionally tested by placing Panel A on the floor and then standing on Panel B as denoted by the purple arrow. I could not break the joint when applying force in the direction shown by the black arrow using my weight (165 lbs give or take a few Christmas treats) and stomping. A larger friend (weighing about 200 to 220 lbs) could not break the joint either.
As an additional test, I placed Panel A flat on the floor and stood on Panel B. It supported my weight for a few seconds before folding like a book. The concrete fractured down its length. However, the two folded halves stayed firmly attached. The intertwined wires remained partly embedded in concrete associated with each panel and held the parts together like stitches.
This kind of failure (placing the exterior of the joint under tension) is not too discouraging, as the outside had no tensile reinforcement. Even an epoxy joint without outside reinforcement would fail when subjected to a similar stress. Thus, outside reinforcement (e.g. fiberglass tape) and inside bulkheads and/or frames should help prevent this failure mode, just as it does with epoxy fillets. More volume fraction of reinforcement inside the fillet, e.g., an additional length of wire, might also help. I have a bag of chopped cellulose fibers and might add that to the concrete for additional tensile strength.
The strength of the third joint is surprising. It supported a lot of weight. Note that these tests all use Titebond III. I would not expect the same level of performance with Titebond II. Stick with Titebond III.
I am anxious to finish my test pirogue. Luckily, there is a currently unfrozen pond with extensive shallow shores no more than about 100 yards from my back door, so a catastrophic failure of the test boat will be uncomfortably cold and wet only for the duration of a short dash back home.

