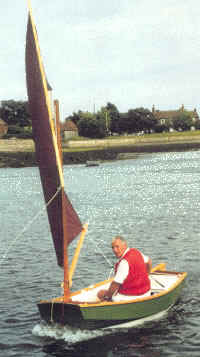
So, You Want to Build a Boat?
One rank amateur's warts-and-all journey into the world of Stitch-and-Tape boat building, courtesy of Selway-Fisher's Skylark 8
by Paul Robson
Day Zero : Preliminaries
Leading up to 1st June 2005
I have to admit that Spouse has a point, though I'm not actually
going to admit it. I'm not sure I know why myself. The nearest I've
ever really got to boating is the Dover-Calais Ferry. And a bit of
canoeing when I was a brat (Spouse would say that was last week then
!). Never done any sailing at all.
 So why build a boat ? Well, the idea
has been fermenting in my mind for several weeks at least. It goes
back a couple of years to when the four of us (self, Spouse, two
children) visited the Boat and Camping show. We camp a fair bit, but
we spent more time looking at the boats. It kind of ran on from
there.
So why build a boat ? Well, the idea
has been fermenting in my mind for several weeks at least. It goes
back a couple of years to when the four of us (self, Spouse, two
children) visited the Boat and Camping show. We camp a fair bit, but
we spent more time looking at the boats. It kind of ran on from
there.
I've bought a couple of books (those who know me would say that is
my standard response to everything), the Devlin
Book, the Selway
Fisher How-to Manual and Catalogue. and one of Phil Bolger's with
about 70 designs in. All three are highly recommended Sam
Devlin's book has lots and lots of detail and ideas, Paul Fisher's is
an easy to read manual with sufficient detail but not so much you get
lost, and Phil Bolger's book is just interesting.
I also downloaded the Mini
Cup plans from Stevenson Projects, which is a free download and
spent a fair amount of time looking at some of the on-line plans and
build sites.
This purely theoretical approach to
building a boat doesn't seem to satisfy the urges, so a few quid are
laid out on the basic tools (some of which I have anyway), and of
course I can do things around the house with them ... I can
use the circular saw to ...... make things (tries hopefully winning
smile). Hmm, acquiescence.
After much mulling over of the alternatives, the plans for a
Skylark 8 a
nearly-eight-foot dinghy which can be rowed, sailed or motored.
If I'm honest, part of the reason for
this choice is that there's information on the build in the Selway
Fisher book (it's one of their sample how to things) and it doesn't
look too difficult. And it'll fit on the roof of the car either
of them, probably.
Like everyone else, I suspect, I
really want to build the QE2 ; Paul Fisher is quite right to
recommend starting small though. Maybe I'll build the QE2 next.
So on to the next step. Buy
some Epoxy and Fibreglass from CFS, and contact a local timber
merchant (Brown's Timber simply because it's just up the road) and
order some plywood and other bits of wood for the boat.
The plans arrive promptly (Selway
Fisher seem to be awfully efficient at sending things) and I hunch
over them and figure it out. Decide to build a model, so I dismember
a cereal box and scale all the measurements, and it seems simple
enough. Famous last words.
Day One : A maniac with a Circular Saw
Wednesday 1st June 2005
A
knock on the door this morning at 8:30 AM. It is not the men with
white coats and straitjacket as Spouse thinks likely, but Mr Brown
and his (soon to be my) timber. This is subsequently shifted to my
workshop.
Workshop is maybe a bit of a misnomer. It's a barn ; but
it's large and dry and fairly clean and has big doors so it's quite
light inside, though I have tackled it with a brush to get rid of the
leaves that have blown in.
It doesn't have much power, one socket
(even though, bizarrely, the electricity junction board is here), and
the socket is about 7' off the ground, but it'll do.
I don't have a workbench so I
fabricate one out of an old door and two saw horses. This actually is
quite handy, because it doesn't matter if I saw into it. I've also a
couple of those workmates. It's not ideal, but it's certainly
manageable, and this needs to be a fairly cheap build, as Spouse's
eyebrows are raised somewhat and she also wants some new curtains.
Could I accidentally buy sail material rather than curtain
material ? Not a chance, it's going to be a Polytarp special.
However, the cunning plan is to next
build something a little bit more cruiser-ish and then lure her onto
the water with promises of sailing off into the sunset. And if that
doesn't melt her heart I'll chuck her over the side.
Deep breath, grab pencil and start to
draw the parallel lines for lofting the sides and bottom. Decide to
follow the advice about plywood being square and straight. Only
problem is, the first bit I grab isn't, so I have two sets of lines
on the first that.
I
must say I'd far rather have millimetres rather than feet and inches
(ever tried doing Physics in foot pounds per square inch ?)
(click thumbnails for larger views)
|
 |
|
Grab my ruler and start measuring. I
must say I'd far rather have millimetres rather than feet and inches
(ever tried doing Physics in foot pounds per square inch ?), but I
get the bilge and side marked out without too much difficulty,
battened up (one is in the wrong place as I misread 1'0 as 10) and
drawn out.
Hmm, looks about right. I decide to
cut both sides at the same time, so tack the wood together. The bilge
panel is easy enough and wonder of wonders it looks about right.
The side panel needs a bit of fiddling as it needs to be cut so as to
leave a bit of wood big enough for the bottom, but with some more fun
with tacks and a bit of plywood wrestling it's done. The bottom is
lofted, nailed, battened and cut out and all these bits look
right. I think, however, that my circular saw (which wasn't the
worlds most pricey) probably has the worst saw blade known to man.
Thin Kerf is not the word for it, it's more like a rotary
hatchet. But it did the job. The QE2 will be treated to a new one.
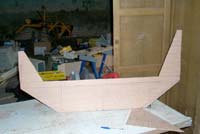
Charge on relentlessly. The bow and
stern transoms are cut out. There's a need for a bit of filing down
here and there, but it looks good. My first efforts with the saw
looked more like modern art than a straight line. The straight bits
are straight. The curves are curvy. I am chuffed with myself.
This, in retrospect, was a mistake.
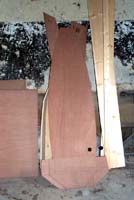
I'm left with two bits to cut out;
well one bit, and one bit that I use later. This is the centre frame,
which by the standards of the other bits, is an odd shape.
|
The ply has quite a few lines on it as a
result of measuring for the previous cut outs and the lofting and so
on. I now make this worse by cluelessly misreading the plans,... and generally cocking up big time. |
|
That's
not my problem, though. The ply has quite a few lines on it as a
result of measuring for the previous cut outs and the lofting and so
on. I now make this worse by cluelessly misreading the plans, getting
the wrong lengths and sizes, putting it in the wrong place on the
wood, and generally cocking up big time. By the time I've finished it
looks like I've drawn a map of the Underground on the wood.
However, eventually I get it right and
carefully mark the lines I want to cut. It'll be painted anyway, so
all the scribbles don't really matter.
However, I cut the wrong lines.
Those of you wish sharp eyes may
notice that this piece is cut ever so slightly out.
I wonder if I can build the boat with
a different height on port and starboard ? Will anyone notice ?
Fortunately I'd got a bit of extra
ply, one for panic/incompetence, and one because it's required for
the Rudder etc., so this is not terminal. And this time round there
are only the lines required for marking up, and it's cut first time,
and it's cut a lot more neatly.
So, now I have all the basic boat
bits. What I don't have is any glue or epoxy yet. The concept of
waterproof glue seems to be unknown in this part of the world.
I think that given that most of the boat is stitch and tape, or
laminated bits like the mast, I might as well use epoxy to bind, so
to speak.
No sooner have I pondered this for a
while, than another man with a van and a box arrives and it's the
West System epoxy stuff I ordered. Most of it, anyway, so I get
back in touch for the missing bits which aren't urgent, fortunately.
I can move on to the next bit which is putting the thwart support
lump of wood on the frame, and then tack and tape it together.
This will be interesting.
Day Two Nerve Gas has nothing on this stuff.
Thursday 2nd June 2005
So, today, I'll epoxy the crossbeam onto
the frame. A chance to experiment with epoxy resin. So out come the
gloves, and the gloves for the gloves, and the eye protectors, which
go on over my glasses.
|
 |
|
The
epoxy resin arrived too late to do anything yesterday, as the lights
in my barn are not exactly brilliant and I wanted to be able to see
clearly what I was doing. So, today, I'll epoxy the crossbeam onto
the frame. A chance to experiment with epoxy resin. So out come the
gloves, and the gloves for the gloves, and the eye protectors, which
go on over my glasses. Two layers of everything.
If you read Sam Devlin's book and you are easily scared, you'll
never ever go near epoxy resin. It's like reading the worst bits of
the Old Testament Look at this stuff and you are dead in seconds
and your children will all catch rabies and a plague will descend
over the lands lasting seventy years and seven.
Hence the paranoia ; which to be fair is probably a good thing
this stuff is not nice.
Sam's book shows scary practice (from
his own workshop !) which he uses as examples of How not to.
The sensitizing stuff is fascinating if you get some on you you
develop a much nastier allergic reaction just being near it which
means any more boats built are chines or planking.
Anyway, I mix this stuff up in the
required proportions in a jar which had sweet and sour sauce in it
(tasty the sauce, not the resin) and stir it for what seems like
hours but was only five minutes.
Those of you who looked at yesterday's
frame shambles and wondered, well, yes, I did eat the sauce first.
As you can tell from the picture, I
decided to epoxy the whole thing (I had plenty of the stuff mixed, so
why not ?). I primed the surface at the same time of course,
and let it cure a bit.
I mixed in some filler stuff that I
bought and applied it fairly liberally to the cross piece, and
applied it in the appropriate place, and clamped it on. I did place
it just fractionally to one side about 1/16 of an inch, so I
loosened the clamps and tried to move it. The bond in what can
only have been a few seconds was amazing I could move it that
1/16 in, but it required a fair amount of leverage to do so. I reckon
it's going to be immovable when it is set. I might put a couple of
screws in anyway, just to be on the safe side.
Despite the gloves and the gloves and the glasses and the safety
glasses, I can feel the epoxy resin burrowing it's way into my skin
as I type this not really, but Sam Devlin's got me worried. So,
I'll let it set and come back to it tomorrow maybe. The test
match starts tomorrow and given we're playing Bangladesh, it'll
probably finish tomorrow as well. So maybe there'll be a few days
where I don't do anything very much other than round a few edges.
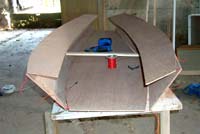
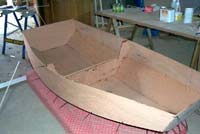
Day Three Making a boat with string and sticky backed plastic
Friday 3rd June 2005
|
You
cut these bits of wood out, tie them together and then stick them in
position with fibreglass, and it becomes a boat.
And there are fairies at the bottom of
the garden, and JFK was killed by aliens from Roswell who faked the
moon landing. |
|
You
cut these bits of wood out, tie them together and then stick them in
position with fibreglass, and it becomes a boat.
And there are fairies at the bottom of
the garden, and JFK was killed by aliens from Roswell who faked the
moon landing.
Today I find out if this story is for
real the boat takes real shape. There's a lot of work to do but
if today goes well I'll have something that looks vaguely finished
when I'm through.
If today goes well.
I'm a bit of an early bird, so this
morning saw me boat building in my dressing gown at about seven in
the morning. Good job I'm not using the circular saw today. It's a
beautiful day, the sun is in the sky, Spouse is still sound asleep,
so why not spend a couple of hours wrestling with what seems like
several miles of plywood, given that the option of spending a couple
of hours wrestling with Spouse is unlikely ?
As you can see from the photograph, I
kind of got somewhere with it. However, today did not really go well,
and the problem was the red thing in the middle of the picture. My
fault really, but I'll blame the wire.
This is an economy (read cheap) build,
and I'm a bit of a make use of what's in the scraps box person
anyway. I have a reel of wire, so I think to myself , well, I might
as well use that wire is wire, after all, surely they don't want
that thick stuff that you use in wiring up a house.
So, wilfully ignoring the advice of
Selway, Devlin and Bolger regarding the thickness of the wire
I march on triumphantly, drilling and wiring, and fasten on quite
neatly the bilge panels, the side panels and the stern transom. It
all seems to go rather well with a bit of shoving and pulling,
the boat opens out and the bottom flexes to something that looks like
the picture in the book, and I can wedge the transoms into place and
the frame, and it looks like it will come together rather like it
should.
The problem is, plywood is really a
bit loathe to be bent quite as much as this, and it requires a bit of
brute force. And that's where the wire let me down. It just wasn't
strong enough or resilient enough. It would break, or unwind itself,
and pulling and holding the bow and stern (learning those
nautical terms now) together was quite impossible.
The idea is that the strength of the
wire and its resistance to being untwisted allows the plywood
to be levered into position and stay there while it is taped
permanently. But this wire just wasn't up to the job.
Then, I have a bright idea. I've got a
stack of hefty paper-clips in my office, they are a fair bit thicker,
I'll try those on the stern, where the real problem and all the
stress is. I rush in and dig them out, and try those instead, and
yes, it does seem to work a lot better, I can twist the wire using
pliers to force it into the position it is supposed to be in. Until
the paper-clip snaps.
So I give up. No more boat building
today, but a trip out to buy some decent wire, or maybe cable ties
that seems easier, and I'll have to replace all the twists
with proper ones, and maybe put a few extra holes in either end where
the stress is.
But that's not all that's wrong today.
In trying to wire it up, I found out the stern transom does not fit
properly.
The bow one is a not far off, but the
height of the top sides and the top bit of the stern transom aren't
the same size. I grab the ruler and measure it, but it all seems to
be right, and I definitely used a measure twice cut once
approach, but there's a noticeable error ; the transom is about ¼
inch too high for the sides. I think I can fix this by fitting
it all up and then trimming the transom down to size. It might not be
a perfectly accurate Skylark 8 but it'll be good enough.
Then, it gets worse. I damage the
front of the hull floor with the drill, quite badly. I decide to cut
out a replacement bow part the top 3 inches, and butt joint
it together with epoxy. This works rather well.
Not a good day, really. You can
understand why some projects never get finished.
Day Four If at first you don't succeed, kick the dog
Sunday 5th June 2005
I have started to
install it upside down. So I snip those cables, and turn it the right
way up. Then I realise the bow and stern are the wrong way around as
well. Eventually I get it right.
|
 |
|
It's
Sunday morning, and I advance on my barn armed with a two packets of
cable ties which I acquired in town on Saturday. Quite a worthwhile
trip, as the small DIY place I visited has all sorts of handy looking
pulleys, braces and the like which look like they might go on later
on, and they sell fibreglass. It's one of those Aladdin's caves
places.
Today is the big
day - today - hopefully - it should go back to looking like a boat,
except this time it'll stay there. In what was possibly a mistake,
after the rather ineffective wiring of the last session I stripped
the boat down to flat bits of plywood again. I didn't actually note
which piece was which but I reckoned they could be married up again
using the holes. Most of the holes are already drilled, but most will
need widening a bit as the cable ties are wider than wire. So, I grab
the hull bottom and a bilge side, put them together, widen the hole
slightly, whang in the cable tie and tighten it up - reasonably. Then
in goes the second one.
Then I look again.
Something is not quite right here.
I have started to
install it upside down. So I snip those cables, and turn it the right
way up. Then I realise the bow and stern are the wrong way around as
well. Eventually I get it right.
Not a good start.
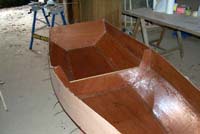
Surprisingly,
though, it goes swimmingly after that. A couple of ties pull out
holes that are a bit near the edge, which happens, but nothing that
won't fill and tidy up, and it goes together surprisingly quickly.
First the two bilge panels, then the two side panels, then the stern
transom, then the bow transom, then the centre frame all submit to my
will. And it all looks okay as well - there's a couple of gaps a
little wider than I'd like, but I think they aren't so wide they
can't be taped and filled, but it looks like it should, and looks
very boatish - it's gone from a few grotty bits of plywood to
something that looks like a boat in 90 minutes work. Dead chuffed.
Even yesterdays
problem with the hull bottom doesn't cause problems it fits no
problem, and the cable ties take the strain on the joint but I
think it would hold up anyway, the epoxy seems fairly strong.
Only one thing
went wrong today - other than the faffing about with the first bilge
panel. A bird pooped on the hull. Still, I'd settle for that.
Day 5 - Revenge of the Epoxy Sith
Monday 6th June 2005
|
After yesterdays
antics with cable ties, it's back to the good old lethal epoxy resin.
Today is also the day that the hull gets its "inner tapes" -
which hopefully means it will hold together without the cable ties. |
|
I
went to see that film last week. On my own. I cannot remember the
last time I went to a film on my own (okay, I know, sad Mr
No-Friends) or even if I ever have.
After yesterdays
antics with cable ties, it's back to the good old lethal epoxy resin.
Today is also the day that the hull gets its "inner tapes" -
which hopefully means it will hold together without the cable ties.
The first thing I
do is to get out the squirty measurement things. The little bit of
epoxying I've done to date was really done more or less by guesswork,
but when I got my epoxy I got one (or two) of those "push to
deliver accurate amounts" gadgets. They work rather well, though
I'm reminded of the tomato sauce dispenser at our local Burger van.
I am lost for
mixing tubs though. We don't eat that much yoghurt. Then spotting one
of our seemingly innumerable cats, I have a bright idea - I can use
the cat food tins. We usually have hundreds of them, as for some
reason Spouse keeps them, cleans them, and then does .... something
with them - recycling, I don't know,maybe she's got a collection of
antique kit-e-kat tins that I don't know about. It's one of the great
unsolved mysteries of our house.
First things
first. I epoxy down the lines of the seams. This is to saturate the
ply, as apparently ply loves epoxy. Then having done that, I cut some
bits off my reel of fibreglass tape to fit - well near enough to fit.
Then I mix some more epoxy and try to fasten them on. This involves
Murphy's law. Despite there being much epoxy on the boat, and little
on my gloves, the tape wants to stick to the gloves, not the boat. So
I keep battling away, pushing it into place, and sure enough as I
come away, the tape comes with me. Eventually I managed to get the
tape stuck in place and launch at it with the brush loaded with epoxy
resin. Mostly this seems to work well enough, and the tape is getting
saturated (it goes clear) and sticks to the wood. After several
rounds with the cat food tins, the inside is all taped up. So far
I've used about a fifth or so of my epoxy stocks doing this, so I
decide to epoxy the whole inside of the hull.
This I do,
splashing epoxy just about everywhere, fortunately not on me. It
looks quite okay, considering it's ply, though it does get splashed
about a bit too much and there's some raised bits. Still it'll sand
off I'm hoping that sanding and filling will cover a multitude of
sins.
So, that's the end
of today. I'll leave it to cure, and see how it looks tomorrow
morning. I might leave it another day, then I'll turn it over and
fill the cracks.
Just before I wrap
up for the day, Spouse sticks her head round the door. It's the first
time she's even seen the pile of wood. "That looks impressive",
says she. Hmmm..... is she being nice or are there ulterior motives ?
Hopefully tomorrow
it'll be okay to remove the cable clips. I've got this recurring
nightmare that the moment I take the last clip out the god of
Boatbuilders (St Michalak ?) will cease smiling on me, and it will
return to a heap of bits of plywood.
But then, I didn't
think the cable ties would work either. We shall see.
Day 6 The Epoxy Black Hole
Tuesday 7th June 2005
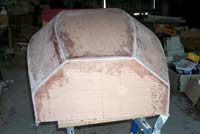
I must admit, taking all things
into consideration, I think it looks terrible. The tape looks
rough, is there any chance of this looking neat? I put my trust in
sanding and primer to make it look neat.
|
 |
|
I have got me a couple of bargains. I
came across this sale in a DIY shop, and got a belt sander for a
tenner, and a little bench table saw for about 15 quid. Okay, so they
aren't exactly top quality stuff, but heck, you can't beat 10
quid.
Haven't done much with the boat today, largely because I reckoned
on leaving the tapes 24 hours before moving it, which means only time
for about an hour's fiddling about. I must admit, taking all things
into consideration, I think it looks terrible. The tape looks
rough, is there any chance of this looking neat? I put my trust in
sanding and primer to make it look neat.
Despite my pessimism of yesterday, the
clips come off, and as I write, the boat has not converted itself
back into a kit. However, there was a slight problem. If you look at
earlier piccies, you'll see I'm doing this on an old mattress I
thought it'd cushion the boat as it came off my impromptu table.
However, a bit of epoxy has leaked
through, and the boat was stuck the the mattress. It came off with a
fair amount of wrestling, but it left bits of red material epoxied
into the gap. I get some of it off, but some of it's filling gaps
anyway, and it's as solid as concrete, so it looks like my boat will
be the worlds first floating mattress.
Anyway. I decide to spend an hour or so
filling the gaps with yet more epoxy (my optimism yesterday about
epoxy levels is dropping rapidly....) and the stuff just seems to
disappear into the seams. Admittedly there are one or two gaps which
are pushing towards 1/8 inch just one or two little bits
but that really shouldn't be too bad Phil Bolger suggests gaps
up to 1/4 are acceptable in his instructions for his
Tack-and-Tape designs (yes, I have another book), and I don't get
near to that.
First batch appears to just disappear,
I don't know where. After some consideration, I make up a second
batch and add in a lot more filler. It looks like semolina,
and has a pretty thick consistency. This goes on well, and fills in
the gaps in the boat without too much effort after I mix up a bit
more. Another quiet day tomorrow, as I've got to let this filler cure
as well. Then attack it to round the edges off, then the outer
fibreglass can go on, and this finishes the outline structural work.
But it looks really scruffy.
Day 7 Sand gets in your eyes
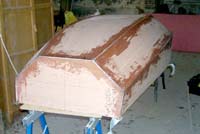
Wednesday 8th June 2005
|
I'm
coming to the conclusion that the pictures you see on the innumerable
boat building sites don't give a true
reflection. First case for the prosecution is the post-sanding
picture of my boat... |
|
I'm
coming to the conclusion that the pictures you see on the innumerable
boat building sites don't give a true
reflection. First case for the prosecution is the post-sanding
picture of my boat which looks not much better and in some cases
worse than yesterdays. But it
isn't, it is much much better.
I was starting to wonder if this whole
exercise was a big mistake. The whole thing looked messy mostly
down to my own mistakes. But I think that filler and sanding can cure
a lot of problems all the muck, all the mess and experimentation
it can be magically removed. You can hardly see the join where I
fixed the bow now and I haven't actually tried to tidy it up (the
butt joint spoils the bow but I'll have to live with that).
This morning I got my new belt sander
out of its box, plugged it in, swapped the light belt for a heavy
sanding one, and got to work rounding off the corners. All I can say
is wow ! For a ten quid job this did a hell of a good job.
Rounding off all the edges took me maybe about half an hour and
the difference on the outside is amazing. It all feels flat and
smooth, and looks tidy and solid. It feels like it's a whole entity,
rather than sheets of plywood forced together ; it has curves, it has
style.
You can't really tell from the
photos how much better it is than yesterday. You have to come and
stroke the side and this is after a few minutes bashing away at
it with a rough sander.
I now understand why all the boat
building books and articles go so much on sanding. Even though
it's pretty rough and the inside will need a fair amount of
sanding and neatening nothing is impossible. But it's given me a
real boost a few minutes work have removed the bumps and lumps
where the panels met and were filled and the boat seems like a whole
thing.
One thing though I need to buy a
dust mask or something similar. Eyes aren't a problem (I wear glasses
and have a pair of goggles anyway) but I don't want to breathe in
much of this stuff.
Another bright idea I had today was
using an old sun lounger as a trolley for
the boat. When finishing, apparently, you need good light, and if I
use the sun lounger I can wheel it outside,
sand, fill and paint to my hearts content, then wheel it back inside
when I'm done. This barn of mine has all sorts of stuff in beds
and mattresses, farming equipment, old computers you can see some
stuff in the background of some photos. There was even an old kit car
in one corner. The owner apparently didn't want it. weird.
Anyway, tomorrow is the final
serious epoxying session I'll have to laminate mast, rudder and
board (she will be a sailing vessel) and that's best done with epoxy
I think if I don't run out but that's much simpler.
...to be continued...