|
|
|
“Wing-Nut”, The Modular Canoe
- or -
“Plans, We Don’t Need No Stinking PLANS!”
design by Bruce Hector
Problem: We were boatless, living beside the Intra-Coastal Waterway in Florida, and the parade of boats was driving me mad. Believe me, it’s a far shorter trip for some of us than others! The mobile home park we’re in doesn’t allow boats or trailers to be stored on the lot. I’m afraid to install roof racks on our new Honda. My wife and I are getting a bit old to be carrying full size 16 footers about. Sadly, my weight doesn’t permit us to bob about in a mini boat with any degree of comfort or safety.
Solution: a modular paddling canoe. I’ve had some experience with modular construction. At the 2003 Kingston Messabout we assembled a 96 foot modular sharpie, named TIMS. We were very pleased with Tim’s performance, stability, and cheap, fast construction. At 80 feet long, with a beam of 4 feet, we measured 10 knots by GPS with a 9.9 hp motor sipping gas waaaaaaaayyyy back at the stern.
So I thought, why not scale Tims down? Half the beam, tighten up the joints by using bolts instead of lashings or clamps, and get back on the water in no time.
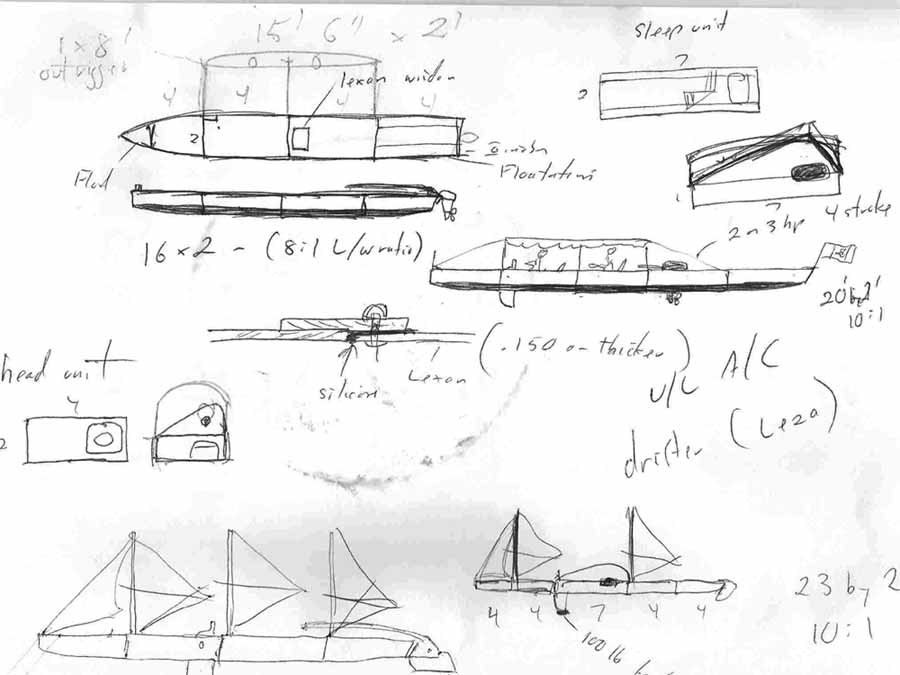
I did a little doodling, and went off to Lowes Hardware with a cut diagram for three sheets of plywood.

click images for larger views
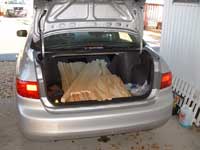
Problem 2: I had almost no tools with me. Especially lacking was any power or handsaws. Lowes charged an extra $2.50 for the dozen or so cuts that reduced the 3 sheets to the sizes I needed for bottoms (2’ by 4’), sides (1’ by 4”) and ends (1’ by 2’). I needed them pre-cut as I had no truck; all pieces had to be transportable inside the Honda. Modular construction easily permitted everything to fit in the trunk. I left the store with the plywood--no piece being over 4 feet long.
 I figured I could make the cuts in the 1 by 2 framing with the saw blade on my Swiss army knife. I did have a rechargeable drill to drive my clamps (wood and dry wall screws) and pre-drill the 1 by 2’s so there’d be no splitting. I actually assembled the first two units, which are totally plumb sides, ends and bottoms, with all cutting done only with the knife’s saw. Nice blade on these little knives, but it was getting dull as I finished the two paddle units. I figured I could make the cuts in the 1 by 2 framing with the saw blade on my Swiss army knife. I did have a rechargeable drill to drive my clamps (wood and dry wall screws) and pre-drill the 1 by 2’s so there’d be no splitting. I actually assembled the first two units, which are totally plumb sides, ends and bottoms, with all cutting done only with the knife’s saw. Nice blade on these little knives, but it was getting dull as I finished the two paddle units.
|
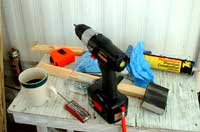 |
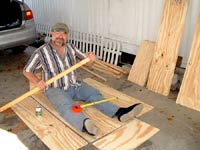
My boat shop was the area under our carport and a small table. Minimalist boat building coming up! The nitrile gloves are for when using the PL, it is awful stuff to get off your hands. This is obviously an early morning photo of the shop, as the beverage is coffee. |
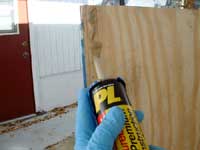
| Making the long cuts that would demise the rockered bottom fore and aft de-moralized me. I broke down and spent $3.95 on a handsaw at Harbor Freight Tools. Good investment. I also used PL Premium as a glue and sealer between all plywood and dimensioned lumber joints. I wanted strength and watertightness. |
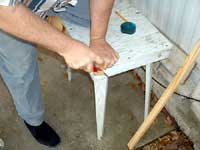 |
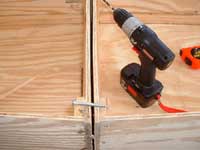
 PL Premium going down between the scribed lines where the chine log would fall. Note the small pilot holes. These were also drilled into the 1” by 2” stock (especially near their ends) to prevent the screw splitting the wood as I tightened them in. On the outer surfaces, these holes were counter sunk using the tip of a larger drill bit, to have the screws end up flush mount. PL Premium going down between the scribed lines where the chine log would fall. Note the small pilot holes. These were also drilled into the 1” by 2” stock (especially near their ends) to prevent the screw splitting the wood as I tightened them in. On the outer surfaces, these holes were counter sunk using the tip of a larger drill bit, to have the screws end up flush mount.
It was coming together nicely.
|
 Fairly quickly, too. I knew I must be overlooking something, as it all seemed too easy. So I took a little beverage break and indulged in some car port sailing. Fairly quickly, too. I knew I must be overlooking something, as it all seemed too easy. So I took a little beverage break and indulged in some car port sailing.
Then it dawned on me. I had made a mistake in the sizes of the pre-cuts. The sides should have been ¼” less than a foot, so the ends would fit properly. I was ending up with uneven joints where the sides met the ends. I pressed on, thinking ¼” wouldn’t matter as I doubted the units would line up perfectly anyway. I’m quite familiar with my carpentry skills.
|
 |
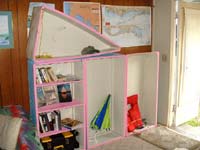
Here’s a shot of the first trial fit. “Boat or bookshelf?” says Elaine. My wife really likes the idea of using the units as bookshelves. I’m happy just being able to store them inside to get around the park’s boat storage restrictions. |
| This shows the PL Premium squished out of the seams, making solid and waterproof joints. You can also see the counter sunk screw heads flush with the sides. My mental arithmetic misjudged the length of bolts needed. Now it’s back to the hardware store for longer ones. |
 |
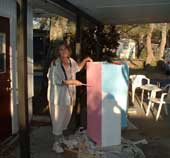 |
Elaine was happy to help with the painting. She chose the Florida color scheme, which means I’ll never take “Wing-Nut” up to Kingston. I’m afraid people would make unkind aspersions to my character and reputation--what little I have left of it in the boat building community. - Notice the close resemblance to a bookshelf when a unit stands on end. |
 Here she is, all decked out for launch and christening. Notice the rocker for and aft. It’s 3 inches at the bow and 2 inches at the stern. A little rocker helps a boat be easily driven, er, paddled. I added her name with a stylized ‘W’ that I thought resembled a wing nut. Flags, bunting, multi-colored umbrellas, as Phil Bolger said: “We are SUPPOSED to be having fun, aren’t we?” Here she is, all decked out for launch and christening. Notice the rocker for and aft. It’s 3 inches at the bow and 2 inches at the stern. A little rocker helps a boat be easily driven, er, paddled. I added her name with a stylized ‘W’ that I thought resembled a wing nut. Flags, bunting, multi-colored umbrellas, as Phil Bolger said: “We are SUPPOSED to be having fun, aren’t we?”
Phil better watch out! His reputation as the world champion square boat designer is at risk if I go much further down this path. Can you say “Modular Aircraft Carrier”?
|
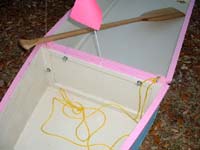 Here’s a close up of the fastenings. The choice of name now becomes evident, no? Notice the angled cut I put on the gunwales. I did this to prevent a pinching hazard. I knew there would be some movement induced by waves and motion, and I didn’t want a finger pinched in a small gap with lots of leverage and weight doing the pinching. By not using a drilling template, I ended up with units that are NOT interchangeable. That’s why they are numbered, to make it easy to assemble. Also, you can see the blend of construction types in the bow unit. The aft bulkhead is glue and screw, while the chines and stem are stitch and glue. And yes, that’s a .39 cent dog chain eye bolt acting as a mooring cleat. No expense spared. Here’s a close up of the fastenings. The choice of name now becomes evident, no? Notice the angled cut I put on the gunwales. I did this to prevent a pinching hazard. I knew there would be some movement induced by waves and motion, and I didn’t want a finger pinched in a small gap with lots of leverage and weight doing the pinching. By not using a drilling template, I ended up with units that are NOT interchangeable. That’s why they are numbered, to make it easy to assemble. Also, you can see the blend of construction types in the bow unit. The aft bulkhead is glue and screw, while the chines and stem are stitch and glue. And yes, that’s a .39 cent dog chain eye bolt acting as a mooring cleat. No expense spared.
By the way, epoxy, wood, hardware, gloves, etc. came to about $100. The three color paint scheme added another $60. We’d have been able to come out lower at home, but here we had to buy everything. Having just bought the trailer, there was no stock of screws in the garage, no left over glue hanging about, no paint brushes, there wasn’t even any beer in the fridge. The $160 does not include the cost of the beer, but luckily, it’s far less expensive in Florida than Canada. |
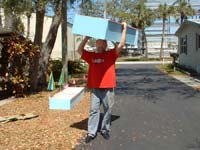
| Elaine and I found the 16 foot length too heavy for the 75 yard portage to our park’s little beach. So with a quick disassemble, off it goes, one lightweight unit at a time. |
 |
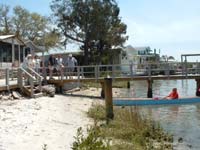 This is the christening and launching ceremony at the mini beach to our park. Half a dozen of our fellow snow birds came to see the big event. A quick prayer to the big guy and one to Poseidon (gotta’ cover all your bets on the briny lads!) asking that all who sail in her be safe, a christening with a little dribble of Heineken on the bow, and I slip her in. As always, I was a little surprised when “Wing-Nut” floated. There are few things in life are better than launching a boat you’ve built with your own hands. Except perhaps, launching your own design. This is the christening and launching ceremony at the mini beach to our park. Half a dozen of our fellow snow birds came to see the big event. A quick prayer to the big guy and one to Poseidon (gotta’ cover all your bets on the briny lads!) asking that all who sail in her be safe, a christening with a little dribble of Heineken on the bow, and I slip her in. As always, I was a little surprised when “Wing-Nut” floated. There are few things in life are better than launching a boat you’ve built with your own hands. Except perhaps, launching your own design.
|
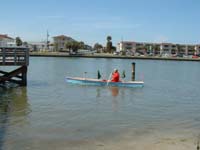 Wing-Nut drew about 2 inches with 250 pounds of proud designer-builder on board. Performance was better than expected. Very stable, with her flat bottom, she had far less tendency to flip me out than an earlier build of mine, the Payson Pirogue. That little devil flipped me in an unintentional Eskimo roll when I tried a side launch. “Wing-Nut” didn’t, and we both survived a side launch with ease. She turns on a dime, yet once I remembered to do the “J” stroke when solo, she tracked well. Wing-Nut drew about 2 inches with 250 pounds of proud designer-builder on board. Performance was better than expected. Very stable, with her flat bottom, she had far less tendency to flip me out than an earlier build of mine, the Payson Pirogue. That little devil flipped me in an unintentional Eskimo roll when I tried a side launch. “Wing-Nut” didn’t, and we both survived a side launch with ease. She turns on a dime, yet once I remembered to do the “J” stroke when solo, she tracked well.
Improvements: I’ll add a small skeg I’ll make up from gluing the rocker trimmings to aid tracking. We’re going to try the cut down beach chair for comfortable seating as my back tells me my age several times a day. To make these, you just cut down the legs of a plastic deck chair to a comfy canoe thwart height, and presto, you have a seat that now doubles a beach chair. I’m going to carry extra hardware, as it’s easy to drop a wing nut or washer in the briny. I’ll try her with standard nuts torqued down with a ratchet and deep socket. The tighter we got the wing nuts, the stiffer and more comfortable she got. There’s a real limit to how much torque you can get with just your fingertips. Also, something in a bimini or overhead cover might be in the works.
I plan to make the power unit shown in the preliminary sketch, and first try it with a trolling motor. With its 10:1 length to width ratio, she should go quite well with minimal power.
Sail, especially multi sails…I don’t know. Scary stuff that! But you never know. (I obviously have far too much time on my hands.) Perhaps with an outrigger.
|
 With both Elaine and I onboard “Wing-Nut” drew about 4 inches, leaving 8 inches of freeboard. The launch was on a Sunday. Whenever it’s a nice day, Sunday brings out the power boaters in swarms. “Wing-Nut” took all but the largest wakes in stride, shipping no water at all. With the larger ones, we had to take them on an oblique angle, still she shipped no water, but it was close. Luckily for us Wing-Nutters, here the water is shallow, tropical and narrow. But I think I’ll add some flotation as well. With both Elaine and I onboard “Wing-Nut” drew about 4 inches, leaving 8 inches of freeboard. The launch was on a Sunday. Whenever it’s a nice day, Sunday brings out the power boaters in swarms. “Wing-Nut” took all but the largest wakes in stride, shipping no water at all. With the larger ones, we had to take them on an oblique angle, still she shipped no water, but it was close. Luckily for us Wing-Nutters, here the water is shallow, tropical and narrow. But I think I’ll add some flotation as well.
As Phil Bolger says about his long, slim power sharpies: “They’re designed to bridge several waves for a smooth ride, and a slight change of course is all that’s needed to stop head sea pounding.” We found this to be true both with TIMS and “Wing-Nut”.
With a load of over 400 pounds, “Wing-Nut” definitely handled better than our 16 foot fiberglass Peterborough canoe, and is a lot lighter also. She paddled quickly and easily, with little tendency to yaw when we were each paddling on a different side.
She’ll be a real pleasure on the quieter weekdays, paddling from waterfront pub to waterfront restaurant. I know one where the fresh shucked raw oysters are still only $2.99 a dozen. Also, there are miles of mangrove lined inlets, dozens of small islets, and some great bird and people watching around here.
“Wing-Nut” will do us fine for a while.
|
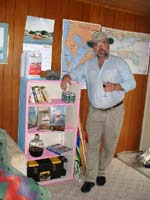
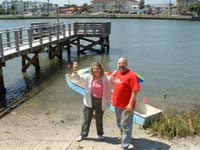 Behind Elaine and me is Gulf Blvd. It’s on the main Clearwater to St. Petersburg beach strip. We are on one of the narrowest spots on the entire Intra Coastal Waterway. Our little Wing-Nut lets us throw the canoes in the water, paddles across in two minutes, and enjoy the beach. There’s plenty of capacity to take a cooler, a couple of beach chairs, umbrellas, the works for some quality beach time, drawing boat designs in the sand. Behind Elaine and me is Gulf Blvd. It’s on the main Clearwater to St. Petersburg beach strip. We are on one of the narrowest spots on the entire Intra Coastal Waterway. Our little Wing-Nut lets us throw the canoes in the water, paddles across in two minutes, and enjoy the beach. There’s plenty of capacity to take a cooler, a couple of beach chairs, umbrellas, the works for some quality beach time, drawing boat designs in the sand.
Copyright: Bruce Hector, 2005
|
|
|