|
A New Leeboard for a Klepper
by Tord Eriksson
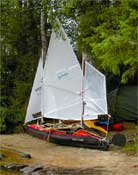 My Klepper Aerius II
(click to enlarge) |
After the first few trial sailing tours with my Klepper Aerius II folding kayak, with its S4 rig and an outrigger (which soon will be enlarged and ballasted), I liked some things and was bothered by others. The jib was a delight, and adding a mizzen proved to be a small stroke of genius, but there were other things that I didn't like, like the leeboards:
It began with my realization that I seldom lifted the windward leeboard on my Klepper Aerius II with the S4 rig and mizzen, and what I've seen from pictures and movie clips, that is quite common. Also, with my outrigger arm clamped to the leeboard thwart and thus sticking out on the starboard side of the kayak, it interefers a little with the starboard leeboard, which therefore can only be folded forward.
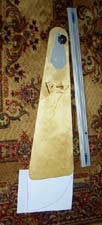
 Klepper Leeboard (click to enlarge)
 |
It goes without saying that fateful day when we ran into a group of rocks it proved less than ideal. Nothing broke, but could well have done so.
Not to be repeated, I hope sincerely!
Secondly, I've learned from various people with a lot of experience with leeboards, that they only use one leeboard on one side! Some had found almost no difference in windward tacking capability with just one, some a little more, but in that case an enlarged leeboard solved the problem!
And as I would sail with an outrigger my boat would heel less, thus the difference in efficiency between a windward or leeward leeboard would be even less, I figured.
Suggested outline |
The original Klepper leeboard seems to have been unchanged the last 50 years, both to outline and profile (nil profile, it is just a piece of birch plywood, with rounded corners).
A Klepper leeboard is 745 mm long, 8 mm thick, and the distance between the pivot and bottom is 670 mm.
The material is birch plywood, and the corners and edges are rounded. Not very efficient but very traditional. Been the same at least 50 years :-)!
I decided that I wanted a bigger and deeper leeboard, and one that was profiled, as to improve the hydrodynamics. This was the first try, but eventually I increased the chord to an inch and a half, roughly.
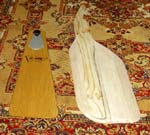 Old and new
 |
Here is it in semi-finished condition: My home-made leeboard is bigger than the original, as well as very much more streamlined. Here it is halfway with the plywood reinforcement "plank" down the middle, and along the entire back, while the "aerodynamically formed bits" are balsa, pure and simple!
Then I flipped it over and added a second plywood plank, and balsa sheets, but it weighs a bit too little to stay down as is.
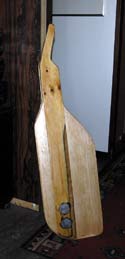 After the first epoxy coat
 |
Here the two holes for the lead shot and a first coat of West System 105 have been added. Now I'll just have to file off the last roughness, add a narrow strip of glass cloth along the leading edge and bottom, to improve wear and tear, and then finally paint it black, to improve UV resistance!
The lead shot is held in place by hot glue, which worked very nicely; the only problem is that you have to cut it smooth, as abrading doesn't work!
As can be seen I had to take off just a little of the plywood by abrading - saved a lot of time and toil. Balsawood which is very easy to sand smooth, and yet, when impreganted with epoxy, or laquer, becomes very stiff and hard. I used outdoor white glue for the leeboard and hope the coats of epoxy and paint will prevent it from dissolving! It will never sit in the water long enough to soak, so I see little problem with the outdoor glue's less than perfect record!
Very impressed with West Systems 105, by the way! Even the wife found the practically odourless epoxy a blessing, as she had had a lot of experience with husbands using Araldite and other nasty smelling stuff!
Soon the first sea trials! |