|
Obsolete Outboards |

|
| by
Max Wawrzyniak - St Louis, Missouri - USA
Bringing
a 1956 Johnson 15 hp Back to Life
Part
II: Water pump
Work |
 |
Part
1 - Part 3 - Part
4 - Part 5 - Part
6 - Part
7
Before we get started on the water pump, I would
suggest a quick review of the old "Water
pumps" column, If Chuckie is going
to waste his bandwidth on that old stuff, we might
as well make good use of it.
For whatever reason, the two outboards featured in
the first two "Start to Finish" series were
about the most difficult of the old OMC (Outboard
Marine Corp., parent of Johnson, Evinrude, & Gale)
engines to change water pump impellers in. The 5 1/2
hp required that the whole powerhead be removed, while
the 25 required that one work through a small gap
between the lower unit and the exhaust housing ("tower"
housing") in order to disconnect the gearshift
linkage so that the lower units could be removed.
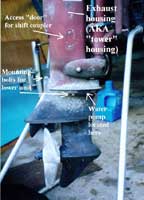 |
Exhaust
housing (AKA tower housing) and lower
unit overview
(click
images to enlarge) |
|
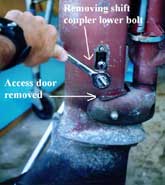
It is much easier to change the impeller in the '56
15 hp because this engine has a small access door
on the side of the exhaust housing which allows one
to disconnect the shift linkage easily. One loosens
the two screws and removes the little panel, revealing
a coupler connecting the shift rod coming-up from
the lower unit and the shift rod coming down from
the shift lever. The lower bolt of this coupler must
be completely removed, as the bolt engages a groove
in the lower portion of the shift shaft, and merely
loosening the bolt will not free the lower shaft.
If you drop the bolt down into the exhaust housing
at this point, it is no big deal, as the bolt will
fall out the bottom of the exhaust housing as the
lower unit is removed. If you accidently drop the
bolt when re-installing the lower unit, however, you
will have to remove the lower unit in order to retrieve
the bolt.
| Disconnecting
shaft coupler |
|
|
Once the shift shaft coupler is disconnected, the
five bolts holding the lower unit on can be loosened
and removed. Once these bolts are out, the lower unit
may fall-off the engine, or it might require a bit
of a tug if the shift shaft is hanging-up in the couple.
If the lower unit requires more than a minor tug to
free it, then something is not correct. It is a bad
idea to carry the lower unit around by the vertical
driveshaft; the shaft may slide out, dropping the
lower unit on your foot.
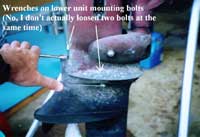 |
Wrenched
on lower unit mounting bolts |
|
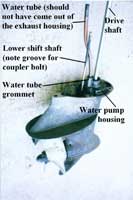
Once off the engine, note if the copper water tube
came out with the lower unit or is still up in the
engine. This tube conducts water from the water pump
up to the powerhead, and if the tube is attached to
the water pump, pull it lose from the pump housing
and insert it up into it's hole up in the exhaust
housing. It is impossible to re-install the lower
unit with the tube attached to the pump; it must be
first inserted into the exhaust housing. When re-installing
the lower unit, you will need to guide that tube into
it's socket on the pump housing as the lower unit
is pushed up against the exhaust housing.
The tube is retained at both ends with "push"
fit rubber grommets and it would not be a bad idea
to replace these sealing grommets if there is any
doubt as to their condition. The one on the pump housing
is easy to pry-out and replace; the one up in the
exhaust housing is much more difficult. I decided
to risk reusing the old grommets on the 15.
| Water tube,
shift shaft and drive shaft details |
|
|
The top of the pump housing is held on with three
screws. One of these screws on the 15 came out with
some resistance and covered with white powder, which
was corroded aluminum. The long periods of submergence,
evidenced by the appearance of the lower unit, had
a detremental effect on the threads in the lower unit
casting. Fortunetly, only one threaded screw hole
showed signs of deterioration, and although it's threads
where in poor shape, there appeared to be enough thread
engagement to hold the pump housing on. Corroded or
stripped threads on these aluminum castings are a
farily common problem, and there where special tools
available to make drilling and re-tapping (re-threading)
water pump retaining holes a quick and easy job. Without
these special "jigs," the job is a bit more
difficult but not beyound the abilities of the careful
obsolete outboarder.
 |
A special
jig (tool) for quickly repairing stripped
or broken water pump housing screws. Although
a more difficult job without the tool,
the basic procedures for repairs are still
the same. |
|
After the three screws are removed, the pump housing
can be slid up the driveshaft and removed. Note that
there is no gasket or seal used underneath the pump
housing. Also note that there appears to be no seal
for the driveshaft in the pump housing. Actually,
there is a "seal" of sorts for the driveshaft
where it passes through the pump housing. It is a
water seal; a cup which holds water acts as a shaft
seal. The water that keeps this cup full comes through
a tiny hole in the pump housing, and this tiny hole
must not be plugged. Excess water merely overflows
the cup and exits the motor through the exhaust outlet.
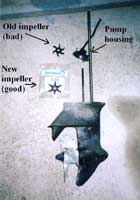
The pump impeller in the 15 was pretty much "toast."
The fins retained their "curved' shape, whereas
a good impeller will have "straight" fins.
My opinion is that once one has gone this far, it
would be dumb to reinstall the old impeller even if
it looked "OK." Unless I KNOW that the impeller
in an engine is good, I ALWAYS replace it. And I NEVER
re-install an old impeller once it is out of the engine.
| Impellers
and pump housing detail |
|
|
Underneath the impeller is a shiny metal "wear
plate." If this wear plate shows signs of heavy
scoring, if would not hurt to replace it. If the pump
housing itself shows signs of heavy scoring, replacing
that might be a good idea as well. So what constitutes
"heavy scoring?" Beats me. I have replaced
the wear plate in one or two of the engines that I
have worked on over the years; I can't remember ever
replacing a pump housing although I might have. A
pump "rebuild kit" will always have the
impeller and wear plate, and maybe the housing as
well. Or you can buy just the impeller and/or wear
plate seperately. I re-used the wear plate and housing
in the 15.
Water will sometimes do weird things. For example,
water will sometimes try to "climb" a spinning
shaft. for this reason, there is an "O"
ring in a groove around the splines at the top of
the vertical driveshaft. You will need to remove this
"O" ring in order to slide the pump housing
and pump impeller on and off the driveshaft. If the
"O" ring breaks, or if your engine is missing
the "O" ring, you might run the lower unit
by a good hardware store and see if they have an "O"
ring which fits pretty well. The fit is not real critical.
I will admit to occasionally not replacing a missing
"O" ring. The risk is allowing water to
get into the lower main bearing in the powerhead.
It can happen but doesn't always happen; your choice.
 |
Are we
having fun yet? |
|
Slide the new impeller down the driveshaft and be
sure that the key way (notch) in the shaft hole of
the impeller engages the little pin on the driveshaft.
Slide the pump housing on the shaft. As you push the
pump housing down onto the impeller, rotate the driveshaft
in a clockwise (looking down) direction and the impeller
blades (fins) will bend back, allowing the housing
to drop down and seat on top of the wear plate. Make
sure that the impeller stays engaged on the drive
pin in the driveshaft. Install the three screws which
secure the housing. I was very carefull to not over-tighten
the one screw with bad threads. Replace the "O"
ring at the top of the drive shaft. A very light coating
of grease on the splines at the top of the driveshaft
is a good idea: any more than a VERY light coat is
NOT a good idea, as it can form a "hydraulic
lock", preventing the splines from fully engaging.
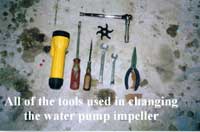
| Tools used
in changing the water pump impeller. |
|
|
Re-installing the lower unit might try your patience.
Take your time. Have the motor vertical if possible,
but high-enough off the ground so that you can get
the lower unit under it. You need to get the driveshaft
splines engaged with the splines in the crankshaft.
Having someone slowly turn the flywheel (clockwise)
might be of help. While doing this you also need to
guide the water tube into it's grommet on top of the
pump housing. Forget the shift shaft for the time
being. Once you have the driveshaft/crankshaft engaged
and the water tube in its grommet, install a few of
the lower unit mouinting bolts but leave them slack
so that the lower unit hangs with a little gap.
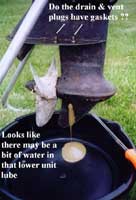 |
Looks
like there may be a bit of water in that
lower unit lube. |
|
Use needle nose plies inserted though the shift
shaft coupler door to move the lower end of the shift
shaft up and down, while using the shift lever on
the engine to move the upper half of the shift shaft
up and down, as necessary in order for the lower shift
shaft to engage the coupler on the upper shift shaft.
Be sure the lower shift shaft is fully seated in the
coupler and then re-install the lower bolt in the
coupler. Install and tighten-up all mounting bolts
and re-install the little cover over the access hole.
Check the shift lever while slowly turning the propeller
to see if the engine egages forward and reverse, and
that the prop turns freely in neutral. Remember that
either the prop or the flywheel must be turning when
trying to shift the engine or the engagement "lugs"
may not be aligned.
Removing the drain and vent plugs from the lower unit
released a "milk shake" looking mess that
indicated that there might be some water mixed-in
with the lower unit lube; taking my
own advice, I refilled the lower unit
with Lubriplate #105 white grease. I really did not
want to hassle with re-sealing this old, corroded
lower unit.
...
on to Part 3...
Happy Motor'n

click here for a
list of Columns by Max Wawrzyniak
|