|
Making a Bimini |

|
 |
Until
now, I never seemed to have the right
boat to avoid the relentless Florida sun.
(click
images to enlarge) |
|
Turning toasty under a relentless Florida sun will
engender lots of thoughts about the advantages of
sailing with a bimini. But somehow, I never seemed
to have the right boat for that luxury. Daysailers
were too small. An old 24-foot sloop required ducking
under the boom at every tack. The sheet leads on our
30-foot balanced lugger were wrong (well, it has a
bimini but it’s only usable under power).
But the boom on our 20-foot boat (also a balanced
lugger) is high enough to allow a bimini, and the
mainsheet is far enough aft to make it feasible. When
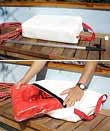
Chuck Leinweber at Duckworks provided the mounting
and other necessary hardware
and a small bit of technical advice, the scales tipped.
| Some of the
hardware from Duckworks. |
|
|
To my surprise, the whole job cost around $40, without
any of the makeshift jury rigging I sometimes try
to save money, and was remarkably easy.
The part that had always inhibited me from trying
this was bending the pipe or tubing for the awning
supports. Chuck had the easy answer – get a
conduit pipe bender from the local hardware or home
improvement store. We were lucky and found one on
sale for $10; otherwise, they go for about $30 or
so. You might have a friend you can borrow one from
(and in which case you can subtract that $10 from
our $40 estimate)..
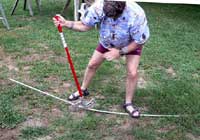 |
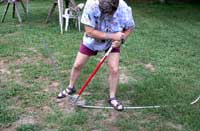
In my
“Man of Aluminum” pose, I
use the conduit bender to begin bending
the tubing for the bimini supports.
|
|
Since the hardware we got from Duckworks required
3/4-inch outside diameter pipe or tubing, “inexpensive”
alternatives like PVC pipe were out anyway, since
the ½-inch inside diameter PVC pipe proved
too big, and would be too flexible anyway.. A local
metal shop provided the type 6061 aluminum tubing,
recommended for outside use. A 20-foot order, cut
into 11 and nine foot pieces, came to $22. For our
Jim Michalak-design Frolic2,
Oaracle, and its crew of average height, they turned
out to be exactly the right size, and I had no more
cutting to do.
Calculating the size you need for the awning supports
is a bit beyond the reach of this article, and of
course will differ from boat to boat. So see the speadsheet
Chuck has published on how to figure those lengths.
(this is a zipped file containing 'bimini1.exe',
a bimini calculator. I don't think it has any malware
associated with it, but I can't guarantee it - chuck)
The photos show a rather small bimini, only about
three feet long and supporting by two sections of
tubing. That’s because Oaracle is fairly light
and unballasted and I’m worried about balance
under sail and stability if the wind gets gusty. It
will be easy to enlarge it, if experience justifies
it, by adding a third awning support. The tube mounded
to the gunwales will then be vertical, with the other
supports being mounted on it and hinging fore and
aft.
| It’s
a bit hard to see the bent part here, but
the bending is nearly complete. It took
less effort than it looks like in this shot. |
|
|
I thought bending the tubing would be the trickiest
part. It was the easiest; figuring out out where to
bend it was the head scratcher. My conduit bender
uses 7 inches of tubing to bend a 90 degree angle.
With an approximately 60 inch beam, if you mark a
centerline, and then 23 inches out each way (30 inches
minus the 7 inches), you’ll wind up several
inches too short. The mathematical way to figure this
is with this formula: Pi times the diameter of the
circle equals the circumference of the circle. If
one quarter of the circle is 7 inches, that means
the circumference is 28 inches. Divide that by Pi
(3.14) and then by 2 to get the radius; the difference
between the radius and 7 inches tells you where to
start bending. That’s the way I did it and it
worked okay. Be aware that any bender you use may
have a different radius. And some benders have instructions
on the side. In practice, I think just laying the
tubing across the cockpit and the sliding the bender
back and forth will give you a plenty accurate idea.
Although I wound up not needed it, most builders will
probably need a hack saw or tubing cutter to cut the
tubing to its final size.
One further thought: I made my supports an inch
or so wider than necessary. The slight bending necessary
to bring the tubing to the cockpit sides puts a slight
curve in the top of the tubing, which helps the binimi
shed water.
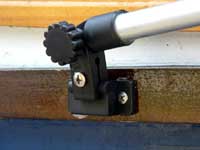 |
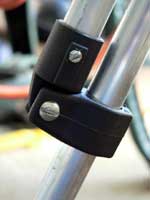
The hardware
was easy to install with just a screwdriver.
|
|
Bending the tubing was, as mentioned before, simple.
Even working deliberately, it was a matter of a few
seconds for each leg. Small adjustments in angle are
easy. If the two legs on one piece wind up slightly
splayed (like mine), simply brace one leg and twist
the other until they match.
Sewing the bimini top also was easy. A wide variety
of materials will do, Sunbrella,
marine vinyl, and many types of canvas. I choose a
waterproof nylon for it’s lighter weight. It
also conveniently came in 60-inch widths, which saved
cutting and sewing a seam to match the width of the
boat. As mentioned earlier, a three-foot length was
selected for the bimini. It was only necessary to
cut that width, plus extra for hemming and a 1-1/4-inch
wide sleeve on each end for the tubing (the circumference
of the 3/4-inch tubing is a bit over two inches.
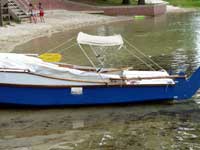
| The finished
bimini provides some welcome shade from
the Florida sun. It may be enlarged if the
boat proves to be able to handle a bigger
awning. |
|
|
The hallmark of gear sold by Duckworks is its simplicity
and functionality. So it is with the bimni
hardware. It’s only a matter of
sliding it in place and tightening bolts or installing
screws – trying to explain it in detail will
likely only cloud the issue. (The gear is, in fact,
much better than the hardware on the many-times-more-expensive
bimini I bought for the 30-footer). Three-sixteenths
braided nylon line is used to support the bimini while
it is up; Oaracle has an abundance of cleats, eyestraps
and other gear to anchor the lines.
One final thought. Give careful planning to the
placement of the bimini, not only where the bimini
is while it’s up, but where it is when folded
down. The location on Oaracle allows the sheet to
clear the supports while it is up, and when it is
down it still allows access to the hatch over the
stern storage area.

Other articles by Gary Blankenship & Helen Snell:
|