|
The Chinese Lug Sail (Junk Rig) |

|
|
By John Tompkins - Leicestershire, UK |
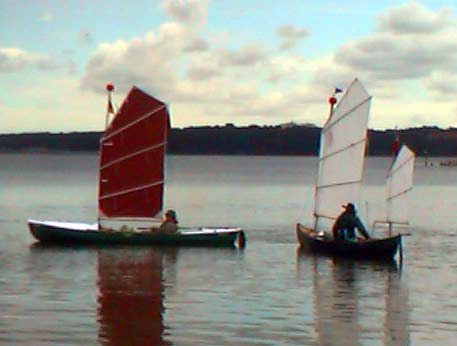
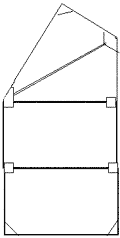
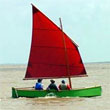
Setting out from Wassersleben on the Baltic
The Brown sail is 44 sqft and the white
Ketch rig comprises a 40 sqft derivative for the main
and a 12.5 sqft mizzen. Our intended trip was cut
short by a comedy of errors and some bad weather.
You can read all about it in "Riddle
of the Sandbar" in the trip logs
on Bill Sargent's www.smallsailboats.co.uk.
I have used this sail since mid 97 (or thereabouts) and am now in the process of replacing it. You can see that I have used one of the alternative batten layouts, and on closer inspection you will notice two short white strips below two of the battens - these were from the early days when I had battens in the original pattern.
The Chinese Lugsail is in many ways the easiest of sails to make, as it is cut flat (it has no built-in shape or camber). This version which I designed for small boats and canoes can be sewn together using a domestic sewing machine.
Take three panels of approximately 3.8 oz sailcloth, each three feet by five feet. Each panel is therefore fifteen square feet, making a 45sqft sail. However when the panels are sewn together the seam overlap takes up a little over one square foot and brings the sail down to about 44sqft. Coincidentally the size chosen by the American Canoeing Association for one of their class sizes and the OCSG for theirs.
Even if you sail a canoe, you do not need to stay with the sizes chosen by these groups for their racing specification, but a 44sqft sail is also quite a comfortable and manageable size in most conditions and you can add a mizzen if you want to increase sail area.
The simplest way to create the shape is to sew two of the rectangular panels together along the five foot edges (fig 1). The seam is sewn flat as shown in fig 1a. Do not use zig-zag stitching for seams as if one stitch breaks the whole seam is compromised; with two rows of straight stitching, if stitches in one row break the second row should still hold.
Sewing Tips: double sided tape holds the material in place while sewing and adds strength to the seam. Use a strong nylon thread for all stitching ans stitch back over the ends to finish each seam. |
 |
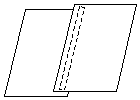 |
Fig 1 |
Fig 1a |
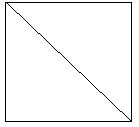
Next cut the third panel across the diagonal (fig 2). Take one of the triangles, turn it over length ways, so that the diagonal cut edges still touch, and sew it back in place along the same edges which you have just cut. This makes a shape like an old style of kite (fig 3).
|
|
|
Fig 2 |
Fig 3 |
|
Then stitch this (along one of the five foot sides)
to the top of the other two panels to give the shape shown in fig 4. |
Fig 4 |
Add the reinforcing patches, made from layers of the sail material, triangles at the corners and squares at the parrel points and batten ends, and fit with brass eyelets (see fig 4a and 4b for details of the patches).
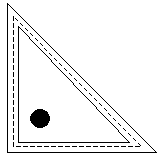
To make the triangular patches, take two squares of the sail material, one six inches square and the other five inches square. Fold both in half along the diagonal, insert the smaller into the envelope formed by the larger, and place at the corner of the sail. To attach to the sail, sew round the larger triangle close to its edge (dotted line). This will keep the smaller triangle in place and provide sufficient thickness for the eyelet to grip but not be too thick for your sewing machine. The eyelet (shown as black circle) should be positioned at equal distance from each edge of the sail, but not so far in as to cause the sail to fold when a line or shackle is attached.
The square patches are made in a similar way, only this time cut two rectangles. Then fold them in half and insert the smaller into the larger and sew as before.
When all the patches are sewn in place take a one inch wide ribbon, fold it in half along its length and sew it around the entire outside of the sail (fig 4c). This is to tidy the rough edges of the material. It doesn’t matter if you have to use more than one piece and join it part way round, but it will be on show so make a tidy job of sewing it.
Battens
Battens are fitted in pairs, one each side of the
sail at each batten position. Battens can be sewn
in place or small brass eyelets can be fitted (as
shown in fig 5) and zip ties used to secure the battens
(fig 5a). (A small reinforcing patch will be needed
for each eyelet). A nut and bolt is fitted through
the hole at each end of the batten and a line from
that to the eyelet in the reinforcing patch on the
sail. Then tension the lines at each end so that the
sail is just taut (not stretched) and the batten is
not bent. Do the same on the yard and boom, although
you can fit an outhaul on the boom in place of the
aft tension line if you wish.
There are many materials that can be used for battens, but a cheap, tried and proven material is the 20mm oval PVC cable conduit available in B&Q and other hardware/electrical outlets at about £1 sterling for a 3 metre length.
Using it in pairs provides the required structure, but if you want a stiffer batten the same conduit is available in 16mm and will slide inside the 20mm. Battens can be fitted either along the seams (fig 6) or at a diagonal to them and should extend past the edges of the sail.
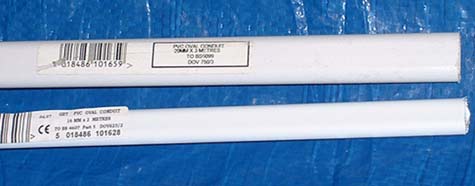
Photo of batten material
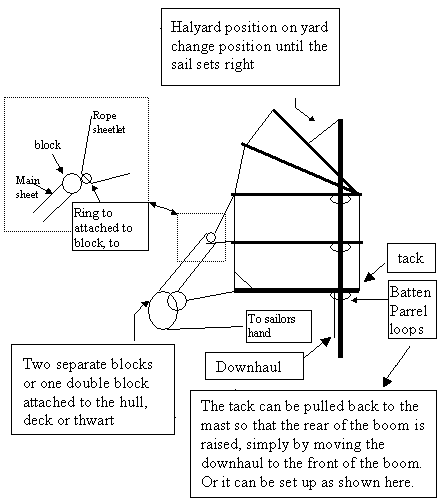
Fig 6
Rigging
The main sheets consist of a rope which runs from the sailor's hand through one block, which is fixed to the boat, up to a block attached to a loop of rope (sheetlet) connecting the top two battens. Then down through another block fixed to the rear of the boat and up to the boom (see fig 6). This exerts a diagonal pull at all points of attachment and keep the leech taut.
The position of the halyards on the yard will affect the tension in the sail. Start with the halyard in the middle of the yard and slide it along the yard to get the sail to set correctly. I find that this sail requires a stiff mast - having a mast that can bend allows the leech to become slack.
The sail can be reefed using lazy jacks (or buntlines), or by simply tying the battens together.
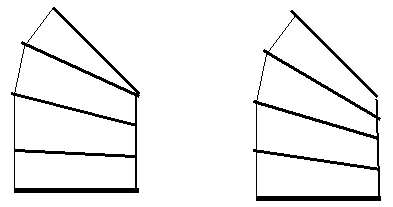
Alternative Batten Layouts
About the Author:
John Tompkins lives in Leicestershire in the Midlands of England, he saisl and paddles canoes anywhere he can. he has been canoeing since the tender age of 5 back in 1957.
John is a British Canoe Union - Senior Instructor(coach L3) of Open Canoe and has been sailing them seriously since the late 80's. He was a founding member of the British Open Canoe Sailing Group and along with John Bull (the Founder) took open canoe sailing to Norway and instructed them on the fitting out and sailing of Open Canoes. He left the OCSG when the rules were thrown out.
As soon as he started sailing John began developing his own sails and has had many successes including being the last person to win the Royal Canoe Club - Paddling Sailing trophy at the RCC's headquarters on Trowlock Island on the Thames. That was with a boomed Lateen of his own design.
He has paddled and sailed most of the coasts of Britain and many of the inland areas, in Germany and Denmark on the Baltic, Norway and Canada.
The Junk Rig that John shows here has several users in the UK, some he built for them and others they have built themselves.

Other articles about sails and sailing:
|