|
Vireo Testing... and Repairs |
|
| By Chris Hill - Conway, South
Carolina - USA |
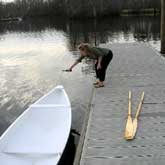
Testing
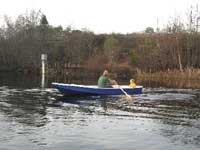
I took my Michalak designed Vireo 14
rowboat, Sandpiper out for some fairly extensive
testing, with and without several passengers between
2 and 42 years old, this week.
Amy christens the Sandpiper.
(click images to enlarge)
|
|
|
She weighs about 63 lbs., according to the bathroom
scale. This turns out to be a bit heavier than ideal
- for me to lift her onto the roof rack by myself
is awkward, since there's no thwart at the balance
point, and I end up supporting a lot of weight on
my head, which can give your neck a crick if you lean
wrong. Or else I have to muscle it around all with
my arms, which I'm barely able to do.
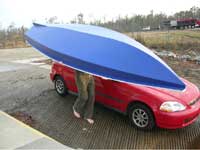 |
Wrestling
it off the car and into the water singlehanded
was a bit of a struggle compared to throwing
around a fiberglass kayak, but it was
doable. |
|
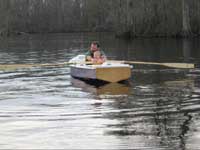
But back to how she rows. By the GPS, I could row
vigorously and average almost 5 mph (8kph) rowing
across a small lake. This was fairly energetic, and
I kicked up a bit of a wake. Top speed registered
on the GPS was 5.9 mph (9.5 kph).
| Sam came along
to help. |
|
|
If I dropped the speed down to between 3.5 and 4.0mph
(5.5-6.5 kph), rowing became about effortless, and
the boat hardly made a ripple in the water - the rings
left by the oars dipping in the water of the still
pond were the most prominent part of the wake. So
I think I could cruise at about 3.9 mph for hours.
With a few kids aboard, or a couple kids and and adult,
it wasn't really any more effort to row, if the weight
was distributed evenly. But it was easy to mess up
the trim if even one person was off center or if all
the passengers were in the stern.
 |
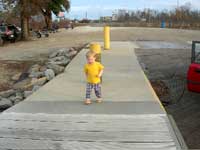
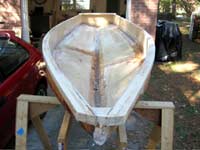
Afloat.
She glides along nicely, and looks like
she'll hold the whole family and gear,
comfortably. |
|
Unfortunately, my worries about how I mounted the
oarlocks turned out to be well founded. When I drilled
the holes through the gunwales for the oarlocks, I
worried that the gunwales might not hold up to the
strain of heavy rowing, and sure enough, one gunwale
has started to crack around the oarlock. I'm going
to use epoxy, some bolts, and some plywood to try
to shore up that part of the gunwale. Won't be particularly
pretty, but I think it's necessary.
| Sam takes
a turn at the oars. |
|
|
Repairs
The Design
Jim Michalak’s plans for the vireo 14 call
for gunwales from two strips of 1” x 3/4”
wood, to make 1” x 1.5” final wales .
A friend of mine cut and planed some 16 foot lengths
of clear southern yellow pine for me, and the extra
length helped me bend them to shape. I epoxied and
screwed (stainless screws) one wale to the 1/4”
plywood sides of the boat, then epoxied and screwed
the second strip to the first. The design doesn’t
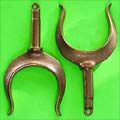
specify how to mount oarlocks to the wales. I settled
on some bronze oarlocks that mount through the wales,
rather than inside or outside. The oarlocks I ordered
had a rectangular plate, with holes for two mounting
screws.
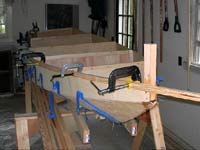 |
First
wale on |
|
| second one
epoxied and screwed to first |
|
|
Beginnings of the problem
My workmanship being what it is, I didn’t entirely
fill the epoxy joint between the two strips. There
were a few places you could see a crack or gap.
I had to decide how to mount the oarlocks. Since
the joint between the two strips falls in the center
of the wale, do I drill holes there? Or do I avoid
the joint and mount them in the inner or outer half
of the wale? I decided, since the oarlock needed a
5/8” hole, and each strip was only 3/4”
wide, I’d be best off drilling the hole in the
center. However, I mounted the oarlocks at something
of a diagonal (see photo), so that one mounting screw
was in the inner lamination, the other in the outer
lamination. Although this may look odd, I felt much
better not driving both the oarlock and the mounting
screws into the joint, practically taunting the joint
to fail.
 |
I mounted
the oarlocks at something of a diagonal,
so that one mounting screw was in the
inner lamination, the other in the outer
lamination. |
|
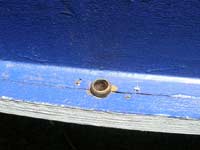
Here’s where another problem came in –
I drilled a 5/8” hole for the oarlock with a
spade bit, but it was not quite a perfect fit. The
hole was a little too snug. After an ineffectual 15
minutes trying to slightly enlarge the hole with the
drill and a tiny file, I decided good enough, but
in retrospect, it wasn’t. I tapped the oarlock
into place and actually had to give it a few good
knocks with a hammer to seat it down in that tight
hole. The mounting screws went in fine.
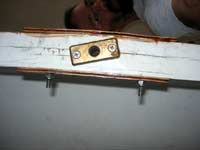
| View from
below: the hole wasn't big enough |
|
|
The joint starts to fail
I’m six foot three and though I’m no
Lance Armstrong, I do put my back into it when I row.
I had epoxied some two-by-fours to the floor of the
boat to brace my feet against when I pull. I did some
fairly hard rowing with various amounts of human cargo
(up to 425 pounds, 200kilos, including me) and didn’t
notice any problems (I wasn’t really looking,
though). Then I let a passenger take the oars, and
as he rowed, I noticed a few things.
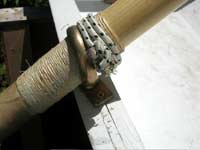 |
When you
lift the oars too high, this happens.
|
|
a) he seemed to feel the oars would work better
the deeper he got the blades, so he was lifting
his hands high and then pulling on the oars, with
the blades a good foot or two deep in the water.
b) This awkward angle put a lot of stress on the
oar-boat joint. I think in a rigid metal boat, the
oar would probably have popped out of the socket
when he lifted his hands so high. However, in the
vireo, the sides flexed a bit, allowing the oars
to stay in the socket.
c) Not only did the sides flex, but the wale on
the starboard side cracked both at the joint between
the two laminations, and also within one of the
laminations (see picture). The port side was OK.
So obviously I hadn’t built things right to
stand up to a little hard use. Time for a repair.
The repair
My first thought was to put some bolts through the
gunwale, from inboard to outboard, to hold it together.
Bolts holding steel or plywood plates would be even
better. The plates would compress and stiffen the
wale where it had started to fail. And I’d dribble
some epoxy through the cracks that had formed to close
them up. Miraculous stuff, epoxy, they say. The last
thing I wanted to do was remove and replace a wale.
And the second to last thing I wanted to do was cut
out and replace a section of wale.
Then I thought I could also make the wale deeper
vertically to strengthen and stiffen the oarlock mount.
So I set about adding wood to the wales around the
oarlock.
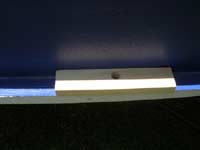
| I carved a
block to make the gunwale deeper in the
oarlock area. I sanded off paint to allow
me to get a wood to epoxy bond holding the
block in place. This should distribute the
stress of rowing over a larger area. |
|
|
 |
The block,
clamped in place and belt-sanded flush
with outside of gunwale.
|
|
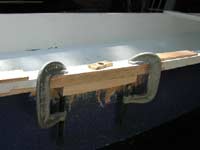
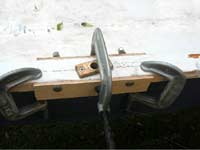 For
good measure, two 1/4" plywood straps
that fit flush to the inside of the boat
and the outside of the gunwale and the added
block, with three inch long 1/4-20 stainless
carriage bolts. When I epoxy, I'll tighten
these loosely to hold the joint. After the
epoxy cures, I'll tighten them a little
more and hacksaw off the extra length on
the inside. For
good measure, two 1/4" plywood straps
that fit flush to the inside of the boat
and the outside of the gunwale and the added
block, with three inch long 1/4-20 stainless
carriage bolts. When I epoxy, I'll tighten
these loosely to hold the joint. After the
epoxy cures, I'll tighten them a little
more and hacksaw off the extra length on
the inside. |
|
I dry fit all the pieces. Looks good to me. I’ll
see if I can find time to epoxy it all together tomorrow
or the next day.
Of course I watered my garden for two hours this
morning, so that meant it rained rained rained this
evening, soaking my handiwork before I got it epoxied.
Funny, the wood pieces seem somehow bigger now! I
knocked the blocks out, but those carriage screws
aren’t sliding out again until the wood dries
thoroughly, if then. Hmm…..
 |
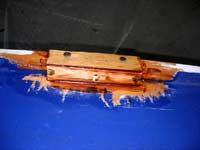
from above
- this shows the damaged side with the
cracks still showing - I tried to get
some epoxy into them, but I'm sure I didn't
get much in.
|
|
| Here's what
it looks like all assembled with thickened
epoxy and bolted together (I tend to get
about an hour a week to work on boats, so
things like painting will have to wait). |
|
|

|