|
Tammie Norrie |

|
| By Phillip Hirst - Woodbridge,
Tasmania - Australia |
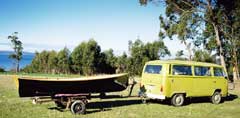
This project started from the necessity of replacing
our tender, a 10’ inflatable with an 8hp outboard.
This inflatable had served us well for the six years
or so that we had lived aboard our 45’ yacht,
mainly in subtropical Australian coastal waters. When
we crossed Bass Strait and came to Tasmania, situated
in the Roaring Forties, we realised our needs had
changed somewhat.
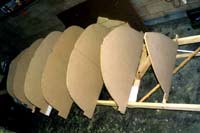 |
Naked
moulds
(click
images to enlarge) |
|
Inflatables have all sorts of advantages in certain
conditions. They are incredibly stable, have good
load carrying capacity and are soft and squishy in
a topside-paint friendly sort of way. Ever had a non-inflatable
tender wander underneath your quarter on a calm night
(for night read 0200hrs) and start hammering through
your paint/gelcoat/hull in an amusing way? We had
an aluminium dinghy for a while that would often do
just that. My how we would laugh at its nocturnal
antics. Actually I would laugh (in a hysterical, borderline
psychotic fashion). My wife will apparently sleep
through hull- hammering/anchor-dragging /rain-coming-through-open-hatch
type noises without so much as changing the tone of
her fake sounding snores.
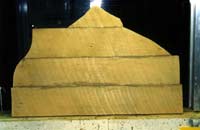
| Cubist transom |
|
|
Like any sort of tender, they also have their disadvantages.
Probably their worst is the way they behave when oars
are attached and rowing is attempted. They are also
wet. That’s okay in tropical Queensland where
getting wet is no big deal, but having the moisture
content of your clothing increased beyond certain
levels in Tasmania is a great way to discover the
wonderful world of hypothermia.
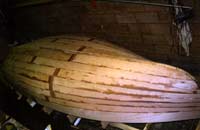 |
All planked
up
|
|
My wife and I discussed this with a friend of ours,
(Russell Streckfuss, owner of Storm Bay Sails) who
also cruised down this way from lower latitudes, and
we came up with certain desirable characteristics.
It had to be stable enough to not immediately eject
an inexperienced visitor. It needed to be big enough
to carry 4 jerry cans of diesel, 2 jerry cans of water,
a pile of groceries, two adults and a child plus at
least 1 carton of beer and an unspecified quantity
of red wine. If there wasn’t room for the beer
then of course the child could be offloaded, but we
regarded that as an undesirable outcome and to be
avoided where possible. It had to have a reasonable
amount of freeboard to keep our families dry-ish in
naughty weather conditions.
If it could be fitted with a sailing rig then that
would be a bonus. Above all it had to row well and
have two rowing positions. Russell and I thought it
would be criminal to deprive our spouses of the joy
of rowing. Indeed they had often been heard to lament
their inability to help with the rowing chores in
a bracing Roaring Forties gale. The lamentation was
usually muffled by the tarpaulin she was sheltering
under, but heartfelt and sincere none the less.
| It made it
through the workshop door without surgery |
|
|
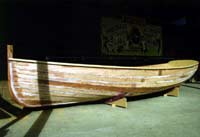
After months of Internet surfing, we found the “Tammie
Norrie”, an Iain Oughtred design, which appeared
to meet most requirements. At 13’ 6” long
and 4’ 5.5” beam it wouldn’t fit
on our deck easily but it was so bloody gorgeous I
couldn’t resist.
The plans arrived in July 2005 and I started not
long after, so you can see I am not a fast worker,
or a very good one for that matter. The construction
is in clinker plywood (glued lapstrake), which we
felt would be strong but light enough for one of us
to drag up a beach above the high water mark. As death
is nature’s way of telling you to take it easy,
chest pains when dragging your dinghy through the
sand may mean it’s a wee bit on the chunky side.
 |
Ready
to Rock |
|
If anyone is considering building one of Oughtreds’
designs, I heartily recommend that they buy (or borrow
from the library as I did) his Clinker
Plywood Boatbuilding Manual. It takes
you through everything step by step and allows even
wood-butchers like me to achieve a reasonable result.
The basic method consists of gluing plywood planks
together over moulds using epoxy. The planks are held
together until curing is finished, leaving no fasteners
in the hull. Clamps of various types can be used but
I used screws and backed them out and filled the little
holes after.
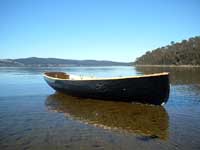
| Launching
day |
|
|
The planking material is Gaboon ply, but I tried
to use Tasmanian native timbers where I could, especially
if I could recycle scrap. The transom and gunwales
are made of Huon Pine, a species found only in Tasmania
and highly prized in boat building. It is extremely
durable due to the high oil content. A tree 100’
tall may take 1000 years to grow. There are virtually
no Huon trees felled these days, most timber coming
from dead trees recovered from the west coast wilderness
areas. It is very tightly controlled.
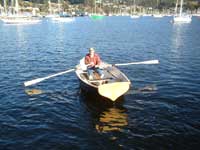 |
She rows
nicely |
|
I used epoxy throughout. By throughout I mean in
my hair, on the floor and my best jeans which I forgot
to get changed out of. My impressive boat building
skills required me to use bucket-loads of filler in
most joints, as whole families of rodents could live
in some of the gaps. Even so it still only weighs
about 65kg. I painted everything but the gunwales,
the stern sheets, the transom and the floorboards.
These bits I oiled with linseed oil, gum turpentine
and terrabine. I hate scraping varnish, so I will
just rub an oil soaked rag over the shiny bits when
it needs it. I Dynel sheathed her below the waterline
for when she is dragged up stony, oyster covered beaches
etc.
| kinda sexy |
|
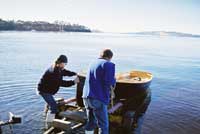
|
We finally launched her not long ago, and we were
not disappointed. She rows beautifully without sacrificing
much stability and the water stayed on the outside
of the hull where I prefer it. She looks kinda sexy
too. I am still working on the spars for the balanced
lug rig at the moment, so I will take some more photos
when I’m done with that.
|