|
Building a Toto |

|
| By Joseph Murray - New Brunswick
- Canada |
I have been building boats for about
15 years now. Mostly I build some kind of small row/sail
boat. Over the years I have always stopped to watch
the paddlers going with kayaks and canoes. The simplicity
of it all had always sparked a dream in me of one
kind or another; from paddling some clear water lake
locally to doing a two week long trek into the Rockies.
 |
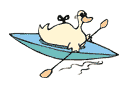
Over the
years I have always stopped to watch the
paddlers going with kayaks and canoes.
(click
images to enlarge) |
|
About a year ago I came across the Duckworks website
and thus the plans available through them. In the
past I have built a few of Phil Bolger’s boats
and I have always liked the idea of the flat bottom
hard chine hull for building ease. When I saw Jim
Michalak’s plans I was literally like a kid
again. I almost immediately bought two sets of plans
from him.
The plans arrived just as I was heading to work a
week or so later; so as not to waste any time getting
started I brought them with me and laid them out on
my desk while I worked. I am a call center employee
so having the plans spread all over doesn’t
really affect my job; other than perhaps having to
get someone to repeat what they just said two or three
times as I was distracted.
| When I saw
Jim Michalak’s plans I was literally
like a kid again. |
|
|
I had never before tackled a stitch and glue boat
although I was very familiar with the process. All
of the Bolger boats had been stringers over frames
and bulkheads like the Light Schooner. Nonetheless
I was confident I could sort it out. The instructions
are very clear and very complete for the Toto.
The following weekend I was off to Home depot to
purchase the plywood (4 mm Okoume) and filler. The
fiberglass materials I bought at Canadian Tire. It’s
a bit pricey but I didn’t want to wait for another
delivery. I had plans to be on the water within a
week.
 |
The instructions
are very clear and very complete for the
Toto.
|
|
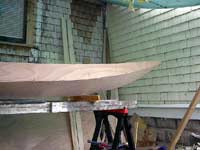
Laying out the patterns from the plans to the plywood
took about two hours all total. I did as Jim suggests
and laid out all the pieces for one side; cut them
out and use them as a pattern for the other side.
Everything went off without a hitch using a Skill
saw set to only the depth of the plywood. Doing this
allows you to cut the curves without difficulty.
Next I would need to join the side pieces together
with a butt joint as the Toto is longer than one sheet
of plywood. While this was drying I could cut out
all the other assortment of small pieces needed for
assembly. I used scrap boards I had laying about to
frame around the bulkhead where required by ripping
them to the dimensions on the plans. The small piece
for the bow was done the same way.
| Everything
went off without a hitch using a Skill saw
set to only the depth of the plywood. |
|
|
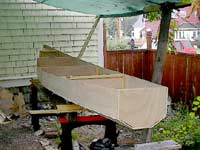
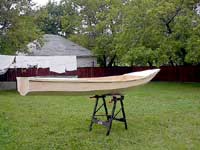
Setting everything up on two folding sawhorses I
first fastened the side panels to the transom. Working
forward and alternating from side to side I attached
all the bulkheads and temporary frames in their respective
locations. Once I attached the small wedge shaped
piece at the bow the flat panels were transformed
into the three dimensional of a kayak. Well, I just
had to go get all my neighbors and anyone else I could
find to come check it out. This could be perhaps part
of the reason why at this point I made a bit of a
blunder.
It is at this point of the construction that I should
have been attaching the bottom panel. In my excitement
to see even more of the shape I inadvertently attached
the bilge panels; then the bottom panel. Well things
didn’t seem to look quite the way they were
supposed to; of this I was quite sure. I sat down
to pour over the plans; checked and rechecked all
the measurements; and rechecked the plans again. Sometimes
things are right in your face and so obvious; but
you just can’t see it. Eventually I realized
what I had done. Thank goodness experience has taught
me not to jump to conclusions and not to haul out
the Skill saw and planer and make things fit. Once
I disassembled and reassembled the hull in the proper
sequence the pieces fit together wonderfully. The
side panels were now wiring up almost dead on to the
bottom panels whereas before they were off maybe 3/8th
of an inch off. During disassembly I did notice that
one of the bulkheads was also forward of a line when
it should have been aft of it.
 |
Once I
disassembled and reassembled the hull
in the proper sequence the pieces fit
together wonderfully.
|
|
Now were into uncharted waters here with this stitch
and glue stuff and Yes I was a bit apprehensive. Jim
recommends taping all the outside seams with duct
tape to keep any putty/filler from running through
and also to provide a nice smooth surface on the outside
once the putty/filler dries. This being done I flipped
the hull right side up and began filling all the seams
where the plywood panels meet and also applying a
small rounded over bead anywhere the panels meet a
bulkheads. This actually only took me about an hour
to do the whole boat. Being the first time it wasn’t
perfect and I did have to go back and do a little
sanding before applying glass tape. Nothing too serious
though. Before applying the tape the hull has to be
turned again and the wires used to hold the panels
removed; flipped upside down again and finish puttying
any places that the wire interfered. From here it
is all down hill. Apply glass tape; wet it out working
your way around the inside until your back where you
start; and then proceeding with a slightly thickened
resin to give a nice smooth ~ no need to sand ~ finish.
The outside was done the same way after a bit more
puttying and fairing of the seams.
| Now were into
uncharted waters here with this stitch and
glue stuff and Yes I was a bit apprehensive. |
|
|
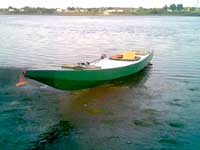
At this point I had decided to go with the Toto as
per the plans and leave the center open with a small
forward deck and aft of the cockpit decked for buoyancy.
I cut no access hatches at all. I applied two coats
of primer to the entire boat inside and out followed
by three coats of marine alkyd enamel outside and
two coats inside. That was it and we were off to the
water. My first couple of paddles were just as I expected.
It was very peaceful and relaxing. The boat handled
beautifully and was very easy to paddle. I had picked
up a two piece aluminum kayak paddle from a local
sports store. The third time out was a bit different.
It was getting late in the season now for this part
of the world being mid October. I took off to my favorite
lake around noon to nice sunny skies; a few clouds
and mediocre winds. Paddling across the west side
of the lake I was protected from the wind by the shore;
making it quite a warm day. As I skirted the north
part of the lake and moved away from the western shore
I noticed the wind was up a bit. Well by the time
I made it too the eastern shore the wind was definitely
up as well and the waves. While trying to head back
across the north side the bow kept getting pushed
off by the wind followed by the waves almost turning
me sideways. All and all I did make it back to the
launch site and the car but not before being swamped
twice. At this point I decided to deck her over for
the next season.
 |
All and
all I did make it back to the launch site
and the car but not before being swamped
twice.
|
|
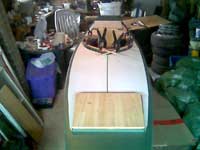
To deck over a Toto we are getting away from the
plans; however it is pretty straight forward. I started
by removing the gunwales from the outside of the hull
and moving them inside to support the decking and
narrow the hull by 1 ½”. I made a temporary
frame for what would be the forward point of the cockpit
giving it just enough rise to shed water from the
decks. From the center point I bent two strips of
thin wood to what would become the rear of the cockpit.
This gave me a full scale representation from which
to transfer to the plywood deck. The 4mm Okoume had
to be ripped down the middle to a point approximately
16” forward of the cockpit in order for it to
agree to do the compound curves required. Once everything
was marked and cut out, I clamped, glued and screwed
it all home. Wiring the 16” seam closed again
to the proper curve I began with the process of putty
and glassing to make everything one unit. I used small
pieces of ¾ by ¾ to frame the underside
of the deck around the cockpit; then overlaying this
with a strip of 4mm by 2” Okoume to form the
cockpit coaming. The top of the coaming is finished
with a strip of ½” by 5/8” cedar
to give a hold for a spray skirt. The hatches were
then cut and framed with 1/2” by ¾”
cedar with a bead of putty around the perimeter. I
made the hatch covers by edge gluing strips of cedar
together with waterproof glue, sanding and clear finishing.
Originally she was painted all red but armed with
some new paint and two rolls of masking tape I set
about giving her a new look.
| The top of
the coaming is finished with a strip of
½” by 5/8” cedar to give
a hold for a spray skirt. |
|
|
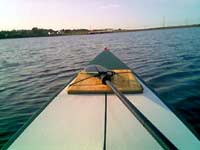
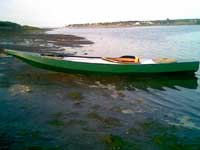
I have had her out many times this year in conditions
from virtually no wind to 20 – 25 knot winds
with no ill effects. I plan my trips based on the
weather. If its light winds I head for the bay ~ if
it’s going to blow I stick to the rivers where
I can work with the shoreline and avoid some of the
wind. I have never swamped her again and I have never
tipped her. She is still light enough that I take
her off the car myself with one arm and sometimes
carry her for 300 – 400 yards to the water.
She paddles very easy and is nice and dry now even
in a chop out on the bay. Now that all the kinks are
worked out; I plan to build another with a friend
so I have someone to paddle with.
 |
Now that
all the kinks are worked out; I plan to
build another with a friend so I have
someone to paddle with.
|
|

More Toto Articles:
|