|
A couple years back I was given a fiberglass Cape
Dory 10’ sailing dinghy dating from the 1970’s.
As so often happens with boats of such age, too many
winter’s snows and seeping fresh water had tenderized
the once sound mahogany thwarts and fittings into
compost. Thus the winter of 2005/2006 was spent taking
her to bare hull and re-clothing her with a lavish
assortment of hardwoods, traditional bedding compounds
and marine oils.
Following post-modernization sea trials I thought
it would be nice to replace the original and somewhat
threadbare nylon sail with a new one of Dacron. I
was also thinking of replacing the sliding Gunter
with a lug rig—so maybe two sails? After picking
my jaw from the floor where it had dropped with resounding
thud upon learning the quote from a local sail maker,
I sought and received advice from sailing friends
and web aficionados alike concerning new cloth and
various companies specializing in supplying sail making
items for those inclined to roll their own.
 |
The Kitchen/Loft |
This idea intrigued me but I found the cost of modern
sail fabrics prohibitive for a first attempt. So much
so, in fact, that I was not surprised to learn of
small boat sails being self-made of blue poly-tarp
or TYVEK house covering—indeed these materials
are even mentioned by Emiliano Marino in his book,
Sailmaker's Apprentice.
Being a bit too much of a traditionalist, neither
of these materials, though inexpensive, appealed to
me. Now cotton, on the other hand...
Until the very recent advent of synthetics cotton
was a staple sail fabric. In his web site The
Times and Tools of A.P. Lord, From 1868 to 1957...
The Working Life of a Maine Coast Sailmaker,
Grant Gambell shows us a Wamsutta Mills sailcloth
catalogue; no fewer than 17 weights of Egyptian yacht
duck, 13 weights of J-H-B American yacht duck and
5 varieties of Wamsutta Light Sail Cloth are indicated.
Additionally, Mr. Gambell points out that Lord also
specified “boat drill”, a cheap domestic
cotton sailcloth for utility applications, and so
at least 36 choices.
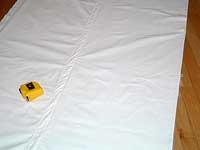 |
Measure twice,
cut once - just like wood! |
The problem of course is that synthetics are now
the staple and the vast New England mills but empty
derelicts; cotton, once king, no longer.
Still, the idea held appeal, but, what weave, weight,
source, how?
Robert Leslie in his book The
Sea Boat, 1892, Chapman and Hall,
Ld, London (D. N. Goodchild 2003 reprint) offers sound
instruction with regard to sail making and suggests,
for fair weather sails, stout unbleached calico of
27” width or “if cost be no object”,
cotton duck. For smaller storm sails he recommends
strong linen boat canvas of 18” width. He does
not; however, indicate weight of fabric.
Robert Kipping does. In Sails
and Sailmaking, 1936 (19th impression)
The Technical Press, Ltd., London (D. N. Goodchild
2001 reprint) Chapter II, On Boat Sails, Kipping specifies
number 7 canvas for the lugsails of ship’s boats.
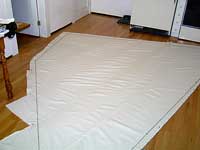 |
Laying out the final shape. |
Here a couple of observations, (1) the term “calico”
can and does cover a variety of cotton fabric types.
Whereas here in the US calico is most often thought
of as cloth used in shirts and dresses, in Australia
(this according to an Australian co-worker) the term
also includes canvas type weaves. Exactly what type
fabric Leslie was referring to in 19th Century England,
is anyone’s guess. (2) Number 7 canvas is a
“double fill” canvas that weights approximately
20 oz. per square yard—much too heavy for a
10’ dinghy—and in all fairness to Kipping,
the smallest of the ship’s boat he addresses
is 18’
A considerable amount of study of re-printed and
original boat plans of the period and time spent in
correspondence with those involved in other forms
of period endeavors—Civil War period tent reproductions
for one, supported the idea of drill fabric. For tents
8-ounce drill was the fabric of choice. 7.5 ounce
drill was also spec’d by Marino in Sailmaker's
Apprentice for “quick and
dirty” cotton small boat sails (4 ounce was
specified for ‘traditionally assembled”
sails). 4 ounce (twill) was also specified by W. F.
Crosby in his plans for the 10’ PEANUT,
The Rudder from Goodchild.
Four-ounce drill, then, became my first choice; however,
while it is a popular fabric in the manufacture of
ball caps, finding a retail source for small amounts
proved difficult—and in the end the best arrangement
I could find would have involved the purchase a 90
yard surplus from a manufacturing company. 7.5 ounce
drill was more readily available in retail amounts,
though still somewhat elusive, but ultimately I found
a mail-order fabric store (Field’s
Fabrics) that offered it for $2.97 a
yard (40” width) so I ordered 13 yards to begin
the process. (Subsequently, I have found a source
of 6 oz drill--contact Gabriela Michalowitz of fabricsource@gmail.com).
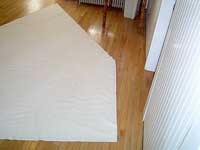 |
Ready for hemming
& rope work. |
As with any new endeavor, the process of acquiring
knowledge and skill is iterative. Book searches concerning
“sail making” return various results,
investigations into each publication, influence direction
and choices. Ultimately the three previously mentioned
books formed the basis of my study while four web-sites/web
based articles proved especially helpful: the afore
mentioned Gambell
site; The
Site of Traditional Sailmaking; Historic
Balclutha Sails & Today's Options,
James Brink, San Francisco Maritime National Park
Association; and Archaeological
Sewing, Heather Jones.
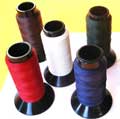
Over the years I had assembled a fair collection
of sail tools—a wonderful seaming palm made
in 1954, an assemblage of needles,
twine, bees wax, thread,
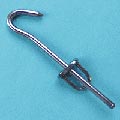
fids etc. To this I added other
tools suggested by Marino; a roping
palm, a 12” wooden fid, “scorpion-tailed”
sailmakers
hook, and one spool each of 3 ply, 5
ply and 7 ply polyester twine (ultimately I needed
a second spool of 3 ply and did not need the 7). I
also acquired pine tar, tallow, tarred marline, a
few needles in sizes I did not yet have (#16 needles
will work with both the 3 and 5 ply twine and one
of these is all that is required for seaming and roping
although a heavier needle, #13, will be wanted for
leathering.), good quality 1/4” and 1/2”
hole-punches and a handful of #4 spur grommets with
setting dies. Note: the hole-punches furnished with
plain brass grommets intended for use with poly-tarps
are NOT suitable for cutting through several layers
of cloth fabric.
For my somewhat rusty marlinspike seamanship skills
I refreshed my splices: eye, back, long, and short
in three-strand, learned a new splice-- “Sailmaker’s”
and learned to make up rope grommets and rings of
marline.
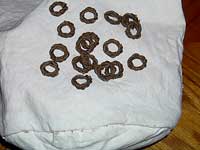 |
Marline Grommets. |
Marino’s very first chapter is called the “Ditty
Bag Apprenticeship” and it is well worth the
time to complete for not only does it teach hand stitch
construction skills but the effort to assemble the
specified materials will force you to find sources—sources
of things no longer carried in neighborhood boat stores
(nor for that matter by even the larger wholesalers).
Welcome to retro-tech!
Speaking of retro tech, this is a good time to talk
about how to make tallow and tar hemp. Tallow derives
from beef fat and is rendered through the process
of melting the fat in water, separating out any meat
bits (protein), letting the fat solidify and repeating
the process several times until pure fat remains.
Completed tallow will have a waxy firm consistency
and is a good lubricant for needles when sewing. I
also use it mixed with pine tar and bee’s wax
when tarring hemp rope.
You can obtain fat from the butcher or treat yourself
to a couple prime rib dinners, trim the leftovers
for the dog and boil down the fat. The small amounts
of tallow required make this option a favorite of
mine.
 |
Time and patience |
Tarred hemp is one of two types of natural fiber
cordage suggested by Marino for use as boltrope when
making cotton sails. Manila is the other. Although
tarred hemp marline is commercially available, tarred
hemp rope is not (or at least not from any sources
I could discover). D&M
CORDAGE (Ropesmith@aol.com)
does list it but in actuality they do not offer real
tarred hemp. They do offer a good quality hemp line
and provide instructions for “tarring”
with spray silicone. Mike Speranza of D&M Cordage
makes a good argument against traditional hot tarring
around the flash point of the tar and the fire risk
associated with the traditional method. I ultimately
used a mixture of tallow, bees wax and pine tar (about
the consistency of bar Ivory soap at room temperature
and the color of toffee), heated the hemp rope in
an oven set to 200 degrees and worked the cold tar
mix into the rope by hand—alternating heating
and working the mix until the rope absorbed it.
Manila is not adversely affected by the salt-water
environment like hemp and does not require tarring.
Properties that suggest it would be the better choice
and if it were not for the very inconsistent lay-up
of the spool I purchased I would agree. If you have
a source of Manila locally and can inspect the rope
prior to purchase I suggest you consider it as the
hemp tarring process is time consuming and a bit messy.
In my case I ordered on-line from what appeared to
be a reasonable source. The result unfortunately was
a 600’ spool of 1/4” manila of very uneven
diameter, poor strand splices and poor appearance—although,
ultimately, I did put it to use as running rigging.
The hemp I obtained from D&M conversely was very
consistent in diameter, splices were well spaced and
appearance excellent.
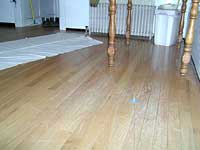
Sail design. In my research I have collected many
sailing dinghy plans and ultimately settled on the
sail shown in the profile drawing of a 10’ double
ender drawn in 1919. Using the spar dimensions given
on the plans and knowing the overall length of the
boat, I scaled the sail from the profile and sketched
it on quad rule paper. Then with push pins, protractor,
tape measure and twine I laid it out full scale on
my kitchen/sail loft floor.
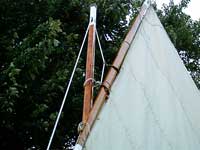 |
Note Hemp Bolt
Rope and Marline Grommets — temporary
halyard |
I will leave describing the fineries of the actual
design process to Marino; he dedicates a great portion
of his book to the subject, but will make some general
comments concerning my choices and experiences. As
previously mentioned I opted for 7.5 oz cotton drill
in 40” width. Marino’s “quick and
dirty” adjective refers to using full width
fabric which to my mind results in a sail looking
more like a re-cut king sized bed sheet than a traditional
sail--I should point out that some fabrics are available
up to 102” in width and bed sheet is the only
description for such a thing I can think of.
I really wanted a traditionally finished sail, so
I applied Leslie’s thoughts concerning cloth
widths and cut the fabric in half lengthwise, giving
me 20” panels from which to work.
While reading up on laying out the cloths for marking
seam allowance, there was one term which crept up
in several sources that I found most confusing—broad
seaming.
 |
Reefing Point
Grommets |
Broad seaming is a technique used to induce curve
into the finished sail by means of increasing the
overlap of the cloths as the seam approaches the edge
of the sail. My confusion derived from differences
in how the mechanics were described in my source materials
and also in how one compensated for the additional
cloth used. The key to unraveling the mystery lies
in the intended sail’s design. Older style traditional
sails are laid out with the cloths running parallel
to the leech (more or less perpendicular to the foot)
whereas modern sails are laid out just the opposite.
In modern sails, broad seams if not compensated, would
reduce the overall sail height, perhaps violating
a class rule. In traditional sails the loss, amounting
to a few inches along the foot, is not worried about.
The actual mechanics of making the broad seam are
quite simple once your normal seam widths are decided.
In my sail I opted for 1-1/8” seam widths with
½” fold under on each edge which provided
sufficient width and three layers of cloth for the
seams to accept reef points. The orientation of the
cloth edges in the normal seam are parallel to each
other. The broad seam is created by changing the orientation
of the upper panel’s edge away from parallel
to form to an obtuse angle as viewed along the seam
from the middle of the sail toward the foot and is
accomplished by leading the upper panel’s edge
further into the lower panel. This “adds”
cloth to the width of the seam, hence “broad”
seam. In common practice a fixed seam width is often
maintained for appearances sake. This is achieved
by cutting the lower cloth’s edge at the desired
angle, thus removing the extra overlapped bit of cloth,
then constructing the seam as usual.
 |
The whole enchilada |
In laying out the seams I found it very beneficial
to iron the folds flat first. I did this on the floor
using a small ironing board laid under the cloths
edge and moved along the seam as I progressed. This
helps considerably by flattening and stiffening the
cloth edge before final layout and pinning, as the
cloths will lie flat against each other. Once satisfied
with the layout I pinned the seam in two directions,
perpendicular to the seam edge and parallel. The pins
placed parallel keep the cloths from moving apart
along the seam and the pins placed perpendicularly
keep the cloths from sliding lengthwise. I pinned
about every 6” alternating perpendicular and
parallel pinning. Once pinned, I carefully folded/rolled
the sail and moved to the sewing area.
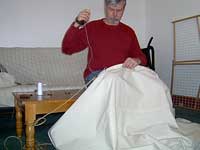
I intended to hand stitch the sail and found Grant
Gambell’s A.P.
Lord Website a real boon of information.
On his site are pictures of sailmaker’s benches
with sailmakers using them. While I have yet to build
my own bench to the style depicted, the practicality
and utility of this tool is remarkable. For this sail
I employed an old coffee table, which worked well
enough, and as my experience grew and techniques evolved
I developed a list of traits my bench would require.
The sewing area needs just a few things, (1) good
lighting, (2) a clean floor since most of the sail
will lay there, (3) a bench/coffee table, (4) a place
to tie off your sail hook (closet door knob or table
leg worked for me—depending on the angle required
on the hook), (5) small tray table within easy reach
on which to keep extra thread, needles, and wax (if
you build a proper sailmaker’s bench all these
things will have their proper place and the tray may
be omitted). One other very important item is required,
MUSIC. Sail making is a most Zen endeavor and will
give you ample opportunity to explore your inner light,
for those times when your light becomes tired, music
is the salve.
 |
Plum Crazy |
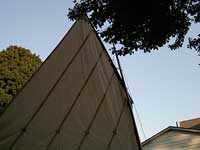
Sewing took place on long dark New England winter’s
evenings. But progress does come slowly as the pictures
show. One word in closing, based on experience with
the final product, the 7.5-8 oz cloth with roping,
leathered corners and pressed in ½” metal
corner grommets turned out a sail much too heavy for
the little 10’ Cape Dory. For such a boat I
would try very hard to find a 4oz cloth. The 6oz recently
found is slated for a small 37 square foot sprit-s’l
(half the size of this sail) for a 10’ skiff
and will have far less weighty hardware. 6 oz will
also be used for a 12’ gaff rigged 1800’s
“sea boat” of William Atkin design.
Sail finish: The sail is finished natural being well
sprayed with water/stain proofing, which only darkened
it slightly but added no color. Pete Culler’s
fond cuprinol will produce a greenish tinged sail.
By the way, aboard a newly retrofitted 1954 Blue
Jay hull the 76 square foot lug sail performs well
in airs above 8 knots.
Bob Booth

|