In several of my articles about designing and building small boats, I mention that I have a 12ft or 14ft version in the works for one of the boats that I am actually writing about in that story. When you stop to think about it, I would imagine that any hull could be scaled up or down if someone was inclined to go about the task, and had a need for a boat of that particular size. In the cover letter to my 14 foot Nuthatch, I state that the "Nuthatch hull" could be stretched out to the mid twenty's. It could probably be lofted up to the size of a container ship, but I don't think I have ever seen a thousand foot long ship that could be described as a Pram, or whether it would even be feasible.
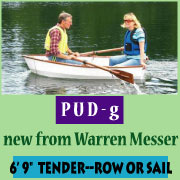
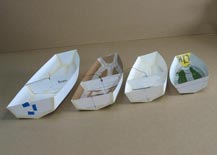
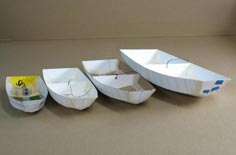
Back in the real world of small boat design, things are easier to deal with in the scale of 6 to 20 feet. As I said earlier, I have finished models of hulls from the same family group, in more than one length. The most numerous is the Nuthatch Pram family, with completed models from 8-14ft, and finished real world boats at 8 and 10 feet. The 12ft version will go into the construction phase this fall or winter, depending on requests from readers such as yourself. When I finish up the double ended O&P Pod, I will most likely start on the 12ft Granville Bay. I don't know if I will have that boat done by the time the Port Townsend Wooden Boat Festival comes around or not. This winter I will start the design on the 16ft Granville Bay as a mostly sailing boat, but will need a bigger shop to build it in, so it may be a while before I get around to building it or any other design in the 14ft plus range.
 |
 |
The 8ft Nuthatch Pram was my first stab at boat design, and I still like to take the prototype down to my local lake and mess around in it sailing or rowing it. The 10ft version is a blast to sail, has more room for gear and people than the 8ft hull. The 12ft hull will have even more capacity to carry things, and when I set the 14ft hull next to it, I start thinking of sail camping, and the Texas 200.
With the Nuthatch family I tried to match the visual appearance of one hull to the next. I didn't just add a proportional number to a measurement on the smaller hull to get the bigger one. There is a bit of variance in the widths and heights of all the panel members. Once I got a model that looked right to me visually and had the right amount of freeboard for safety and oarlock height, the rest of the time was spent getting the panel corners to line up and fit. Also to make sure that the panels could be laid out on standard sheets of plywood. But as the lengths and widths of the hulls increase, the number of sheets and the thickness's of the plywood also increased, as well as the cost. So does the cost of the extra epoxy, fiberglass tape and cloth, number of stainless screws, amount of paint and stain, and so on to a point of diminishing returns. (See the next to last paragraph)
I believe the trend to smaller family boats will be a result of the increased price of gas to haul a large boat to a nearby ramp to launch it. It may be cheaper to stack two or three 8-10ft, 80-90 pound boats on a small trailer (then carried to the water's edge) and let each family member be the captain of their own vessel. In my past days of sea kayaking, I saw that couples tended to get along better in singles rather than doubles's. Marriages seemed to last longer when they could paddle their separate ways, and it was a lot friendlier around the camp fire at night for the rest of us. Remember, there is more room in an 8ft Pram than a 16ft sea kayak for camping gear.
 |
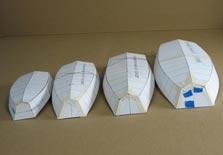 |
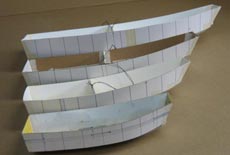
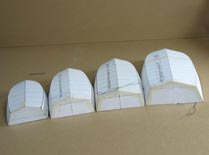
Time to get back to what I started out writing about. I have found that it is much easier to design hulls in the 14-16ft range. At that length, you have enough size to work on the overall shape of the hull. By that I mean that the curves can be stretched out more, and the depths of the arcs increased. With an 8 foot hull like the first Nuthatch Pram, there wasn't much I could do to the shearline to add some wow. You either make the ends too high, or the freeboard at the beam too low. To average out the difference, you wind up with a hull that is fairly flat along the rails. With the 10ft and the 12ft hulls, I could add more curve to the side panels my adding curve to the top and bottom edges. On the 8ft and 14ft foot hulls, the top and bottom edges of the side panels are parallel straight lines to help in the layout. On the 10ft and 12ft hulls the middle of the panels sag a bit. This gave me two things. More curve to the top edge for looks, and more curve on the bottom edge to push the outer edges of the two bottom panels down to increase the amount of underwater volume, and make the two hulls set higher in the water than they would if I had keep the lines straight.
But looking daily at the 14ft model hanging in my kitchen on a string after I have had a few hundred breakfasts, it too may take on a sag in the side panels. I would only have to make the layout panels a couple of inches wider, and I could add some nice curve to the lines. I would just need a longer lofting batten, and not have to worry so much about getting the scarffed edges of the plywood to line up. I could be off an inch and still be able to cut out curved panels.
 |
 |
As the hulls get bigger, I like to reverse engineer a design to determine the size of outboard motor that the Coast Guard says can be used on hulls of a certain transom width and length. After doing a few what-ifs of transom widths to the overall length of the hull that I am trying to design to, I can come up with a maximum horsepower rating. With most of my hulls, a little 2 hp Honda can get you where you want to go, but a couple of them can take up to a 5hp outboard. When I did the calculations for the 14ft hull; I was surprised when the max horsepower jumped up to 60. After checking the web for outboard motor sizes, and using the transom depth I wanted for this hull to be really seaworthy, I found that a Honda X50 (the X has a 25" shaft length) would be my favorite for the stand up center console Nuthatch 14.
At some point I need to work up some kind of chart for weights vs. volumes in boat hulls, to give me a better idea of what I am trying to shoot for as I scale up a design. I have one now that I use to help me get what I consider the best visual effect on beam vs. length. The "look" of a boat has more to do with the beam to length to depth ratio, than what the width of the transom may be. I have three 14ft skiff models that have completely different sterns on them. One is a double ender, one has a very narrow "V" transom tucked up to give it a wineglass look, and the last one is much wider to give it more weight carrying capacity, but they all look right for their type's; because the beam width is correct for their length. All three are rowing and sailing hulls, so I have to keep the "center of hull depth" to a minimum for rowing. Too deep a hull (top of the rails to the keel) and you start needing longer and longer oars to keep from having too steep of an oar shaft angle. Hands up by your head, instead of your chest.
On a pure sailing hull, you can add some depth to the design to give yourself some cabin space up forward, or a back rest when using fore and aft seats along the sides back aft. It also gives you a more "upright" seating position, which helps on those long days on the water. Aka, the Texas 200. You don't want to be setting on your tail bone, on the hard bottom of the boat for 4-5 days while beating to windward. I'm trying to figure out now, how to add some low "sailing seats" to the sides of my O&P Pod so I'm not setting in the bottom with the sand and water; and maybe add some snaps, or straps to hold in a couple of the small ThermoRest® stadium seating pads.
One thing you have to remember when you get serious about expanding things, is that the longer, wider, and deeper the hull becomes; it also gets heavier (harder to move around in your shop), and costlier to build (harder to convince the wife you need it). Bigger shop, more wood, epoxy, glass tape and cloth, and bigger fittings for everything. All of which adds to the time and expense it takes to build your dream boat. Remember that a hull floats on it's bottom, and as such, think seriously about any added construction above the waterline that the designer doesn't show in the plans, or approve of when contacted. When considering a boat to build, look at the design from the ends if you can; models of the hull help if you can make them. Does it look more like a circle, or an oval on it's side at the beam? Which do you want to be in when the wind and waves pick up?
The one thing home builders need to consider when dreaming about building their own hull. is at some point, and I would imagine around 18-20ft, and maybe less; it would be more economical to buy a good used fiberglass boat, than to take the time to build one from wood. There are lots of them sitting in back yards, and in storage areas around the country, getting greener with mold by the year; and they don't become firewood, or rot away to mulch with brass and stainless bits to dull your lawnmower blade when forgotten and neglected.
I hope I have made some sense about boat designs and scaling them up with this story. I seem to be spending more of my time putting together videos for YouTube, than working on the build plans and text instructions for the O&P Pod. My YouTube page is www.youtube.com/redbarnboats and the O&P Pod's flickr.com site is www.flickr.com/onp-pod bookmark these links, as I am always adding to them.
Thanks again
Warren Messer
Red Barn Boats. |