A few days ago I came across a blog in which someone thought about building a tall ship as a
vacation vessel to sail up and down the coast where he lives. The other cutthroats on his blog
pretty much told him he’d lost his marbles.
Well, I’m a boat dreamer, so I didn’t try to keelhaul him for his dream. If he’d asked me what
I thought about building a brigantine that he could own and sail, this is what I’d say.
First, I’d buy a little model ship of a
brigantine which has enough parts in it
to give you an idea of all that you’ll
have to be built or buy. Masts on
square riggers are built in two parts
with trestle trees, platforms, turnbuckles,
halyards, parrels, stoppers, chain
plates and miles of rope and whipping.
Then a brigantine would have two or
three sails on the foremast, a gaff
mainsail and topsail. And it would
have two or three headsails with bowsprit,
lines, chains, winches, and a huge anchor. A model would give you an idea of how much
metal has to be fabricated, how many lines, the deck, the houses, the rudder assembly, and the
hull with frames, inner and outer keel, deadwood, horn timbers, and a laminated bow.
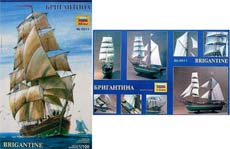 |
1/100 Model English Brigantine Sailing Ship from www.megahobby.com - $80 |
Building a model is fun, and in this case it would tell you what you’ll have to plan for, prepare
for, and accomplish.
Then I’d build a 10 foot version of your brigantine, to give you an idea of the sequence of putting
together a ship. A ten footer could double as a dingy. By now, you’ve realized you don’t
want to go through all of this, or you’ve realized you’d rather have a boatyard do the work for
you, or you’re thrilled by the challenge of it all. There is nothing so beautiful as square sails
pulling on a reach, but there is no rig with so much to do, so much to maintain, so much to
know.
In any event, here’s what I would do in building a 10 foot replica of your brigantine. First,
since this boat is only 10 feet long, I’d have only one sail on the foremast, two on the mainmast.
The foremast with the square sail is going to drive the boat powerfully, so the hull needs some
width at the mast. It needs to be stable. And it needs to give you the opportunity to make thole
pins, a gaff, square yards, three sets of lines for each sail, and a bowsprit for the head sails.
| So I would get the Dynamite Payson book, Build the New Instant Boats. In that book are reduced
plans for Pointy Skiff.
This will be the basis for our
Itty Bitty Brig. You can take
the perfect shape of the bottom
and alter the sides. |
 |
Then you’ll be able to design
our brig and its sail rig as we
go. This will give you a good
idea of what a tall ship entails.
 |
Let’s take the Pointy Skiff as a framework for a brigantine. The skiff as originally drawn has
12 degrees of flare to the topsides. So let’s give it three panels instead of one. This is a classy
look and it’s also useful.. It will create the angle for the halyards to be secured inside the top
plank and the chines in the joint can be used as supports
for seats. |
I’d suggest making the frames with a lap at 10 inches
up from the bottom chine, then the second lap another
ten inches up, and the sheer eight inches up from the
second lap. Cut and fit a batten into the frames at the
bow, stern, and midframe. Then push the batten until
you love how it curves. Put two battens on, curve
them with spacers, then glue them as they sit in their
notches. You can leave the spacers in for stiffness.
Then lay an 11foot long by 36 inch wide sheet of plywood
on the outside of the frames, from the bottom
chine up. The plywood will be higher than the frame,
so you get inside to draw the lines along the bottom
chine and the first batten up. You’ll be drawing on the
top of the first chine, although I don’t show the chine
in the drawing on the right. Cut one panel out at a
time. When you repeat the process for the second
strake, you’ll be using less plywood. It will be easier
to hold and bend, with less cut off. This way you have
beautifully curved lines. The laps can be nailed or
glued onto the battens.
| One advantage of this method is with the battens on
the inside, you have made enough of a shelf for supports.
I would recommend not lapstrake, but seam
batten construction. It has no advantage in so small a
boat but it resembles the carvel planking of your full
sized brig. Make sure to bevel the lower plank horizontal.
You can do this by hand and eye. Paint it all
around, including the edge and put it on. The middle
plank, being vertical, will fit parallel with the beveled
edge of the lower plank, or garboard. |
 |
 |
You can also sand a tiny angle into the joint, in the
carvel style and fill it with marine paint or epoxy, or
even a tiny string to duplicate the traditional carvel
method. |
Now for the interior. Study plans for large ships usually
are vague about interiors since the client will have
to decide what he or she needs and wants. The Coast
Guard has certain mandatory guidelines such as communication
equipment, a head, a motor and shaft, etc.
Other layouts such as how many bunks, shelves, tables,
the galley, etc are then chosen later.
Since this brigantine is going cruising, the interior will be important. The way cruisers are
framed is with planking on the outside of the frames and on the inside. The inside planking
is usually thicker than the outside, and it’s called the ‘ceiling.’ When the hull and deck
beams are solidly in, the floor timbers go in upon the inner keel. Then the ceiling planks go
on. And then long battens called bilge clamps go on from stem to nearly the stern. Upon
these the bunks, galley, and other interior sections sit and are fastened. It usually looks like
this in the top illustration. I have not shown much in
the way of details for the sake of clarity.
Now for our ten footer, this method would make the
boat too heavy, so we will simplify it
while keeping the same basic method of
cleats on the planks. In the case of a flatbottomed
boat like ours one cleat goes on
the floor, one goes on the topside, as I’ve
shown below.
The way I’d do this is glue the seat facing
to the inside cleat at a perfect right angle.
I’d use clamps. Then I’d nail or
screw through the seat facing clean from
the inside through the boat bottom into
the bottom rub strip. I prefer twist nails,
but screws, nails, or glue would do here.
Then I’d add the topside cleat, and the
seat from the topside to the seat facing.
On the ten footer I think I’d add a hinge
so I could store stuff inside. |
 |
Now for the sail detail. Square sails
have three lines for each lower corner.
The braces move the lower yard when the
ship tacks. The sheets adjust the sails.
And the halyards raise and lower the
yards with sails furled on them. While a
ten footer doesn’t need all of this tackle,
it’s good to learn to handle the lines here.
The brace moves the yard when you
tack. The reason to have a sheet as well
as a brace is that square sails are powerful.
You’ll spend more time letting the
sheet out to keep from being overpowered
by the wind than you will drawing the
sheet in. Square sails are cut to let the
wind off in order to control the trim of the
ship. This is great fun. If you get your
friends to handle the sheets, you get to
yell at them. But not your wife. |
Now as for the sails, this is how I would design them. The square sails have vertical edges
called leeches. In my design the leeches are not perfectly vertical so that they can be controlled
easier. They won’t fill as much in strong winds and heel the boat.
I’ve shown four lines for securing the square sails. The black lines leading from the square
sail spars to the mainmast is how tall ships are rigged. In a ten footer, running the lines aft to
the cockpit would make them easier to handle.
The rudder will have to be fairly large due to the pressure sails high up on the masts. exert. Also
I would not use a leeboard with this rig but a daggerboard. A centerboard trunk would take up
too much space. An angled daggerboard 3 1/2 feet below the waterline would enable you to
stay with the flat bottom and yet have the grip you’re going to need. I wouldn’t exceed 100
square feet of sail in all, and probably go for around 75 square feet.
One final detail, the mast. In full sized brigs, the mast is in two parts to strengthen the upper
part of the mast. With our ten footer, the mast will have to be taken down and put up. This is
no quick operation as it would be with a sloop.
I have kept the masts pretty low so they can be made in one piece. With a foremast of 8 feet
above the sheer and a mainmast of ten feet above the sheer, the masts can be carried on a cartop
or strapped to the boat when the boat goes on a trailer. Here is the two part assembly which is
glued together.
|
You can see that the masts are closer together than
it appears in this illustration. I put them this way to
make it look clearer. Now for the ratlines. They
certainly aren’t necessary on a ten footer but you’ll
be needing them on a full sized brigantine. For the
ten footer I’d run nylon rope from the top strake of
the hull up to the trestle, down to the strake, up to
the same trestle and down again to secure them.
They won’t have any role to play as far as strengthening
or stiffening the masts, but they are a pleasure
when you look up. Besides, onlookers think you
know so much, they’ll probably ask you if you knew
Billy Budd, Foretopman (Melville).
You can put a cleat or an eyebolt on the platform to
run the rope through. You can cut two holes in the
platform or use the illustration here on the right. I’d
do it this way to be the least amount of trouble in
getting the masts up. |
Now that’s enough to get you started. By now you
should know if you really want to go through with
this. By now, it is decision time. You can pay a
yard to have a tall ship built, or you can build it
yourself. If a yard does it for you, be realistic as to
how much it will cost. You’ll have to go to the yard
to sail it away and then you’ll have to sail it home.
If you decide to build it yourself, I’d say buy George
Buehler’s book, Buehler's Backyard Boatbuilding,
How to Build A Wooden Boat, by Bud McIntosh and The Complete Rigger's Apprentice by Brian Toss.
***** |