Anyone who has built a boat, especially a sailboat, knows that those final details seem to take forever. So it was as Olivier Chamel and I worked to finish the sailing rig for his Michael Storer-designed Goat Island Skiff. We had already tested the boat with an electric trolling motor and oars (see earlier story) and were pleased. But now we were anxious to test the 105-square foot balanced lug sail -- huge in my experience for a boat this size.
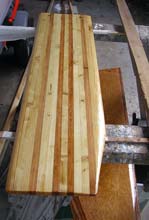
The mast had been built along with the hull, but not the tiller, boom or yard. The yard we cut down from an old boom I had on hand, while the boom was laminated from spruce. The latter required three separate steps, or work sessions. The first was to laminate the wood. The second was tapering it according to Storer's precise instructions, round the edges, wrap fiberglass tape around the ends to prevent splitting, and coat the spar with epoxy. Finally, after the epoxy set, holes have to be drilled in the ends to take the lines that tie the corners of the sail to the spars, or in our case, install the eyestraps that serve the same purpose.
And, of course, the spars also had to be varnished.
We had the centerboard and rudder made, but not shaped. So the rounding and tapering of those finds had to be done, as well as fiberglassing and then varnishing both.
The stripped-glued rudder blade (top) and the ply-laminated rudder (bottom) where shaped, fiberglassed and varnished.
click images to enlarge
The somewhat complex rudder assembly had to be undertaken. The sides of the laminated tiller have to be attached to the rudder cheeks, with bolts through the tiller arm from the inside, and coated with three coats of epoxy, the last with graphite for abrasion resistance. Then the rudder cheeks are glued to a spine or post, and the two sides of the tiller glued to spacers.
The first assembly steps for the rudder, where the tiller is attached to the rudder cheeks. This is actually inside out, in that what will be the inner sides of the cheeks are on the outside in this shot.
The finished tiller and rudder, minus the rudder blade, which is held in place with shock cord.
Finally, the pintles are attached to the rudder and the gudgeons to the hull. On the latter, backing plates of ply must be precut and coated. It's also worthwhile to note that if the stern deck is already glued down, the lower gudgeon cannot be through bolted without cutting an access hole (covered by a deck plate) near the transom. Olivier decided this deck plate (offset to avoid the centerline frame supporting the deck) will actually be handy to reach anything stored under the deck that migrates to the aft end. In fact, the more he uses the boat, the more he likes it.
Cleats were installed for the halyard and downhaul and the running rigging was set up according to Storer's instruction, with the exception of using a 3:1 mainsheet instead of the recommended 2:1. My experience with the slightly larger lug on our Jim Michalak Frolic2 design indicated that a 2:1 sheet could be a handful in a breeze. Finally, we attached the sail to the yard and boom, lashing it at the corners and using a lacing along the foot and head; some designers prefer individual ties but Storer specified a lacing and we did it his way.
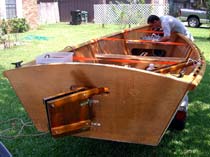
Setting up the boat for the first sail.
Launching day was hot, with a light wind. We were going to Lake Hall in Tallahassee, FL, a small lake surrounded by small hills and trees. That means that light winds tend to be fickle, frequently dying or shifting, or both. (Ironic note: after spending a few hours laminating and carefully tapering and finishing the boom, it broke in a freak accident before the boat ever reached the water. We substituted the boom from our Frolic2, which is the same length and about the same maximum thickness, but not tapered anywhere. It appears to work fine. At this writing, Olivier has finished and installed a new, untapered boom out of a stock 2 x 2.)
Helen and I brought our Michalak Piccup Pram to use as a photo boat Tiffany brought some lunch as she watched the first actual setup of the boat that had been taking shape in her carport for six months.
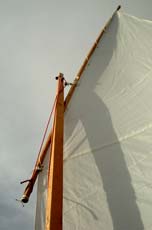
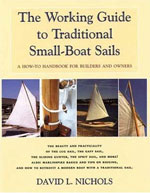
To my surprise, the first setup of the GIS went smoothly. Rather than a parrel to hold the yard to the mast, Storer attaches the halyard to the front of the yard, runs it around the mast on the opposite side of the yard to a block on the yard, and then to a block or deadeye on at the masthead and then down to the deck. You can find an explanation on Storer's website and David Nichols, in his excellent book on traditional sail rigs, also mentions this technique.
A way to hold the balanced lug yard to the mast without using a parrel. It works very well.
I'm dwelling on it at length here because Storer claims that this method cures perhaps the most serious drawback of the balanced lug: the tendency for the aft end of the yard to come down first when lowering the sail, threatening to bean anyone in the stern of the boat. My limited experience from four outings on the GIS is he's right and I'm going to retrofit this method on our Frolic2 for more experimentation.
Pardon the diversion. Anyway, we got the GIS sail up with little trouble, and got the sheet rigged. Just before we took a break for lunch, I raised the sail on the Piccup, figuring Olivier would enjoy the contrast.
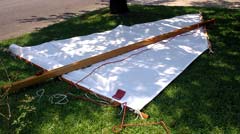
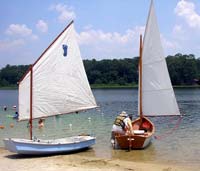
Olivier and I head out for the first sail in his Goat Island Skiff, while Helen’s and my Piccup Pram patiently awaits its turn. Even though the GIS is further away from the camera, you can see how much bigger it’s 105 square foot sail is than the 55 square footer on the Piccup.
Michalak now specifies a 68 square foot sail for the Piccup, but when I ordered my plans a 55 square foot sail was standard, and that's what I use. The GIS sail towered over the Piccup rig, and I noted a sly smile on Olivier's face. After lunch, Olivier and I headed out for the maiden sail of the GIS. The breeze would whisper lightly for a few minutes, and then die away for several, before coming back to tease us again. We were able to establish that the GIS moved well in light airs and handled smartly when the wind was there.
We went back in and Helen and I relaunched in the Piccup, while Olivier and Tiffany embarked in the GIS.
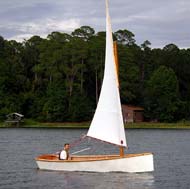
Tiffany and Olivier on the GIS in light but steady breezes. A nice set to the Duckworks sail.
The wind gods obviously approved of the improvement of crew, because the wind commenced to blow steadily. It remained light, but a couple times got into the 10 knot range, sending both boats scooting along.
Olivier reported continued good handling, and the boat looked sharp in the higher puffs when the speed hit around 4. The sail shape looked good.
We got a much better reading the next time Olivier and I took the boat out, again on Lake Hall. Then the wind was blowing at a steady 10, with higher gusts. On the lake, that meant frequent puffs and lulls, mixed in with changes in direction. The wind seldom blew in the same direction for 30 seconds.
Again, the boat rigged quickly and we were on the lake. The fun began with the GIS being a light boat, meaning if we both got on the weather side in light airs, the boat took a noticeable and somewhat uncomfortable windward list. Centering our weight fixed that, but when a gust hit, the boat would quickly heel to leeward and we would scramble for the high rail. Getting to the center of the lake somewhat reduced the disparities of wind velocities, and we got accustomed to the arrival of gusts and changes in wind direction.
The GIS proved to be a quick accelerator and again a nimble craft to steer. We got better at dealing with the changes in velocity and direction on the small lake, scrambling on and off the rail as needed. Even though the wind built to 15 with higher gusts for several minutes, we never came near dumping the boat. According to Olivier's older model GPS, we generally did better than 5 mph, with frequent sustained runs, when the wind picked up, above 6. Our maximum observed was 7.1 (or better than 6 knots), but I suspect we had several bursts that did quite a bit better but which weren't picked up on the older GPS. (Olivier has hit 8.9 when out by himself.)
We beached briefly to tighten the halyard and downhaul as the wind increased, and were rewarded with a better sail shape.
At the end of more than two hours of sailing, we were satisfied with the performance. With the constantly shifting wind, it was difficult to judge the boat's windward performance, but Olivier felt it was good. We were pleased with the performance on a fairly windy day that saw recurrent changes in velocity and direction that we could keep the boat on its feet and moving. The handling again proved quick and sure. Of course there are a few details that still need addressing.
The shock cord that holds the rudder blade in place (see Storer's website for details on his unique way of rigging a kick-up rudder) needs less tension (we were using a store-bought length with hooks on the end and couldn't loosen it). In the voluminous GIS instructions, I couldn't find the detail on where to attach the halyard block in the yard, and so took an educated guess. I thought the sail had a too much twist in the higher winds we had on the second sail, and wondered about moving the block aft on the yard. We definitely missed the recommended tiller extension (now added), which makes it easier for the helmsman to get to the rail and steer from there.
Olivier coming in to pick me up for an evening sail.
On my most recent trip on the GIS, Olivier had been out a few more times, both by himself and with Tiffany. In fact, the previous day, they had been on Lake Hall when a line of rain came through with gusty winds. Olivier estimated the peak gusts, ahead of the rain, at nearly 30 mph. He managed to keep the boat upright, even with the full sail, but had trouble getting to windward. We were heading back out on a windy day (Hurricane Gustave was a day from landing in Louisiana and we were on the outer wind bands, about 300-350 miles from the center).
Winds were around 15 and gusty when we departed and before too long, we had our own rain squall come through with higher winds. Our guess is it got around 30 again in the strongest puffs – enough to stop me from shooting video clips. But with both of us on the weather rail and Olivier luffing the sail as needed, we had no trouble keeping the boat on its feet and going. (It bears mentioning here that I outweigh Tiffany by at least 80 pounds.)
I had moved the block about a foot aft on the yard to see what effect this would have on the twist on the sail. But that caused the boom to ride too low (without much effect on the twist), sometimes it hit the inner gunwale while on starboard tack. (You can see how low the boom was in the last two videos) Olivier had also replaced the rudder shock cord and noticed the blade had kicked partially back and up during the stronger winds. So when the wind eased during the rain, we headed back to shore to make those adjustments. It should also be mentioned that when we rigged the new boom, the sheet was set up at 2:1 instead of the initial 3:1, something we didn’t notice until we were out on the lake. Olivier thought it was fine that way: I thought it was a bit heavy in the higher gusts but still manageable. The 2:1 set up definitely makes it easier to ease the sail in gusts.
We headed back out into a light wind, with the boom set much better. The winds were initially light, sometimes all but calm, but eventually picked back up to 10-15. Another, lighter batch of rain came through and the wind picked up to 20 or so. Good sailing, but unlike earlier, both of us didn’t have to be on the rail to keep the boat upright.
After about two and a half hours, we headed in to put the boat up, satisfied that she’s now set up and ready for more serious sailing, jaunts down at the Gulf Coast and to the barrier islands.
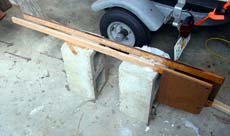
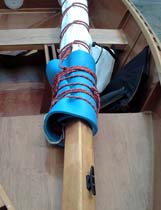
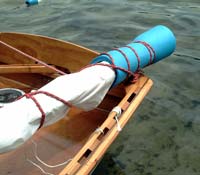
Something worth mentioning here is Olivier’s way of carrying his rolled up sail and spars. A typical solution would be to build removable cross beams in the front and stern of the boat, which would be lashed or clamped in place and to which the spars and secured sail could be tied. Olivier instead took an old piece of closed cell foam and cut it in half. Each piece is long enough to wrap around the bundled spars and sail about one and a half times, one piece at the front and one at the back.
The halyard and sheet are used to lash everything together and tie down the front end to the cleats at the mast step and the aft end to one of the stern cleats. I particularly like how the foam covers the ends of the rolled up sail, the parts hardest to protect from the wind when towing the boat. And of course the foam does an excellent job of protecting the varnish on the spars and the interior. It’s also easier to store than the cross beams. A neat system, which only adds to the ease of using the Goat Island Skiff.
Olivier gets a picture of Tiffany bundled up on a cool November day (about three weeks after their wedding on a warm October day!) on the Goat Island Skiff. That's Helen and me in the background on our Michalak designed Frolic2, Oaracle.
Olivier and I are eagerly planning some joint outings with our boats.