Ah yes,
it is the winter wild
when a young man’s heart
naturally turns to thoughts of. . .
boatbuilding. |
 |
Well, the poet didn't say it just like that, but then I'm not
a young man and don't want to be, either. So I have been thinking
of this winter season and boats. Of course, I've been known to
think of fruit cocktail and boats, so this is not unusual. Except
that the winter is the perfect time to fire up the garage heater,
spread out boat plans, and dream of a spring breeze beneath a
blue sky.
If you want to hum Irving Berlin's Blue Skies
while you're in the garage with the radio loud enough to irritate
your kids, go right ahead.
Those of you Duckmeisters who have read my columns know I love
little boats. So I've been looking at the Michalak Slam
Dink. For all of Jim's interest in practical
boats, he went off on curving rocker and sides here. It's probably
too short for my 240 pounds of dinner muscle, but it's a perfect
kid's boat with a big-boat bow and nice curves everywhere.
However, at 7 1/2 feet waterline it has the trouble most V-bow
boats have when the waterline is shorter than 10 feet. Bending
the chine could launch you through the garage window. I think
I'd want some extra chines around.
But there are several things you can do.
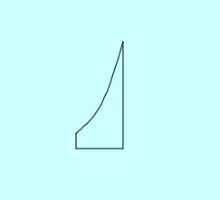
One is to put the chine on the inside and shape it like this:
| You can carve a little more out of the middle
than I have shown here. The top can be thicker, but not much,
since it is where the bend must take place the most. |
 |
If you put the chine on the outside, you can use an ordinary
clothes iron to steam the chine while you bend it a little at
a time. I would not bend it too much at one time, since any bending
of wood beyond its' normal state weakens it. You might take a
tip from the Splendid Splinter, Ted Williams. Use a glass coke
bottle to rub the fibers smooth so they lay down as the chine
cools from the steam.
Now you're thinking of stitch and glue. Well, builders have come
up with different ways to keep the plywood together while the
glue sets. The original method-or the one I saw first- was by
Sam Devlin, wire ties. He may have begun with wires because he
was building boats with more stress on the ties than 8 to 10 footers.
Dynamite Payson then tried to make this idea easier by using
tape. He called it Tack and Tape, as he was temporarily nailing
the panels in place with frames, then taping the panels with strong
tape the full length of the panel. This enabled him to mix the
glue and filler right there in the chine. It also meant he didn't
have to cut wire ties off after the glue set.
Some builders found this method easy but not effective. By that
I mean the tape didn't make the panels as immovable as the wire
did. And the tape didn't work when the angle of the flare was
too great. A boat has to be designed with tape in mind, and this
can be done. Ken Simpson does this with his two and three part
boats.
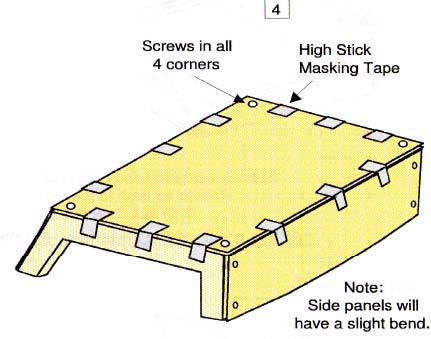
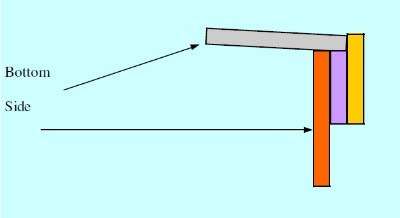
Ken specializes in take-apart boats which perform well. He uses
only slightly curved sides. This enables him to screw the corners
down and tape along the sides, as you see below. He uses Titebond
III to glue the insides first, while the tape holds the panels
in place. Ken recommends using the strongest tape you can find.
This is a page taken from Ken's design called Toter 2. It fits
in the trunk of most any vehicle, designed for paddles, oars,
or small motor. His plans include very good photographs of the
Tape and Glue process.
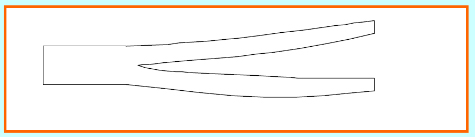
Another solution to the bend of small boats was described by
Harry Bryan in Wooden Boat Magazine a few years ago. His design
is called Daisy, a 11 foot dory skiff. He demonstrated an traditional
technique using the chine.
This is how he cuts it, not all the way along the chine. Glue
is applied to the inside of the cut after it is put in place.
One end will bend longer than the other, so the short end needs
to be long enough.
When I was cleaning out my tools closet, I found a box of clamps
sitting there. I stared at them long enough to imagine another
way of dealing with short boats with a curving chine. The idea
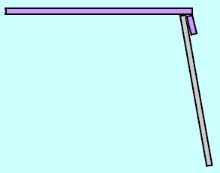
is to cut the sides out of, say, 3/8" plywood. Then cut a
strip one inch wide out of that same 3/8" plywood to lay
around the outside of the topside panel, clamped and glued. With
two edges you have 3/4" of landing width.
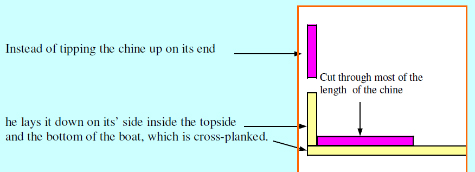
Then take the same clamps and clamp the
bottom to the outside layer of the chine. It's the same
method as the original Instant Boats only with plywood instead
of solid wood chines.
A traditional C clamp will not hold since it’s two
points are usually made movable. However I have about 30
spring clamps from Home Depot which will do the job. |
 |
Now let's say you want to arc the bottom of the boat. This will
improve a small boat's rowing qualities, although it will not
necessarily sail any faster, except in light air. Still it's fun
to have some techniques at your disposal.
What you do is add a third layer of 3/8" strip, but make
it 1/2" taller than the other two chine layers. Then cut
the bottom slightly larger than the sides and press it in from
bow to stern. The bow width will have to be the same as the chine
width, with the bottom width increasing as you cut it aft.
Of course at this width, 9/8" you could also use screws
or nails for the side sections and then press the bottom section
in and glue it.
There is a variation on this plywood strips for
outside chines method, with an arched bottom. It’s easier,
but I’ve never actually done it. What you do is the same
two plywood chines on the outside, but the outside one is lower
than the other, creating the angle of arc.
With these two methods for an arched bottom, taping
the outside with glue would be best. You don’t necessarily
have to bevel the layers of plywood. In fact keeping the straight
edges inside the joint creates a way to trap the glue in place.
Just make sure the edges of the plywood
are sealed well.
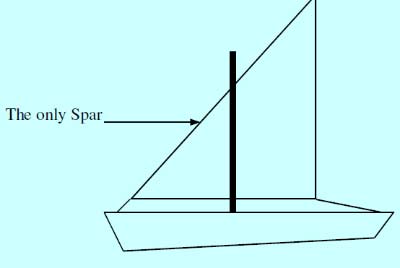
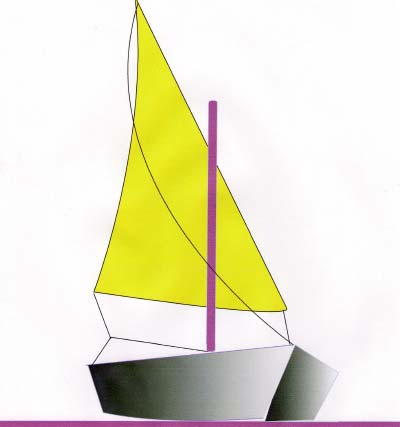
A great rig for a small boat is a lateen rig, along the lines
of the Sunfish and Sailfish. It can be built with a mast and two
spars which fit inside the boat, or a mast and one spar. It can
be built with no boom to go boom all over your head.
One advantage of a loose-footed sail is that the sail can be
cut fairly flat for windward work while it will still have a nice
curve for downwind sailing. The great limitation of a loose-footed
sail is it can only be sheeted in relation to the cut of the sail.
This usually means well aft. You have to deal with a loose-footed
sail, you can't just tie it off on a cleat and kick your feet
up. And it has another limitation, with which we can deal.
Sails pull based on the wind hitting the sail facing the wind,
and the lift of the sail's curve on the other side of the sail.
When the mast is on the windward side of the sail, it interferes
with the wind very little, but when the mast is on the other side
of the sail, that curve of the sail is interrupted. The sail becomes
flatter, which is not so bad, but with the loss of that leeward
curvature, the power of the sail is reduced. You won't lose performance
toward the wind, but on nearly all other points of sail you will.
So what can we do to get the sail on the other side of the mast,
when you tack? Lug sails have different methods, depending on
the size of the sail and the men on board. Since I'll assume you
are the only one in our small boat, we can leave the sail where
it is with little sail area before the mast or we can move the
sail.
In order to move the sail around the mast, the sail must be loose-footed,
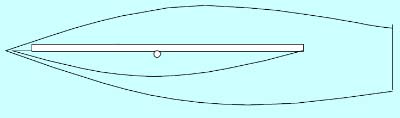
which is good. The first option is to cut an equilateral triangle
sail. Then we hang it right at the midpoint along the top spar.
This actually doesn't look too bad to me.
This shape gives you some sail area higher than
the mast, where the wind is usually stronger than near the deck
and it gives you some sail area forward. In order to tack, this
is what we'll do. We'll have two lines fed through a hook in the
breastplate, one from the tack to the bow and another one from
the peak to the bow, on the windward side of the mast.
When you tack, pull the sheet attached to the peak-which goes
around the windward side of the mast-and the sail will rotate
around the mast behind it for the peak to now become the tack.
In fact, the wind will help the sail go around the mast but you'll
still need to tie it off.
The line in your hand, the sheet, will stay there,
it will simply turn over. You actually won't lose any momentum
tacking if you adjust your turn of the tiller to the movement
of the spar. Both lines from the spar will have to be run aft,
so you can tie them off without leaving your seat. I will give
you one warning: don't tack near the dock as the sail actually
never dumps its wind-Hello!
That's one way, and I've done it so I know it works.
There is another way, which I've never done or witnessed, but
I've deduced it from historical accounts and paintings of big
lateen rigs on fishing ships around the Mediterranean.
With this method the sail goes around forward of the
mast. Most everything else is the same as the previous method.
This method means the spar will have to be secured to the mast
very close to the mast top. The reason for this is so the spar
takes the wear of scraping the mast, rather than the sail. The
line which moves the sail around forward of the mast does not
come from the peak but the clew. It simply rotates the sail around
before the mast from the clew rather than rotating it around aft
of the mast from the peak.
The line from the tack to the bow does not move. An eyehook or
something similar is used so the line can rotate as the sail turns
over the mast. Each side will have two lines: one to pull the
sail around and one to tie it off.
This is a technique for a larger craft than, say, an 8-12 footer,
due to the need for room aft. The boat will have to be tacked
most of the way all around before the wind helps the sail. It
probably worked well enough on Mediterranean fishing boats which
would sail out on one tack, make their catch, turn around and
sail back home.
Paul Austin
***

|