Reprinted from Australian Seacraft, August,
1976.
Improve your boat, enhance relations with the first mate,
even make some money by converting old pieces of rope to these
attractive mats.
So you've end-for-ended your halyards twice and they're beginning
to look long-jawed. Some of your mooring warps are chafed and
worn. What you do with your old rope? Throw it in the bin, or
relegate it to the boot of the car?
Why not preserve it and use it for making decorative and practical
rope mats? Two simple ones are shown here, of which the oval mat
is ideal for the foot of companionway steps and the carrick mat
for placing beneath deckmounted blocks to prevent banging and
chafe. Either made in very small rope will do duty as a teapot
stand or table mats.
However you use them they will certainly enhance the appearance
of your boat, as well as giving you great satisfaction in the
making.
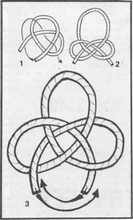
CARRICK MAT
Take about five fathoms of 1 in, or 11/4 in, rope, middle it,
make an underhand loop in the left-hand bight and lay it under
the right-hand one as in Fig 1. Then take the right-hand working
end round in the under/over sequence shown by the arrow and you
will end with the knot looking like Fig 2. Work the top loop in
and the two side ones out until they are all the same size, all
symmetrical and the knot about the same size as the finished mat,
allowing for tripling the strands. See Fig 3.
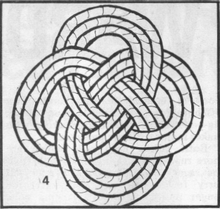 |
Fig 4 |
Form the lower loop the same size as the others by passing the
ends round in the directions of the arrows, and continue both
ends round the knot until all strands are tripled. See Fig 4.
Seize the ends to their neighboring strands and cut off the excess.
This mat can also be made by making a Turk's Head round a former,
such as a small bucket, then removing it and flattening it out.
By varying the type of Turk's Head employed, a wide variety of
Turk's Head mats can be made, of which the carrick mat is the
simplest. The larger, more complex ones end up with a hole in
the middle, which can be filled most attractively with a small
carrick mat sewn in place, or a small coil cheesed down and sewn
in place. As an indication of how attractive these mats can be,
a five-part Turk's Head mat with a carrick mat insert I made for
my mother to put outside her back door was promptly hung on the
wall!
OVAL MAT
The most important thing to remember with these mats is to keep
them symmetrical all the time as you work. For the oval mat take
about 10 fathoms of 1 in, or 11/4 in. rope (or 10 mm diameter,
preferably natural fibre or a reasonably soft synthetic material
- terylene or a good quality polypropylene), middle it and tie
a loose overhand knot in the centre. Lay the top loop of this
over a convenient nail or other protuberance in the deck, then
draw down the two lower bights as indicated by the arrows in Fig
1. Twist both these loops over to the left as in Fig 2, then lay
the left-hand one over the top of the right-hand one and juggle
with the embryo mat until it assumes the shape in Fig 3.
Then take the two working ends from the top and lead them down
through the knot in the over/under sequence as depicted by the
arrows in Fig 3, after which the knot will appear as in Fig 4.
The basic mat is now complete and it will pay you to juggle it
into its final shape and size, allowing for the strands to be
tripled, as any reshaping when the mat is completely finished
will be a long and tedious job. The pattern and overall shape
should be clear from Fig 4. The lower loop is now made by passing
the two working ends round in the direction of the arrows in Fig
4 so they lie close alongside each other. Now follow round the
knot with both ends, laying them snugly alongside the strands
they are paralleling, until the complete mat is tripled, as in
Fig 5. The greater the care you take with this following round,
the more attractive and symmetrical will be the finished mat.
Finish off by seizing each end tightly to its neighboring strand,
somewhere in the middle of the mat, and cut off the excess.
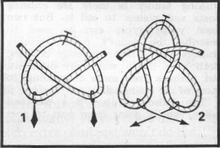 |
Fig 1 and 2. |
In the diagrams the mats are drawn very open in order to show
the weave clearly. In practice they should be drawn up fairly
closely to produce a reasonably stiff and solid mat. It takes
a little practice to be able to form these mats neatly, although
the carrick is easier than the oval. Try to visualise the finished
product constantly as you work, especially its size, and you will
soon find yourself turning out tidy work. When your first important
visitor steps aboard, wipes his feet and compliments you on your
handiwork, it will all be worth it.
****
Good Faith Notice: We have used reasonable endeavours to
locate all the owners of copyright materials appearing in this
article. If you are the copyright owner, or know the contact details
of the copyright owner, please contact me.
*****

|