| Talking boats means talking knots.
Typically, I think of knots to be tied in a line, as in "tie
a knot or tie a lot." My recent experience building two EasyB
cedar strip canoes had me thinking of the knots that appear in
wood grain. Based on the design by Skip Johnson with plans featured
in PDF
format on the Duckworks Website, the process of building
these canoes with my buddy Chad had been my best boat building
experience to date. But the fearsome specter of knots, and wood
quality in general had kept me away from the cedar strip method
of building.
If you are on this site you are likely an addict of boat porn.
You may spend hours skimming sites and blogs hoping to catch a
glimpse of varnished ecstasy. Boats that so smooth and sinuous
it seems more likely that their curves were molded like clay rather
than simply glued together. Nary a knot to be seen in those gleaming
works of art. I have always admired those boats and told myself,
"someday I will have the skills and patience to do that."
Followed closely by the perceived knowledge that I would need
deep pockets to afford the high quality wood and tools that seem
to be required to create such art.
"Keep to your ten foot boats," I would tell myself.
Referring not to the length of my three previous little vessels,
but the fact that they look pretty good as long as the viewer
stayed ten feet away. The allure of the cedar strip method never
let me go however, so I continued to cruise the boat porn for
more stunning lakeside images. Along the way I read the blogs
and forums created by the amateur and professional craftsmen responsible
for feeding my addiction and started to learn a bit of their ways.
I figured out the secret, wood with no knots, milled at someplace
far away from my Florida home by some dude in flannel with a cool
beard. Clear stock that was milled with a bead and cove. Clear
stock that should be as long as your boat if possible. Clear stock
that was not cheap!
More net surfing, some actual sailing on my fiberglass boat and
I happen upon Gary Dierking's
site about outrigger canoes. Wow, double whammy! I loved my San
Juan 28 (now sold), but it is a bigger boat with all of the draft
and attending complexity and I live in Florida the land of shoals,
gunk holes and mangroves. Wharram Cats and outrigger canoes had
caught my attention and would be the perfect supplement to my
expanding little fleet. The Ulua is featured on Gary's site, a
strip built outrigger. Still being gun shy about strip building,
I email him about the possibility of trying to build the Ulua
in ply, explaining how hard I thought strip building was. The
nice response I got back started to burst my bubble. In his 2006
reply email he said, "I think you'd find stripping quite
a revelation as there's actually less chance of error than in
any plywood hull and the results will blow you away. It certainly
requires no more woodworking skills than a stitch and tape."
Fast forward a bit until his book "Building
and Sailing Outrigger Canoes" comes out. In
the chapter describing the strip plank building method, Dierking
describes a process for cutting strips, single handed with just
a circular saw, some clamps, a fence and stable saw horses. Later
in the chapter he shows how simply butting the strips together
on works just fine, with some planks needing just a bit of bevel
to form a smooth curve. Not only that, no need to scarf full length
strips, butting the shorter pieces works just fine for them too!
My bubble was burst, but I still wasn't ready to commit to a
build. Enter my buddy Chad a few years later with a stack of tongue
and groove cedar he helped his sister remove from a wall during
a remodel. He had built a couple of nice Adirondack chairs with
it, and then asked me what I thought he should do with the rest,
my answer was, "BUILD A CANOE!" The next day I downloaded
the EasyB pdf, shot some questions off to the Duckworks forum
(receiving a response from Skip Johnson himself no less) and decided
we should give it a try, knots be damned.
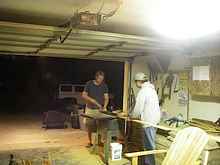 |
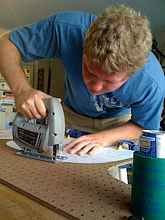
Safety first when cutting the strips. |
The boards were all three to six feet long, cut on an angle at
one or both ends. One side was rough faced, and after cleaning
up the tongue and groove off the boards they were about 1x3.5.
I bought a twelve foot pine 1x12 to use for accent pieces, and
because I wanted at least the first strip placed for the gunnel
to be full length. We set up a feather board, per Gary Dierking's
instructions in his book, and started cutting nominally 1/4"
strips. We printed out the full size patterns, glued them to pegboard
and cut out 2 sets of molds to attach to 2 strongbacks. We weren't
just going to build 1 boat, we were building 2 at the same time!
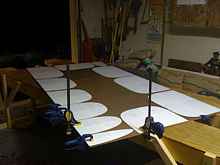 |
The plans show were printed twice for each mold
station to get full size from the half breadths printed, and
we stacked to pieces of pegboard to get 2 sets of molds with
one cut. |
|
Jon cutting mold stations. |
From my reading, I knew knots were weak spots. Tolerable if they
were tight, but weak. As we bent the strips to our pegboard forms,
some of them broke. Most did not, and we thought they looked soooo
cool. Each time we hit a snag, we would consult either Gil Gilpatrick's
Building a Strip Canoe, or Gary Dierking's
Building Outrigger Canoes book and we would get through it. The
knots might be weak spots, but we figured, hey they are 12 foot
recreational canoes that will be glassed inside and out they will
be plenty strong. We found the main problem with the knots, at
least in our application, was that when we started sanding in
preparation for glassing the knots are a bit harder to sand than
the clear areas. For that matter the cedar was easier to sand
than the pine. All this may be no-brainers to experienced woodworkers,
but it was great learning for us.
|
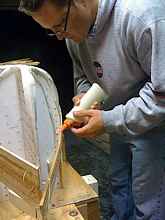
Rubber bands and pegboard holds the strips as
Chad uses the trusty Elmer's wood glue to edge glue the strips.
Very easy, and a lot of fun. |
|
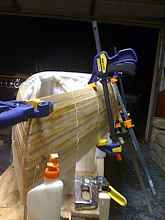
You can never have too many clamps! |
|
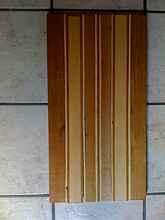
Chad's Deck Blank before glue up. This would
become the bow and stern breast hooks after they were fit
and glassed. It was made from leftover strips, and larger
uncut pieces of 1 x 2 cedar and pine. |
Friends and neighbors were constantly coming by during the build
and many asked if we were going to sell these canoes, or what
they might sell for if we were so inclined. Our response was always
no, they are going to be used and passed down generation to generation.
My building insecurity dragon always reared its head here as I
thought of all the mistakes and imperfections in the build. Often
I could see the intent of a technique used on a section, but then
realize the execution was far short of perfect. But no one saw
those issues but Chad and I. They saw two buddies drinking beer
and doing the impossible, bending wood into the shape of a canoe
and they thought it was cool (beautiful, kinda wacky...)
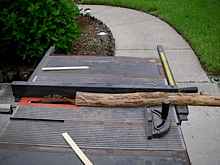 |
I made a similar blank, but (on a dare) first
milled this cypress log to use as the center piece on the
blank, it had a beautiful rose color. |
 |
My deck blank gluing up, with cypress heart
found when camping in center. |
We had a lot of help. Help from a few great books. Help from
the author of one of those books even! Help from Duckworks website.
Help from Harry the neighbor who works on classic cars (thanks
for the sandpaper and mixing cups). Even help from the man who
designed the EasyB via the Duckworks forum. Chad's wife was super
understanding as we took over half the garage. My fiance too,
as she watched me truck off to Palm Harbor whenever I had an evening
free from teaching or band practice. To me one of the most important
bits of assistance came from working on the project with someone
else. Chad and I would constantly bounce ideas off each other,
interpret instructions and pictures from the books, run to the
store, or hold a strip while the other stapled (Yes I know the
EasyB molds should allow it to be a stapleless build, but they
just worked for us). Working with a buddy made this build so much
more fun and relaxing than any of my previous projects.
|
Chad finished first, such a light boat! |
|
We detoured from the original plans, and did
traditional breast hooks and gunnels per Gil Gilpatrick's
book. Here is Chad's boat sanded prior to varnishing. |
As I write this, we are getting ready to varnish our completed
canoes. What a great feeling. I look at all of the many imperfections
that made me wince as we worked. I see each of them and recall
the memories made in making this little canoe that will continue
to make memories. Each spot is like a scar or tattoo with its
own story, and none of those stories would have been told if I
waited until the moons aligned and I had the clear stock, amazing
workshop, and spontaneously developed woodworking skills.
|
My boat was a bit behind, since I moved an hour
away mid-build. Here we are ready to screw in the gunnels
and breast hook at the stern. |
Here is a link to a google album of some of the build pics. The
first 11 in the album are the shots I picked and noted in this
article, but there are many more: click
here.
Click here for Jon's
blog.

|