or How Not to Build a Boat - Another
Nut Building Boats in His Backyard
By Paul Cook - Las Cruces, New Mexico - USA
I was reading through some of the archive issues
of Duckworks and I came across Bill Moffitt’s article “That
Was Horrible”. I showed my wife some of the
pictures of his construction of Embers Watch and my wife said,
“That just looks too familiar, so you’re not the only
nut building boats in his backyard.” My reply was there
are a lot of nuts building boats in their backyards. I had to
admit though, that some of his construction pictures with sawhorses
and parts stacked on his patio looked eerily similar to the parts
and pieces stacked on my porch when I was building my puddle
goose. (Except my porch looked a lot messier!) I
did a little of the work in our living room, but my wife banned
me from using the piano as a stand for my circular saw.
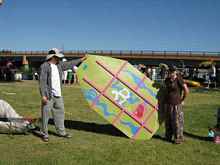
I built the puddle goose, Muy Fragil, so that I could take five
people on the river for Raft the Rio. The previous year my wife,
my sister, and her two boys all rode in the puddle
duck. Two grownups in a puddle duck is really about
the max it was designed for, with my sister’s boys , ice
chests, umbrellas, etc., in there as well , the water line was
probably a little higher than it should be. That being said, there
are no rapids or rough water areas in this part of the Rio Grande,
so it really wasn’t an issue. I figured with the boys growing
every year it might become an issue, but the real driver for building
the puddle goose was that my son and his girlfriend wanted to
have their own boat to do the race in. (And I still wanted to
participate!) We built a small raft for my daughter to ride on
by herself (Tide bottles float really well) and I was riding on
our bucket raft with my son and his girlfriend. They really wanted
to go fast and try to win, and I just wanted to have a good time.
By building the puddle goose, I was able to ride in the bigger
boat with the other crowd and let my son and his girlfriend take
the puddle duck. That made everyone happier.
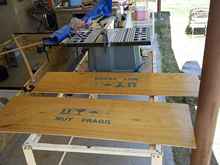
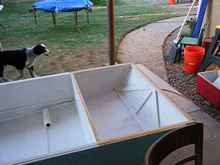
Close up of the bow and stern panels.
Sides clamped for sanding.
Here is a shot of the side where I inlayed some
strips to fill voids.
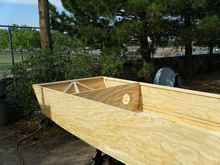
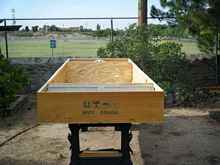
I started the puddle goose by cutting out rectangles for the
sides, splicing them together and then tracing and cutting out
the profile. I don’t remember if I started framing the sides
right away or if I cut out and framed the bulkheads first. It
took me a while to frame the sides though, because I had to rout
grooves in the framing pieces to fit over the butt joints. When
I did the butt joint for the hull pieces, I attached the largest
hull piece first and then glued and screwed the butt plate on.
I let that cure before attaching the second hull piece, gluing
and screwing that to the butt plate. Since I didn’t know
what I was doing, I didn’t use any fiberglass on any of
these joints. The butt joint for the hull pieces fit inside the
framing on the sides, so I didn’t have to rout any special
grooves for that. I used ¼ inch exterior grade plywood
for everything and I used Titebond II for gluing all of the framing
pieces and gluing the hull to the sides. Since I purposely chose
to use plywood crate pieces for the stern and bow, I’m not
sure those are actually exterior grade. I’m willing to live
with that though.
Close up of the starboard side.
Close up of the port side.
I used epoxy to fill cracks and to seal around the butt joints
and the seams of the hull to make sure nothing leaked. I caulked
all of the inside seams with PL Premium Concrete Blend before
I put the decks on. I picked up the PL Premium Concrete Blend
in Albuquerque. I never could find it at any of the local places
here. When I built the puddle duck, I caulked with regular PL
Premium. As far as I know I don’t think any of the seams
have ever leaked on that boat either, but those seams were a lot
messier. I think I spent around 250 dollars building the goose,
but I haven’t added a sail, mast, leeboard and fittings
to make it sail yet. I bought four deck plates, three sheets of
ply, a few 1 x 2s for framing, screws, PL Premium, epoxy, and
several bottles of glue. I already had some scraps for framing.
I was going to use a sheet of ply from a shipping crate for one
of the bulkheads, but I used the wrong measurement for the length
of the panel and cut it too short.
A close up shot of the bulkheads installed.
Bulkhead being painted.
When I built the puddle duck, I used some specially coated,
exterior grade screws that looked kind of like gray colored drywall
screws. The threads were great for pulling pieces together tight,
but the smallest size I could find at the hardware store was a
little big and I split a couple of pieces of wood in the process
of building, even though I predrilled holes for the screws. I
didn’t want to take the time to pull the screws out and
fill the holes (I know I’m lazy) so I just left them all
in, filled any cracks with epoxy, and painted over them. I had
no real expectations about how long the boat might last anyway.
I decided I might want the puddle goose to last a while, but I
still didn’t want to pull screws and fill holes. I ordered
some square drive, silicon bronze boat screws to build the puddle
goose. I don’t remember what they cost. They were a little
expensive for something that was supposed to be a cheap boat.
Unfortunately I didn’t order quite enough, so I ran to the
hardware store and supplemented them with stainless steel sheet
metal screws.
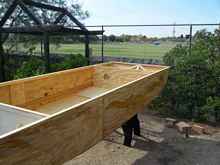
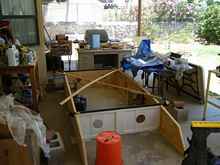
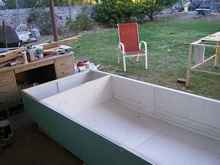
A shot of my messy porch with the bulkheads
installed.
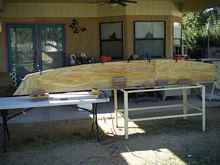
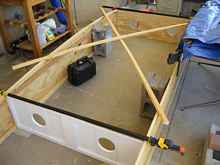
A view of the boat looking from the stern end
to the bow end.
This is not a great shot, but it shows the extra
brace I had to glue and
screw onto one of the chine logs because the butt joint broke
twice while I was working on it. Fortunately this happened
before I glued the hull on.
It probably would have been cheaper and easier to remove the
screws and fill the holes. The screws worked great on the puddle
goose though, and I didn’t split any wood. When we went
to flip the hull over, I was glad we had the screws in there.
The boat made some horrible popping and cracking noises when we
turned it over. This was after I had let the glue set. I was convinced
that I had all sorts of broken seams and the boat was going to
have huge leaks. Just to be on the safe side, I filled any small
voids or cracks I saw along the entire outside edge of the hull
on both sides with epoxy. I guess it worked; we didn’t get
any leaks at all when we took it on the river. I opened the deck
plates after we got back and everything was dry inside the air
boxes as well.
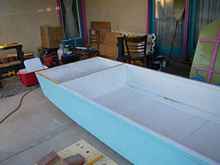
The hull painted before we put the decks on.
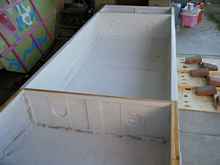
A shot of the hull after priming.
Raft the Rio encourages people to use recycled materials. I
came across a plywood shipping crate at my wife’s office
and decided to use it for the puddle goose. It wasn’t enough
to do very much, but at least give me a few pieces. I started
the project a few months before the race thinking that would be
plenty of time to get done (free evenings and weekends when we
didn’t have other things going on). Life and weather have
a way of conspiring against you when you’re trying to finish
a project. In my rush to finish at the end, I caused a couple
of problems that could have been avoided.
Inside primed, bow.
This is the inside of the hull primed with the
deck plates installed.
I didn’t notice the first problem until I got the decks
glued on. I was hurrying so much that I didn’t pay as close
attention to a few measurements and how square (or not) the bow
and stern panels were. I had cut them from a shipping crate because
they had the labels that gave the boat its name. In order to use
them I had to cut metal strips away from the sides. I used a square
to mark them and cut them with a circular saw, but that’s
just not as good as squaring something up on a table saw for someone
who’s not a great carpenter. Unfortunately, the boat has
a twist in it. It works fine, at least for going down the river,
but that twist in it really bothers me. One of my measurements
to the stern bulkhead was slightly off. I had marked them before
I put the framing on and clamped the sides together to sand them
the same. I should have measured and checked them after I finished
that sanding process. But that’s what happens when you get
in a hurry. I just kept thinking that If I didn’t finish
the boat my sister and her boys wouldn’t be able to go on
the river. And I didn’t want to disappoint those boys. I
really didn’t want to use the bucket raft again either because
it’s way too heavy and I don’t like lugging it around.
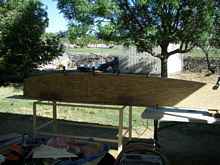
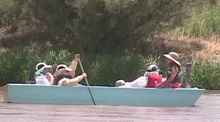
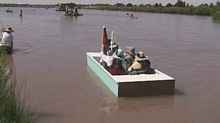
Here is the Puddle Goose making good time.
Muy Fragil getting umbrella up.
The second problem was from painting the outside of the boat
too close to the day of the race. I was still painting about three
days before the race. Even with our 90 and 100 degree temperatures,
that wasn’t long enough for the paint to cure well. After
the race was over some of the paint was so soft it just rubbed
off on things. When everything dried out, I had a bunch of tiny
cracks appear in the wood and exposed places with bare wood. So
now I have to sand that all down, fill cracks with epoxy and repaint.
I should have just epoxied the entire hull to start with. The
places where I epoxied over the butt joints and cracks that were
in the plywood to start with survived just fine.
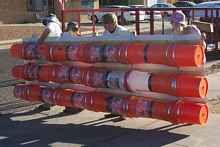
The top of Low Tide
Low Tide on the water
That brings me to another point. The plywood I bought from the
store for this boat was terrible. Even after sifting through several
sheets to get some “good ones”, I discovered several
bad cracks in part of it. I epoxied over those before I got to
painting to make sure they didn’t cause a problem. Some
of the pieces were twisted so badly after I cut them out that
I had to lay bricks down on part of it to hold it straight enough
to glue the framing on. You can see the extra little board across
the framing close to the bow. I had a butt joint there that broke
twice while I was building. That was where the plywood was twisting
the worst. I probably should have made scarf joints or half-lap
joints in the framing pieces as I glued them on the sides, but
if I had done that, I would still be building the boat. I didn’t
have these kind of issues with the plywood I bought for the puddle
duck, and it was supposed to be the same kind of wood.
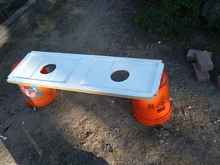
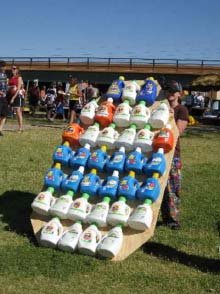
This is my daughter's raft, Low Tide, made
of course from laundry detergent bottles.
The vertical stripes that appear on the side of the boat were
from voids that were in the plywood. When I cut the side pieces
out, I found two voids that went all the way through the middle
ply. There were only three plies in the wood. When I looked through
them, I could see daylight from one end to the other. I rigged
a clamping guide up and routed out the outer layer so I could
inlay a solid strip in the voids. Murphy struck again and my clamping
guide slipped while I was routing. When I got done, one end of
the groove was wider than the other. So then I had to shim some
super thin strips of wood into the fat end to fill the gap. When
I finished, I epoxied over the inlays to seal them. I clamped
down the ends of my clamping guide with additional clamps when
I did the second one so that I didn’t have the same problem.
All of those kind of problems really annoy you when you’re
out on your back porch late at night in the summertime, getting
eaten alive by mosquitoes while you’re trying to get all
your cuts marked out straight and wondering if your neighbors
are going to report you for violating the noise ordinance when
you turn your saw on because you’re working so late. Well,
you get the picture.
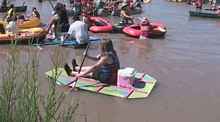
This is the bucket raft after it was rebuilt
for three people.
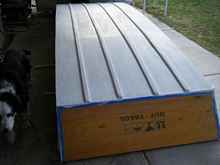
I glued four rub strips on the bottom of the goose to keep the
hull from flexing. I didn’t get pictures of the process
of gluing them on, but I wish I had. I used about two hundred
bricks to clamp them down until the glue set. I didn’t have
enough small bricks, so I threw a few cinder blocks on as well.
It was quite a site! That curve in the hull really does give it
a lot of strength. I used some solid pieces of ¾ by 1 inch
pine for the strips on the goose. When I built the puddle duck
I ripped some narrow strips of redwood bender board and laminated
two layers for each strip. The strips were about ¼ inch
thick, so they were easier to glue on than the single pieces I
used for the goose. When I build the next puddle duck, I’ll
go back to using thinner layers and laminating them. My wife put
several coats of spar varnish on the bow and stern and did most
of the painting of the rest of the boat. She has much greater
skills at that than I do.
I mounted a couple of conduit brackets at the bow and stern
bulkhead panels to hold two big umbrellas that we put up when
we started the race. I don’t have any pictures of the boat
with the umbrellas up. The wind picked up really bad about half
way through the race and one of the umbrellas was broken and swept
out of the boat. We had to turn around to go fish it out of the
river. We took the second one down before it got broken. We caused
such a stir that one of the emergency boats came over to make
sure we were ok. We were ok; I was just embarrassed that I didn’t
take the umbrellas down when I should have. At one point before
that happened, the wind was blowing so hard the umbrellas acted
like sails and the boat got blown backward, even though we were
paddling with the current of the river. That should have been
my clue to take the umbrellas down right then, but I don’t
always learn things the easy way. (If only I had reefed!) The
shade was nice while it lasted, but when the wind knocked over
one of the umbrellas, it mangled one of the brackets, as well
as breaking the umbrella.
I didn’t know anything about making hatches when I built
the boat (or anything about building boats for that matter!).
I put these nice big air boxes on for positive flotation and used
a couple of six inch deck plates to access the boxes. That will
keep things nice and airtight, but if I had built a hatch along
the center line, I could have had a lot easier access to all of
that space. You can see from the photos that I put lots of small
braces on the underside of the deck lids. I think that might make
it a bit difficult to go back and put an access hatch in the top
of the deck at this point. I still need to get a sail, mast, rudder,
and leeboard made for my puddle duck and the goose so I can try
sailing them. It would have been nice if I had put a motor well
on the back end in case I wanted to put a small motor on. But
I wasn’t thinking about that when I built the boat. I haven’t
managed to get either of my boats rigged to sail yet (unless you
count sailing backward on the river with umbrellas!) because of
other home projects and some health issues that have gotten in
the way. But I have vowed to sail in at least one of my boats
by the end of this summer. After all, I’ve already ordered
plans for Michalak’s
Ladybug. I want to have done at least a little sailing
before I start building the Ladybug. I won’t be rushing
the construction on that one though.