|
Easy to build, light duty cradles for small craft
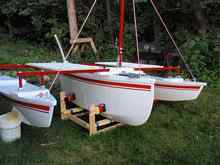
I am almost done building a trimaran dinghy. After spending countless hours sanding, fairing, sanding, priming, sanding, painting, sanding, painting, sanding, and painting the three hulls, I needed to flip the bulls over so I could do the same for the decks . . . And then be done! But, both outriggers and the main hull have vee bottoms. They won't sit upright on their own. I needed some easy to build cradles to hold the hulls upright without scratching the new paint on the hulls.
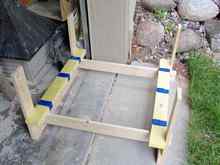
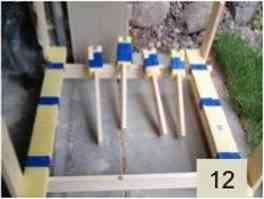
Ankle biters: Figs. 1-3 show how the extra length of the arms project out beyond the legs. Let me just say that these are ankle biters. Trim the extra length off! |
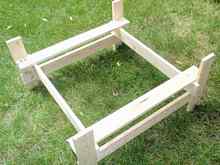
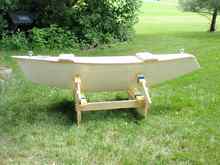
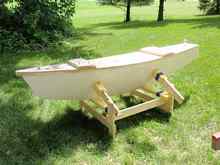
These easy to build cradles did the trick. See Figs. 1-3. Each cradle is made from six 1 x 4 x 6 foot standard boards which cost only $1.49 each at the local building yard. The support beams and arms are padded with 1 inch foam which was $11 for a 4 x 8 sheet. Maybe 2 inch foam would be better. I used about 1/3 of the foam sheet for the padding. A pocket jig and pocket screws were used for assembly. I used 1 ¼ inch pocket screws. Building all three cradles at the same time, it took about 1.5 hours to make all three. Below is the cradle for the main hull. It's almost identical to the outrigger cradles, except the lower cross beams at the ends of the cradle sit on the floor for extra support. I did this because the main hull weighs about 100 pounds plus a little change, whereas the outriggers are about 45 pounds.
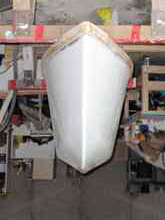
The main hull, by the way, is tortured plywood. This approach provided a nice vee bottom and a bow with a fine entry. Fig. 4 is another view of the main hull while it was still upside down. Check out those reflections in the main hull!
Here is how to build the cradles. I'll describe building one cradle, although I built three at the same time.
Cutting the parts: First, we'll crosscut all the parts from the supply of 1 x 4's. If you bought six of these that are six foot long, you'll use about 5.5 of your boards.
From one board and part of another, cut 4 legs that are 24 inches long. It's not essential that these are all exactly the same length. Make them close, though.
From 3 full length boards, cut 6 pieces that are 34 inches long. A first pair is for the cross beams. A second pair is for the girders. A third pair is for the keel boards. Each pair needs to be the same length. If your boat is longer, you may need longer girders. If your boat is wider than these narrow trimaran hulls, you may need longer cross beams and keel boards.
From the boards you have left, cut four arms that are 18 inches long. Later these will be trimmed to length after assembly. See Fig. 1 for why you want to trim these (ankle biters). Right now, leave them long.
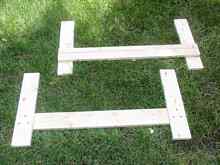
Leg assemblies: Using your four legs and two cross beams, assemble two identical leg assemblies as shown in Figure 5. The cross beams are screwed to the legs with three pocket screws at each joint. Note the cross beams and legs make an H with the cross beam closer to the bottom of the H than the top. Specifically, I placed the cross beams 3.5 inches from the bottom. This is the width of a 1 x 4. Hence, I was able to use scrap 1 x 4 as a spacer to locate the cross beams on each leg.
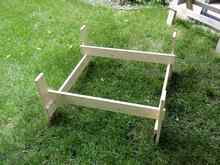
Girders: A pair of girders connect the two leg assemblies. See Fig. 7. These rest on the cross beams but are screwed to the legs using pockets and pocket screws. A pair of pockets are made in each leg for this attachment. I used a Kreg pocket jig. Fig. 9 shows the pocket holes for the girder attachment close up.
Foam cushions: Use one of the keel boards as a pattern to scribe foam planks on your foam sheet that are the same width as the keel boards. You'll need two of these foam planks. Use four if you want more cushioning. Also make a third and fourth planks. From these, cut 8 pieces that are 6 inches long for your foam "mitts" that will be placed on each arm.
Keel boards: Rest the keel boards on the girders. Screw to the legs using a pair of pockets and pocket screws. See Fig. 8.
The pockets are made in the keel boards. You can barely see a pair of pockets in the upper left of Fig. 8. At each joint, a third screw is used to attach the keel board to the underlying girder.
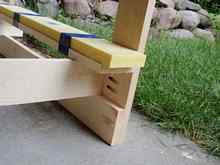
Foam cushions: Place a foam plank on the top of each keel board. Duct tape wraps at each end hold the foam in place. See Figs. 9 and 10.
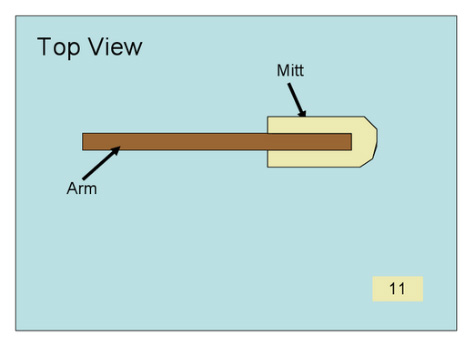
Arms with foam mitts: A pair of foam "mitts" are attached to the end of each arm. These arms are used to brace the boat in the cradle. The mitts project beyond the ends of the arms by about an inch so that only foam touches the boat. I used duct tape to wrap the mitts onto the arms. A pair of screws per mitt also work. See Figs. 11 and 12.
An improvement that should be noted is that I wrap foam or carpet around the ends of the arms so there's no chance the pads will slide down to low and not provide cushioning. There is a foam about 1/2 in thick that comes in rolls so it's flexible. It's sold at Home Depot for home construction. |
[Does not enlarge] |
See Fig. 1 where you can see duct tape wrapping the pair of starboard mitts at the bow, whereas screws hold the mitts on the port side.
Boat support: A pal is helpful for this step. Lift the boat onto the cradle, being careful not to knock the boat on the arms. Lower the boat onto the cushioned keel boards, roughly centered. Your pal should now hold the boat vertical while you attach arms at the bow. Note from Figs. 1-3 how the arms are angled so the foam mitts seat nicely against the hull sides. Use a pair of pocket screws to attach each arm.
Once your first pair of arms are mounted, the boat will stand up well enough so that your pal can step back while you mount the aft arms.
Perhaps add casters so you can wheel your cradles around the shop if needed.

|


 3
3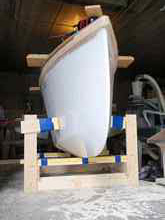 4
4