I thought you might like to see a few pictures of my build of
a Cinderella
canoe designed by Gavin Atkin's.
The design can be obtained free from Gavin's website "intheboatshed.
net"
It was my first canoe built from a book rather than a kit and
I learned a lot. Being 12ft long the planks have to be butt-jointed
with tape. The way the plans are laid out at present means that
before cutting out the planks two 8 x 4 ft sheets of ply need
to be butt jointed with fibreglass tape. This is an awesome task.
I found that by transposing the origin of the offsets to the corner
diagonally opposite then the bottom sheets could be cut off and
the remainder of the 8 x4 's could be cut up the middle. The butt
joints would then only need to be 2 ft long. I used Excel to do
the sums.
To cut out the planks I used a Makita mini circular saw which
proved to be invaluable. I have two rechargeable batteries as
they soon discharge but it is not difficult to swap them mid-cut.
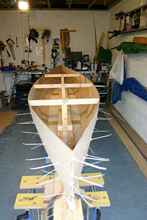
I used plastic ties for the construction which I like as they
are less inclined to tear the wood than copper wire. The hull
is constructed around 3 tee pieces which I built into a single
jig as seen in the picture. My only real problem was with the
fillets. I taped them whilst the epoxy was too soft and consequently
they are very lumpy. Also where I dot and dabbed between ties
they were too big. Because there was no rebate and the joints
were just butt joints I did not want to sand the fillets down
too much. Next time I will let them set before adding tape. The
problem with this is that you get air bubbles next to the fillets.
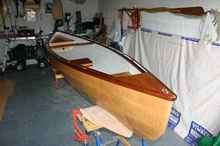
I glassed the bottom of the canoe to protect it - a wife can be
useful for holding the other end of the fibreglass sheet.
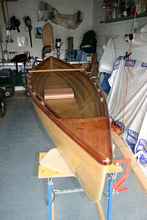
I fitted the buoyancy tanks which I think look quite nice. I
have been told that an inverted canoe sits very low in the water
and buoyancy tanks make it more manageable. I look forward to
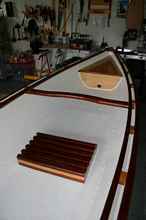
inverting it to find out! I designed my own seat and added the
broken inwales which really enhance the design. I used International
Interdeck inside as a non-slip medium. Anyway it doesn't look
too bad for a first go built from scratch. My varnishing skills
are improving, hopefully the same can be said for my methods of
stitch and glue. Next time I will try using scarf joints. I was
fascinated to watch my rollers start to smoke as I applied the
epoxy on a warm day! I thought I had been working too hard.
Thanks to Gavin for his advice and June for holding the fibreglass
- the stern end of course!