Custom Search
|
|
 |
sails |
| plans |
| epoxy |
| rope/line |
| hardware |
| canoe/Kayak |
| sailmaking |
| materials |
| models |
| media |
| tools |
| gear |
 |
| join |
| home |
| indexes |
| classifieds |
| calendar |
| archives |
| about |
| links |
| Join Duckworks Get free newsletter Comment on articles CLICK HERE |
|
|
| Out There |
By Paul Austin
- Dallas, Texas - USA A Little Adventure |
 |
|
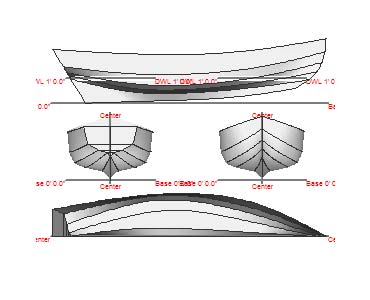
The good folks who take care of the National Historic Landmark Schooner Adventure loaned me the lines to their ship. So I thought I'd propose a model of Adventure. This proposal will be for beginning modelers like myself.
For modelers who carve solid wood, Adventure would make an easy first ship model. Probably the best or worst decision you can make is choosing the wood to carve. It needs to be soft, without knots unless the knots can be cut out. The LOA is 7 times the beam, so the cuts are gentle with little wood to cut off. A block of wood 48" by 10" would work for a model 42" long. I chose 42" so that the cuts would not be so fine the edges flake off. If you cut the deck line first and then the profile, you won't have to cut off much wood at any one time. Nathaniel Herreshoff cut his models using this method.
After these four cuts, put the wood in a vise deck down. Captain Nat used a draw knife to carve away the shape of the hull. Nowadays we use a plane for most of the carving away, then a chisel to chip away toward the keel until we can fit the templates on the hull to check our work. You can even line the inside of the template with fine grain sandpaper to sand the curve of the hull, saving some hand work and guessing . Just don't press on the template too much or it will grind more of the hull away than you want. Sanding wood is like getting a haircut -once you cut, it's hard to glue it back on. And painful, too.
These are four bulkheads used as templates. The templates can be made of just about any wood, so long as they don't change their shape. I think you'll find that the tiny discrepancies between the template and your hull can be faired. Just don't press on the template too much - if it won't go fair the hull till it will. Smooth paint covers any mistakes, anyway. If you're thinking you might want to put this model in the water someday, remember to keep the outer keel wide enough to fasten a deep keel on it. What Carlson calls Chine 1 is the keel.
For solid wood hulls, making a template for the deck's sheer is a good idea. Decks not only had a sheer stem to stern but they had a camber to the bulwarks. Be patient here because nearly everything that makes a model right will sit on the deck. Originally the quarter deck was 1-1/4 feet above the main deck. I think I would not camber the quarter deck, just so I won't have to work so hard to match the bottom of the main house to it. That is the basic idea of solid wood hulls. The lift method I will leave to the experienced modelers. Here I've included the bulkheads as frames and planks for the traditional method of modeling, frame and plank. This method takes longer, requires more tools and precision, but if you learn this method there is no ship you cannot build. I have run the numbers through the Carlson program for enough frames and the templates, so if you want the numbers just send me an address.
+++ Now, to the rig. While Adventure is a schooner, the rig is actually simple. One topmast, two gaffs, and two sets of shrouds. I can look at this and see how it would take fewer men to work the sails of a schooner than a square rigger. The deck is simpler, and the bulwarks can be lower because schooners don't have braces and yard lifts and channels and turnbuckles and lanyards with which to contend. The plans for Adventure don't specify exactly how the sails are controlled. So we can be as refined or as simple as we like. On the booms sails had cringes, blocks, and a boom band to secure the sail. You can eliminate the clew block by running the sheet from the cringe through the boom or over its end to the boom cleat. My idea is to do things simply so that they look good; then once my skill level improves I come back to add historical details as long as I can do them well. I don't want to do a detail badly in order to be faithful to the period of the ship; I want to do what I can do well.
The gaff has a few more parts. When Adventure was built, the peak halyard looped through five blocks so that it would be easier to pull the sail taut. After all, sails on a schooner are heavier than on a PD racer. With a model you can do the five blocks or one or two or any number. The gaff was raised by a double purchase tackle, which was two blocks close together to provide an assist to the men on deck. The blocks are close to the gaff neck, through an eye on a metal band which was slid over the gaff about 2 or 3 feet from the gaff jaws.
The mast and topmast were secured by overlapping the top of the mast with the bottom of the topmast. A platform holds to bottom of the two sections of mast, while the cap holds the top of the two sections. Some platforms were fancy and complicated in order to hold the weight of a man in all kinds of weather. You might remember the famous scene in Treasure Island when Jim Hawkins has to confront Israel Hands on the platform. The scout who first saw the white whale in Moby Dick was on the platform. Squaring the masts makes gluing a platform easier.
Now comes the shrouds. They add a great deal of period appearance to a schooner. Every model I've ever seen has them black. On Adventure in the previous drawing you can see they are lanyards and deadeyes.
I hope Adventure has been an encouragement about modeling. There is a great deal more to beautiful models than I could include here, but it's a start. If you can't build it at 122 feet, why not 42 inches? Top Ten Modelling Tips 1-Start with a model which can be built in your lifetime. |