Well! What is the hardest job in boatbuilding?
I suppose that depends on the design of your boat, what tools you have to hand (ripping lumber is a pretty difficult task if you only have a hand saw), what your experience is, and various other factors. For me on my boat it’s the job I have just done, it took 15 hours to fit the chines. Having said that I recon I could do the job in less than half the time next time, with hindsight and experience. This is the first boat that I have worked on of this size, so I tried to use methods employed on smaller boats with clamps and sisal twine, a recipe for failure. These chines are 3” x 1 ¼” made of white oak and 26’ long, a hefty piece of timber at the best of times. The problem is that the front 6 foot needs to be bent horizontally, vertically and twisted all at the same time. I knew the job had to be done with a Spanish windlass but as there was no rope to hand I tried to compromise with bad effect and loss of a days work.
Clamps will not hold where the timber is not square to the jaws and screwing shaped wedges to the chines will not always do the job, the screws pull out or the angle still is not exact or in this case the stem got in the way of the clamp and the wedges were in the place I wanted to put the screws. Even large sash cramps will bend if you put too much strain on them at the wrong angle and two smaller cramps had the ball joints on the jaws broken off. As for sisal string, having tried to use it in a Spanish windlass in the past on smaller woodworking project I know it will disintegrate as soon as any strain is put on it so just didn’t try. Even quadrupled and used to hold the wood in place it was not quite up to the job.
|
Don’t compromise, do it the right way. You know it make sense. |
After having spent a fruitless day struggling I went and bought some rope, what a difference this made, no point in trying to economise on tools if it means that you can’t do the job.
So how should the job be done?
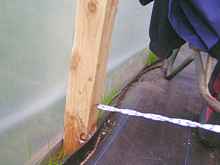
The first job is to cut the frames to take the chines, bear in mind you will probably have to make small adjustments to get the actual finished fit so allow for this. You will need two good anchor points for the windlasses approximately at right angles to the finished position of the front end of the chines. I used vine eyes in the uprights of the boat shed near the ground to get the correct angle.
|
This was the best point to anchor to. |
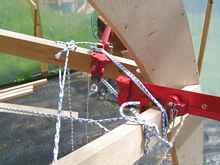
A point worth mentioning is to tension the sides in tandem, firstly to avoid putting undue stress on one side of the boat skeleton and secondly so that you can ensure that the chines bend at the same rate as a matched pair and thirdly for safety as you can put some cord around the wood to prevent it springing back fully if the windlass snaps or the vine eyes pull out.
|
Always keep an eye on the safety aspect of the job. This rope round the sash cramps will prevent an accident if the windlass breaks. |
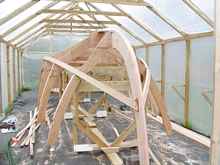
The timber is under a lot of strain and will do a lot of damage to your vocal chords if it hits you, that is if you survive. The rest of the chines will have to be loosely supported, I tied mine to the roof of the shed to hold them out of the way and adjusted the position of the support as subsequent frames were fixed.
|
26 foot is a lot of timber to hold up by hand so enlist the help of a piece of string. |
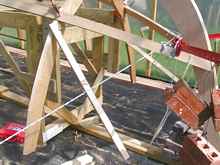
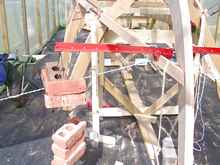
To get the twist on the front of the chine I used two sash cramps and hung stacks of bricks from the end of the cramps, by grouping the bricks into sets of 2 or 4 I could easily add extra weight to twist the wood the require amount. These cramps may need to be moved down the chine as subsequent frames are screwed and glued.
|
This worked a treat thank goodness. I can’t imagine how I would have done the job if not. The bricks are the same ones that helped me to build the boat shed. |
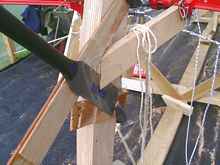
Making the joint on the stem is a bit awkward, but not too difficult. Depending on your plans the final position may need to be slightly back from the front of the stem to allow for shaping a ridge at the centre to fix the plywood skin to. Before making the first cut a critical point is to ensure that all the excess chine length (apart from a couple of inches) is at the back of the boat so you can slide it forward and have another go if you make a mess of the first attempt. Failure to do so will result in a lot of angst. The first cut will require a spacer to be held against the stem to offset the cut, this will result in a cut that is not quite at the correct angle, so tighten the windlasses, use a thinner spacer for the next cut and repeat the process. The third time all you should need is to run the saw along side the stem to get an exact fit.
|
Start cutting with a standoff. |
|
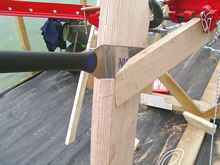
Then finish the final adjustments against the stem. |
Before you fix the joint into place it’s worth considering the glue you are planning to use, most of us will probably use epoxy and a heavy duty filler. Before adding the filler to the epoxy I like to brush a coat of epoxy on the joint, particularly the end grain, to ensure that the joint is not starved of glue. I know the filler should prevent this but feel that its always good to allow a bit extra epoxy to saturate the wood as it makes a stronger joint.
Having cut the joint, glued and screwed it into place I would leave the windlasses and sash cramps in place to avoid putting too much stress on the new joint until the glue has dried and can take some of the strain off the screws. Now attend to the first frame adjacent to the stem the wood at this point will probably also require some twisting so if you don’t have another pair of sash cramps or means of placing the chine in the correct position wait until the glue has dried on the stem before attempting this. Subsequent joints as you move towards the transom will become easier unless you are building a double ender.
Having tackled ‘the hardest job in boatbuilding’ you will find that there is another job even harder - the next new job to learn.
*****
Click HERE for a list of articles by Mike Machnicki
|