
 Custom Search
|
|
| sails |
| plans |
| epoxy |
| rope/line |
| hardware |
| canoe/Kayak |
| sailmaking |
| materials |
| models |
| media |
| tools |
| gear |
 |
 |
| join |
| home |
| indexes |
| classifieds |
| calendar |
| archives |
| about |
| links |
| Join Duckworks Get free newsletter Comment on articles CLICK HERE |
|
|
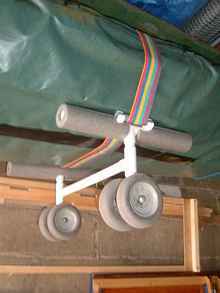
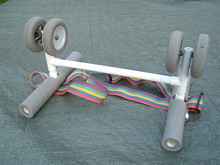
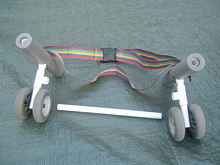
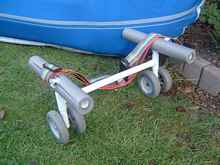
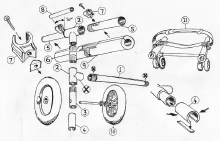
| Trolley for Kayaks or Inflatable Canoes |
by David Hurst - Roberttown, West Yorkshire, England |
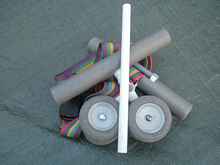
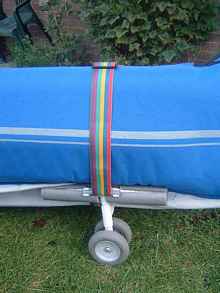
After many years of use my old home-built Kayak trolley needed replacing. It was built for a plywood kayak and was narrow enabling it to pack inside the hull when on the water. This year for our summer holidays I got an inflatable canoe which needed a much wider wheel base and larger trolley to be stable. So I robbed the wheels off the old frame, which are a couple of pairs of recycled child's buggy wheels. These sit each side of the supporting tubes. The next challenge was to find light tubing with ready available fittings, a search round the garage and I came up with some 13/16" (21.5mm) PVC overflow waste pipe left over from a kitchen fit out. The nice thing about this was it did not need to be finished, could be bonded using a PVC adhesive and was made to be used with water. Using this as a basis of my construction I set about the task. After sketching out the frame I came to the conclusion that it would need to dismantle in order to fit in the back of the canoe when on the water. The simplest way I could do this was to have two identical tee frames with a friction fit cross or spacer tube holding them apart.
The only other area that needed a bit of consideration was the bottom tube where the axel passed through. It looked a bit thin. I decided that a sleeve made of the same tube should beef this up. A couple off 2" (50mm) lengths were cut and a ¼" (6mm) section removed lengthwise from these so they would squeeze together and sleeve inside the 13/16" (21.5mm) PVC overflow waste pipe used to take the axles. A bit of PVC pipe weld adhesive added to the sleeve helps it slip in place and keeps it there. Once all the components were cut to size I had a dry assembly run, I did find that a number of the joints did need easing to allow them to fit fully together this was done with 180 grit sandpaper by rubbing and rotating the tube till a good fit was achieved. Once happy that everything would assemble correctly I used the adhesive making sure that the tee joints/couplings aligned at 90 degrees to each other and all the joints were pushed home fully. To drill the holes for the axles I used a drill stand, which is the best way when drilling any type of tubing. It was then a straight forward job of adding the wheels and cutting the pipe insulation to fit round the clips holding the webbing and tee joints/couplings forming the top tee. The final piece to add was the webbing which was a matter of laying it in position and pushing the two sections of pipe in place over the strap, because the webbing is a loose fit it is easy to adjust the length in the normal way. I did not want to get complicated and make a bespoke strap so I got hold of a luggage strap from the supermarket and looked at how I could use that in my design. The simple answer to use two short lengths of 5/8" plastic water pipe and four wall clips, I formed a V-shaped notch in the base of each clip so they would sit on the 13/16" (21.5mm) PVC over flow waste pipe, they were then fixed with 1" (25mm) 8 gauge stainless steel wood screw, it was then a simple job to place the webbing between the clips and push the water pipe in place. This also allows the adjustment of the webbing and replacement if needed. The whole trolley is quite light and very compact when dismantled, sitting easily in the stern behind the rear seat. When assembling the frames I have found the best way is to fit one tee frame to the connecting/spacing tube, turn the frame upside down so the top rest on the floor and offer up the other frame in the same orientation, this way they line up well. It did not take more than three hours to put together and it works well on roads, short grass and even flat wet sand. It does have its limitations because of the size of the wheels but that's a trade-off to keep it compact, I was glad I had it for the summer holiday. The canoe was like paddling a bath tub! But still great fun nonetheless.
Description of parts The main tubing and T-fittings are over flow waste system pipe in PVC plastic 13/16" (21.5 mm) diameter one 10' (3050 mm) length plus 4 x tee joints. The other pipe and clips used to retain the webbing are 5/8" (15mm) diameter plastic water pipe 1 x 8" (200mm) length and 4 x fixing clips are used. Wheels used are a couple of pairs off recycled child's buggy wheels 4 ½" (115 mm) diameter. But others could be used. I off the shelf 2" (50mm) wide adjustable suitcase luggage strap 6' 6" (2000mm) long. A 39" (1000mm) length of 7/8" (22mm) bore pipe insulation sleeve. A tube of PVC pipe weld adhesive. List of parts shown on sketch
|

 |
 |