The Build
All homeboat builders have experienced first cut fever when you are hesitant to push that circular saw through plywood committing yourself to hours of building, ruined clothes, epoxy speckled floor, frustration, and ultimately open yourself up to experiencing failure. What I experienced as I looked at my chalk lines on a sheet of 1/4 inch BC ply while holding my circular saw was magnified by the realization that by making this first cut I was committing myself to hours of sailing in a range of conditions with failure in more ways than one looming around the corner. I felt fairly confident in my building plans and ability to turn the pile of wood into something that resembled those plans since I have built 12 boats with 5 being my own plans. I also felt confident in my design having built and raced two ducks in the past and receiving design advice from some of the most recognized builders in duckdom through the EC puddleduck yahoo group. Still... was I nuts?
I chose 1/4 inch BC pine for its durability, availability to PDR builders, and since I already had 4 sheets in the shop. I knew this would make for a heavier duck than the ones I had made from luan but those had been prone to failure of the laminations and rapid rot both of which I did not want to happen while I was in the middle of Florida Bay. I could have bought Meranti, Okume or similar expensive boatbuilding ply but that went against the spirit of puddleducks. They are supposed to be inexpensive easy to build boats well within the capabilities both budgetary and carpentry of the average Joe. The duck that does the Everglades Challenge should be in this same spirit so, regular old Home Depot BC it was!
First step was to cut out all 4 sides, the bow, and the transom. Why 4 sides? Well, there are the sides to the boat and the sides to the airboxes that were to provide my emergency floatation. The easiest way to cut plywood for me is on sawhorses setting the blade so it just barely scores the top of the sawhorses. My sawhorses show the history of a lot of boatbuilding through the shallow cuts that crisscross their tops. Ironically, these shallow cuts actually improve them increasing the ability to grip the wood so it doesn't slide around. The bow and transom are easy but the sides require some calculation as I doing 16" high sides rather than the 18" shown on the class rules. Since only the bottom 10" of the hull need to conform to class rules this is legal but it does require a bit of calculation, primarily with the location of the bow chine, to get it right.
|
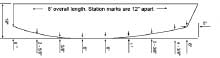
The required dimensions from the rules page at pdracer.com. |
|
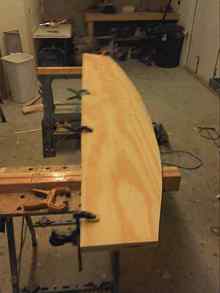
I stacked all 4 sides together so I could complete the sides in one cut. |
I decided to use stitch and glue to build the duck for its durability, simplicity, and ease of building. Chine logs can be prone to crack or rot and they are a gathering place for boating muck that is hard to clean out. Plus, the screws or nails used to attach them can start to rust causing some of the failure noted above. If you take the mechanical fasteners out, then the glue joints can fail especially if the boat takes a pounding. This is what happened to Queequeg's Coffin during the 2010 Florida 120 and towards the end of the event I had to bail every hour to keep my rear out of the water. In contrast, stitch and glue leaves a nice clean curve inside the boat easy to clean out with the swipe of a sponge. The chine is built up from layers of thickened epoxy and fiberglass so becomes one integral piece that won't come apart no matter how much abuse the water dishes out. There are no mechanical fasteners in the chine to cause failure and the join holds together fine without them. Finally, once you get the knack for doing stitch and glue the boat goes together easier than chine log construction. Only downside is drying time which means chine log is only superior for a quick build.
I started going 3D by laying a 4x8 sheet of plywood for the bottom across two sawhorses so it would sag making it take on the shape of the rocker. I then drilled corresponding holes along the long edges of the bottom, sides, transom, and bow transom. Then, I take precut 2 inch pieces of copper wire and push it through the corresponding holes and twist it together using flat nose pliers. I have also had great luck with zip ties when there isn't an extreme curve and they are easier to use and to trim off later but I couldn't find any in my shop. Of course, there were definitely challenges as the plywood can be a bit floppy and I really need an extra hand to hold everything in place while I stitch. Still, two hours after my first cut I had a 3 dimensional duck!
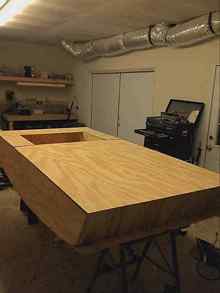
Next, I put the sides of the airtanks in and tacked them in place with nails through the bow and transom. I did not stitch those pieces to the bottom as the wire would have gotten in the way of the extra piece of plywood I was putting on the cockpit sole for reinforcement. I lowered this extra reinforcement in place and put some bits of wood in the airtank to keep the inner sides from shifting. I then laid the deck in place and stood back to take a look. I had built.... a BOX! I is at this point I posted looking for advice on how to add a few more curves for aesthetics but ultimately decided to keep it simple.
|
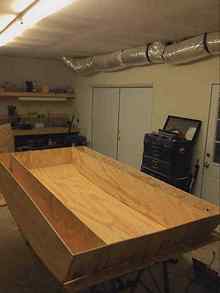
A 3 dimensional duck complete with side airtanks! Extra reinforcement for the sole is just laid in making the bottom look flatter than it is. Note the twists of wire visible on the bottom chine. |
|
Decks laid in place. Definitely box shaped but a lot of boat in a short package. |
I set the deck aside and started taping the inside seams. My simple method for doing this is to first ladle blobs of thickened epoxy in the chine then lay dry fiberglass tape on top. Starting from one end, I squish and shape the thickened epoxy under the fiberglass tape. This makes shaping it easy as the tape prevents the thickened epoxy from sticking to my fingers. Once I am satisfied, I use a chip brush to paint unthickened epoxy on the tape until the dry spots disappear. Later, I will go over the tape with some thickened epoxy to fill the weave. I do this for all the sides, bow, and transom. In the cockpit area I put epoxy on the sole doubler and use drywall screws through the bottom to clamp it in place before taping around the cockpit. I then let the epoxy cure. I later add a layer of fiberglass to the sole of the cockpit and a few inches up each side to prevent the plywood from checking from exposure to moisture I am sure will be trapped underneath whatever I choose to sit on. I do not fill the weave in later preferring a textured finish to the cockpit floor for better traction.
Once everything has dried, I test the sturdiness of the boat by lifting one corner. Very little flex at all even before attaching the deck! As I stand back admiring my work, I start to think. Instead of having the leeboard pivot bolts go through only one side, wouldn't it be sturdier to have a longer bolt that goes through both sides of the airtank? The geometry seemed to indicate it would. In addition, if I ran the bolt through the airtank inside of a pvc sleeve it would reduce the risk of water seeping through the pivot bolt and filling up the airtanks unseen. So, I went ahead and reinforced both sides of the airtank with a pvc sleeve in between. Then, another though hit me while looking at the big flat deck, it would be very tempting to walk or sit on so I should probably run some support beams breadthwise. Besides, I already needed reinforcement where the forward hatch and rowing thwart would go. The hatch is a slam hatch which I have already verified watertight by using it on Queequags coffin during the 2010 Florida 120. The hatch would make it easier to access the forward part of the cockpit and, if it opened forward, could be used to scoop in the breeze when sleeping on the boat during hot nights.
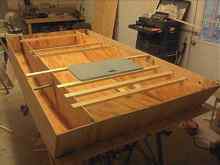
As I was planning my beams I realized I could set the beams into notches in the walls of the side airtanks instead of being just screwed in. I could also run one beam from one side to the other right where the leeboards are for extra reinforcement. Again, this would add weight but make for a very solid boat that could take the punishment dished out during the EC. All the beams went in and I added stringers on the inside of the airtanks to give me a solid surface to glue and screw the deck into.
|
Boat stitch and glued together with reinforcement beams and leeboard mounts in place. The beams forward of the hatch are for the mast step, the hatch itself is setting there to test fit and to give me an idea of where to put the side pieces. Aft of that is the reinforcement for the rowing thwart and then the aft part of the cockpit opening. All beams are notched in so the sides of the airtank actually provide support. |
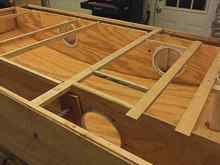
As I am doing all of this I am looking at the available storage in those side airtanks. I really don't want to load my spare floatation down or store items that I need to get to frequently tempting me to sail with the tanks open. However, it would make a nice place to tuck things like spare batteries, water, and etc. So, I installed four 12" quarter turn deckplates I bought from duckworksbbs and had installed in Knot Yacht but later took out discovering I didn't need them. I also glued in a divider halfway down the tanks dividing them into two storage compartments each. The deckplates would also allow inspection of the inside of the airtanks and access for repair or through-bolting of hardware. On the transom I glued on an extra piece of 1/2 inch ply to reinforce where the gudgeons for the rudder would be through bolted. Before installing the deck, I painted the interior of the airboxes and the cockpit white for a clean look and to make it easier to see items.
|
Large quarter turn deckplates installed at the cockpit opening and where the slam hatch would be installed. Small backup items can be stored in the airtanks and these also provide access for inspection and through-bolting hardware. Mast step can be glimpsed to the right extreme right. |
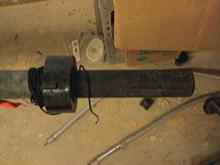
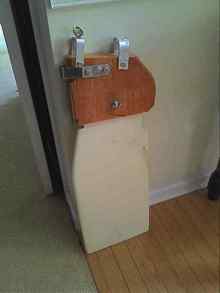
The final item to install before the deck was the mast step. The bottom of the mast step I reinforced by running a 1x4 from one side airtank to the other. Prior to running gluing and screwing this piece in, I had attached a round plug the same diameter as the inside of a 3" pvc pipe with a 5" long 1/2" bolt. This bolt would go into a hole on the foot of the mast and provide the lateral resistance needed while still allowing the mast to easily rotate. Up at deck level I had two beams notched into the side airtanks the diameter of the outside of that same 3" pvc pipe apart. Finally, I screwed in two smaller pieces between these beams running fore and aft. The 3" pvc pipe was then lowered into place through this upper support network and over the plug with bolt through it at the bottom and trimmed flush to fit under the deck. Epoxy was then carefully poured down the pvc sleeve to seal the bottom from water intrusion and reinforce the bolt. The PVC sleeve is there primarily to keep the water out of the boat.
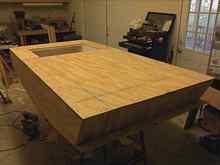
Next step was to glue and screw the deck on the boat. I used 1/4 inch plywood everywhere but the side decks by the cockpit opening. I used 3/8 ply there since I knew I wanted to hike out and give a stronger ply to attach oarlocks to. I know from experience how much stress my body parked on the rails and bouncing on the waves can put on sidedecks of a boat and I wanted no flex fatigue on this boat! Having played the guessing game of: where is that support I need to screw the deck into? - which I firmly believe is the origins of the battleship peg game, I went ahead and marked where each of the support beams I needed to put screws into were. I then used PL premium on all of them before lowering the deck into place. Once the deck was on, I cut out the opening for the forward hatch and mast by first drilling a hole then using my router with a flush laminate trimmer attached. Once all the glue dried, the boat was extremely solid with no flex.
|
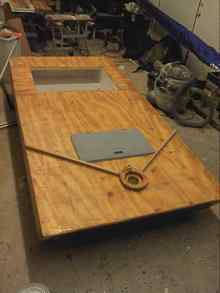
Chalk lines placed where the support beams are helped when it came time to screw the deck in place. |
Next, I flipped the boat which is when I noted how much heavier it was than my previous two ducks. The weight of the BC plywood combined with all of the extra reinforcement really added up. I later put the boat on a scale before painting and it was 125 lbs! One the boat was upside down I cut all of the copper wire and pulled it out of the boat. I then sanded the chines round, trimmed the bottom bow and stern, and glassed them all with some heavy fiberglass tape and thickened epoxy. Once cured, I trimmed the tape smooth with a sharp chisel prior to laying dry fiberglass over the whole bottom then wetting it out with epoxy. Dry cloth is so much easier to smooth out on the hull. Another coat of thickened epoxy filled the weave and gave me something to sand smooth later.
Once again I flipped the hull so I could sand the deck corners round and glass them as well. Glassing the hull is required for a boat made out of fir or pine plywood in order to prevent the wood from checking. Okume and Meranti ply don't check so don't need to be glassed which is another reason they make for a lighter boat and helps drive down the overall costs of using these more expensive plywoods. Once the epoxy cures I go to work with a sander listening to a good book on tape. To protect my ears I use construction grade headphones, I wear safety glasses to protect my eyes, and a mask to protect my lungs. I prefer sanding to going through the effort and frustration inherent in getting a smooth final coat of epoxy that doesn't need sanding. In the process I generate a lot of fine dust some of which I capture for later use and the rest of which coats every surface in my shop.
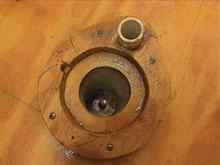
Once done sanding, I turn my attention to making the upper mast step that the ball bearing collar on my escape rig locks into. This collar holds the mast against the lateral force of the wind in the sail while still allowing the mast to easily rotate. I have never seen an escape sailboat in person so I had to figure out the shape of the upper mast step by studying the collar on the mast. On the side near the bottom of the collar is a tab about 1/4 inch high by 1/2 long and 1/4 inch wide. On the opposite side is another tab higher on the collar but about an inch tall.
|
Unique rotating collar on the Escape Sailboat rig I was using for the ECduck. |
From the collar on the mast I figured out the step made from three stacked pieces of 3/8 inch ply with the top and bottom having a notch cut out but on different sides and the middle having the area between these notches removed. This way, the first tab drops through the notch on the first layer to rest on the second layer of ply. Rotating the collar brings the bottom tab in line with the notch on the bottom layer where it drops in. The upper tab on the opposite side of the mast collar then drops into the notch in the first layer. I think the picture below is worth a thousand words. Bottom line is a very sturdy mast step that allows for easy rotation while keeping any water that finds its way down past the collar out of the cockpit. Just behind the mast step I installed another smaller step for the boom. I use a ¾" galvanized electrical conduit for the boom which is deck stepped allowing the mast to rotate freely in order to roll up the sail. The deck mounted boom with curve also acts as its own boom vang.
|
Mast step with the locking ring glued and screwed into place. Note the bolt at the bottom of the step that will go into a hole on the bottom of the mast. All the lateral forces on the mast are taken by the bolt and the plywood ring. The PVC sleeve is there only to keep out water. Note also the smaller PVC pipe making the step for the unique boom. |
One problem with a flat deck is water can easily travel down it and find its way into the cockpit. So, I put two pieces of wood on either side of the mast step angled back to serve as forward water deflector and also reinforce the upper mast step.
|
Mast step and forward water deflector in place. Hatch won't be fastened in until after painting. |
Now I turned my attention to the sliding raised hatch. I cut out rails from plastic deck lumber for the hatch to slide on. I then cut the sides of the cabin out of 1/2 inch ply then propped them in place to see if the proportions were correct. Looking at those sides got me to thinking about how the rigid top would always be there creating windage regardless of if it was being used or not and how it might bind while trying to slide. I started thinking again about a cloth dodger like I used on Little Gem and how it could be folded down reducing windage if needed. Using the removable side mounts Chuck sells at duckworksbbs I could even remove the dodger and tuck it safely below for trailering or just to get it out of the way during nice weather. What finally sold me on the dodger was actually sitting in the boat and realizing I would need more than the planned 8" in height to comfortably sit inside. My wife happened to pass by the shop when I was in the boat with a far-away look in my eye and just snorted while rolling her eyes. I decided to set the top project aside and work towards getting the boat ready for the test sail.
|
Sides propped in place for the hard cabin top. I decided to go with a cloth dodger instead after this dry fit. |
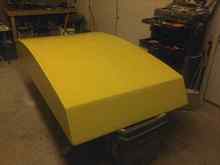
Once again, I flipped the hull (a good workout) and cleaned it in preparation for painting. I chose to paint the hull of the boat yellow as I have seen how well that color stands out at a distance and I wanted to make sure the coast guard or other rescuers could find me. No, I am not being pessimistic! I just have a belief that if you prepare for the worst it will not happen. Bad things only happen to those who are unprepared for them, or at least they are only really bad for the people who are unprepared to deal with them. This belief originates from what I learned earning my Eagle Scout at 14 years old just prior to moving to Norway where I learned to sail. The deck I would paint an off-white color having had experienced the glare from a bright white deck in full sunshine. For paint I chose Interlux Brightside boat paint which I believe is the least expensive, most durable, and best looking paint to use on a boat. In terms of expense, a quart of this paint costs the same as a gallon of porch enamel at a big box hardware store but the same quart goes on so wonderfully opaque that two coats are the equivalent of four coats of the cheaper paint. Add to this the fact that Interlux is extremely scratch resistant, adheres extremely well to epoxy, and is very easy to keep clean and you have a finish that requires much fewer touch ups or repainting over the years. Finally, Interlux Brightside is self-leveling meaning brush strokes just melt away leaving a smooth glossy finish. This means you can use disposable foam rollers and/or chip brushes and still get a finish that outshines that of the cheaper paint applied with much more expensive brushes that require costly clean up time. I only wish my favorite boatbuilding supply store, Duckworksbbs, would carry this paint. hint, hint. The paint goes on without a hitch though it does reveal the fact that my sanding isn't perfect due both to impatience and the limited time I have to build this boat and get it tested before the Everglades Challenge.
|
Bottom painted in bright yellow for visibility. I did have to clean the shop of all the dust the build had created before this shot. |
I already had two kick up rudder assemblies I could use on the boat. The first one was a commercially made rudder with a metal rudder head and nicely shaped blade that I graciously accepted amidst much laughter at the end of the 2010 Florida 120 where my homebuilt rudder came apart causing much embarrassment. The other was a rudder made from a backup rudder blade I made for Little Gem and a rudder head I made for another boat. I chose the homebuilt because it was 4 inches shorter for shoal water work though the ugly specter of the rudder coming apart was pushing me towards the commercially made rudder. I attached it to the boat using a weekender rudder set from duckworksbbs. Since I was planning on a transom mounted fishtail drive I had to mount the rudder assembly below the top edge of the transom. I routed the rudder control lines from the back of the rudder head, up and out to fairleads on the transom, and through a pulley in each forward corner of the cockpit opening. The rudder blade was weighted so I only needed to install a cleat and line to hold the rudder up. For things like that I prefer those little horn cleats from Home Depot and tie loops in the line to put over the horn when I want it raised.
|
Rudder I adapted for use on the EC puddleduck. The brackets for the tiller would be removed. |
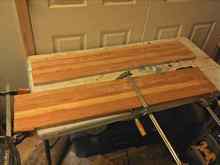
I didn't have suitable leeboards sitting around the shop but I did have some oak and poplar 1x boards so I decided to make the leeboards butcher block style with alternating wood types. I epoxied the wood together and ended up with boards 42 inches long by 9 inches wide. Once the epoxy had cured, I went after them with a belt sander until I got a nice foil shape. I drilled holes for the bolt and the line to raise the board. To keep it down, I rigged some shock cord and make the tension adjustable by using horned cleats on the boat.
|
Second leeboard clamped, glued, and drying. |
|
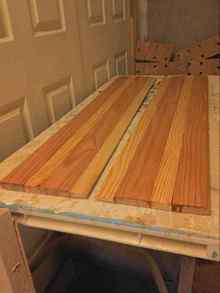
After a lot of sanding, the leeboards are ready for varnish. |
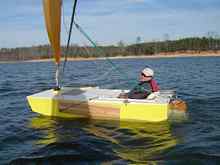
At this point I was eager to try her out on the lake and you will have to wait for the next article to find out about the first sail, tweaks and upgrades, and the results of the second sail. However, I will leave you with this one picture to whet your appetite.
|
Picture from the test sail. Story forthcoming! |
“If you would like to support Scott’s effort, you can make a donation HERE.” |