 Custom Search
|
| sails |
| plans |
| epoxy |
| rope/line |
| hardware |
| canoe/kayak |
| sailmaking |
| materials |
| models |
| media |
| tools |
| gear |
| join |
| home |
| indexes |
| classifieds |
| calendar |
| archives |
| about |
| links |
| Join Duckworks Get free newsletter CLICK HERE |
|
|
| June Treasure Chest |
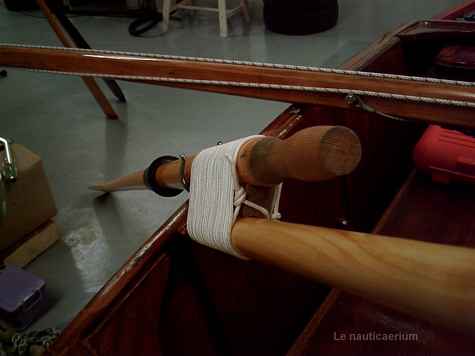
HomemadeYou can make your own Scullmatix very simply with an oar, a handle, a wooden spacer and a nice whipping, and that's it! For example, here is a model that works quickly - very well. At no doubt you will be able to make prettier!
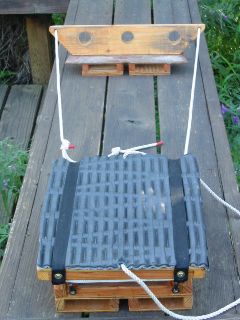
For those who want more details on the measures to be applied, we must understand that the most important thing is neither the angle nor the exact size of the grip, but the length of the lever between handle and blade. It depends on the length of the elements relative to the size of the sculler, his position in the boat and sometimes even his age! Anyway to make it simple and fast, we may consider that it takes away from the center of the handle and the blade axis in centimeters equal to the length of the vessel in meters. For example for a boat about 4 to 5 meters, it will be good to have the handle of the Yuloh (the name of the Asian sculling device) or Scullmatix (my invention derived from the same principle) shifted by 4 to 5 cm from the axis of the blade. The length of the handle grip will obviously depend on the size of the boat and the person doing the sculling. The angle of the handle will be adjusted accordingly (usually considered an angle of 10 ° to 12 °). The exact length of the handle is less important since the handle grip is parallel to the axis of blade: the sculler instinctively grasps the handle at the most comfortable place without further complication. Guy Capra Adjustable StretcherI took this stretcher idea from someone who posted to Duckworks a few years ago and worked it out a bit differently. The box is classic Michalak. Now its being used in maybe 6 or 8 of the rowboats I've built and for me works great. I loop the line around my seat box, but the line could be attached to thwarts, frames, or otherwise if fixed seat rowing from a thwart.
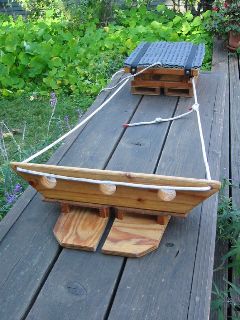
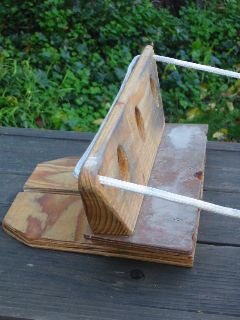
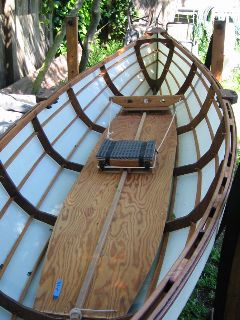
This set up is for my SOF rowboat that has a stringer down the center of the floorboard, so it matches the groove in box and stretcher. Line is 1/4" double braided dacron as it has less stretch for cheapest price. I use an adjustable knot to chance the length of the line. The stretcher is a piece of 2x4 ripped to 1/2" on top and a full width bottom with lightening holes as desired. Its length is a few inches short of the boat's beam when it is in place. The wider the better. Then it's screwed onto a piece of 1/4 or 3/8" ply. Maybe after all is worked out and functioning well, one could go back and glue some/all of the contacts. Friction of the line through the two holes in the 2 x 4 piece keeps it fairly stable, as long as one applies same force to both feet. I took a pic of the stretcher placed in the new boat today. Gives an idea of how all works.
The box is over the middle frame and stretcher towards stern. The strip down center is for strengthening the 1/4" ply floorboard and to keep both things only moving fore and aft. Steve Chambers BoatUSTake a Friend Out This Safe Boating Week and Show Them the Ropes Six Tips in Less Than Six Minutes
ANNAPOLIS, Md., April 30, 2013 - This National Safe Boating Week, May 18-24, do something different. Take a friend out boating, sailing and fishing and show them a good time - and how easy it is to keep everyone aboard safe. Giving your guests a short pre-departure talk about important safety gear and tips for safe operation could go a long way in making sure the day stays fun. The following list of six tips from the BoatUS Foundation for Boating Safety takes less than six minutes to share with guests: 1. Most newcomers to boating have no idea how a boat handles once you're out on open water. Explain to your guests where the best/safest places are to sit during operation, how you'll handle wakes, and if your boat is on the small side, show them how a passenger's shifting weight can affect your boat's stability or exposure to waves. 2. With your VHF radio turned on, tell your guests how to call for help on channel 16. If you have a DSC-VHF radio, show them the red mayday button and explain how to activate it. 3. Bring out the life jackets and encourage your new-to-boating guests to wear one. If they are not worn, ensure they are easy to get to, such as under or next to their seat. 4. Point out the location of other important safety gear such as flares and fire extinguishers. 5. Show your guests on a chart where you're going, and let them know you've filed a float plan so others know the boat's whereabouts and when the group should be returning. 6. Let them know what to do if someone falls overboard - having a spotter is essential as is keeping a throwable device, also known as a type IV personal floatation device (PFD), handy at all times. ### About the BoatUS Foundation: The BoatUS Foundation for Boating Safety and Clean Water is a national leader promoting safe, clean and responsible boating. Funded primarily by the half-million members of BoatUS, it provides innovative educational outreach directly to boaters and anglers with the aim of reducing accidents and fatalities, increasing stewardship of America's waterways and keeping boating safe for all. To make a tax-deductible donation to this 501(c)(3) nonprofit, go to www.BoatUS.com/Foundation.
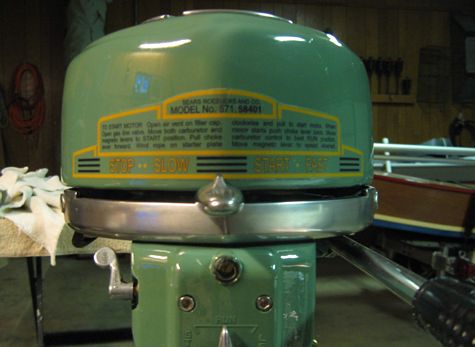
1946 Elgin OutboardI refurbished this 1946 Elgin outboard motor. It was manufactured for Sears Roebuck by "West Bend". The color is Dupli-Color "Detroit Diesel Alpine Green", 500 degree engine paint. The color matches 99% of the original exactly. In the photo taken outside with sunlight, the camera thinks it's blue. This is also true if taken inside with a flash. I discovered that if I disabled the flash, the color would come out almost true.
Each part was given 4 coats of color on top of self-etching primer then a clear coat. The clear coat MUST be applied before the color coats cure (got this information from Dupli-Color folks). Then, each part one at a time was hung in the oven and "baked" for a couple of hours at 250 degrees. The parts came out of the oven looking beautiful and the paint was fully cured. Those are "water-slide" decals you see on the tank. They can still be ordered, believe it or not. Ray |
|