
 Custom Search
|
| sails |
| plans |
| epoxy |
| rope/line |
| hardware |
| canoe/kayak |
| sailmaking |
| materials |
| models |
| media |
| tools |
| gear |

| join |
| home |
| indexes |
| classifieds |
| calendar |
| archives |
| about |
| links |
| Join Duckworks Get free newsletter CLICK HERE |
|
|
| May Treasure Chest |
Homemade Oar Locks & SocketsI do not enjoy gyms but I do enjoy rowing (as well as walking and bicycling) so for parts of the last three decades I have rowed my 8 foot dinkey to and from my old 32 foot sailboat. Over the years I added different kinds of oarlocks (as well as a sail for, a short time) and a 2 hp outboard which I use mostly for guests).
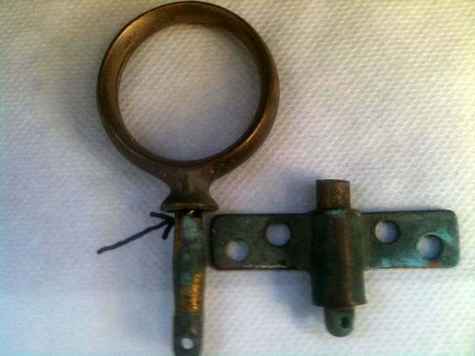
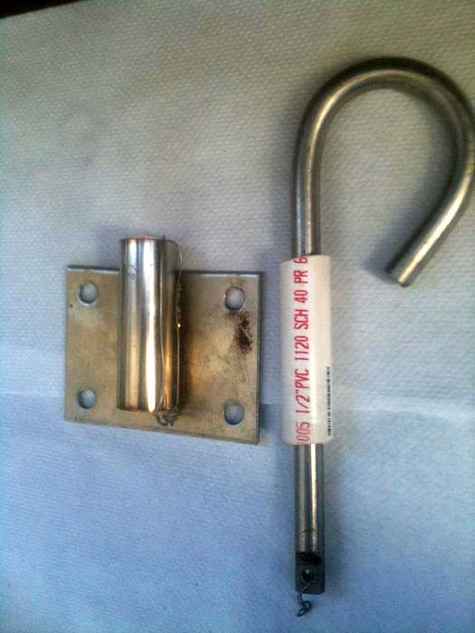
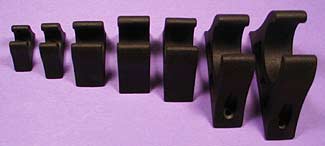
Photo 1 above is the type of lock and socket I used for a very long time. The black line is where the shaft of a few of the oar locks broke off from the ring. The vendor replaced the broken locks but when I row in places where they are strong currents and winds I need to able to rely on the locks and sockets, so I decided to move away from possible dubious bronze castings to common stainless steel and tig welding. On one of the boat forums I read a participant suggested that bearings for shafts could be made of common plastic pipe found in Big Box stores. So I purchased a short piece of that common white half inch schedule 40 plastic pipe. The ID of this pipe is a little bigger than ½ inch. I then explored the cut-off bins of machine shops doing work in stainless steel. I found some rod that had a nice fit through the plastic pipe and some pipe with a ID a little bigger than the plastic pipe and some inch plate to weld the the pipe to.
Photo 2 above is what I ended up with. I thought the oarlock was a little crude but I had to accept what the shop could do in the short time they offered me. After a few weeks of daily rowing to shore and back from my anchored out old sailboat the leather on the oars seems to have molded to the new locks just a bit and I can twist the oar a little with each stroke and row without undue effort.
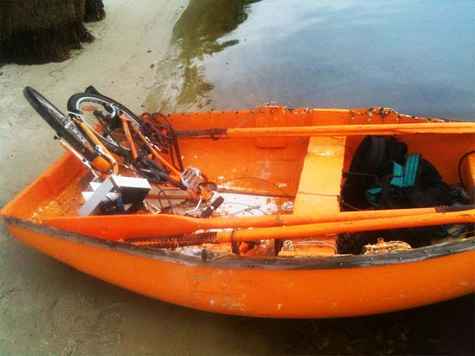
Photo 3 above is the dinkey I have been using and rebuilding for the last 3 decades. See You on the water, John Dean A Sign For All of Us
Dave Lucas Clamps
I needed to make an odd sized frame-and-panel door at a friend's place last summer. Not having my bar clamps with me, I remembered an old drawing I stumbled across somewhere for a panel clamp you can make out of scraps. You get a 2X4+- joint one edge, and then glue and screw a block just thicker than the boards you need to glue up to the end. Then take just about any other long-enough scrap you can find and glue and screw one end on top of the end block to form a long slot. Cut a second block the same width as the other one, and get a bolt long enough to go through the three, and then drill a hole down through the three pieces, and then cut a lightly tapered wedge. For the door I banged together three of them. Assemble/glue the door slide it into the slot, drop the bolt down through the holes in the three pieces, and use the wedges to clamp the thing together. Bullet proof. Aside from being essentially free, the nice thing I found was that with regular bar clamps the panels/doors tend to want to bow up, but with the "slot" clamps, you can tap softwood wedges between the top board and the workpiece to flatten everything down really close to finished. It is a great option for one-off things like solid-wood centerboards and dagger boards, as decent bar or pipe clamps to do the same job could easily run $60 - $100 +. Here's an engraving of one [above], from about 1770 from Andre-Jacob Roubo's The Art of Carpentry. Endlessly adaptable, especially if you use bolts/blocks to clamp against at both ends, in that then you can accommodate pretty much any thickness of wood, and still use the face wedges to flatten the panel to minimize the amount of surfacing you need to do after glue-up. Brian Wale LashingWith a gentle nudge from Martin a friend, I took these pics of lashing the gunnels to the frames on the BC Handliner. For this wale lashing I'm used 100# dacron kite line and for the stringers (lower pic) I used waxed leather workers sewing dacron line. It's like calf roping at the rodeo, each lashing is carefully timed. For me it takes between 5 and 19 minutes per lashing.
The two top holes are not the practice ones, through both wales (1/8"). Below in the frame the line is already threaded through a hole.
The kit: a small screwdriver for lifting lashing to get needle under; thimble; needle-nose pliers for pulling needle; tightening dowels; wax; short blade knife; 100# dacron line; counter-sinker for holes; and, lastly the needle stuck into a piece of cardboard.
After two loops, I wound the dowel and pulled very hard - watch the line creep as you do this.
Almost finished with four loops and four half hitches to tighten the loops. With the needle go to other side to do same and then finish off with a simple overhand knot.
This is the stringer to frame lashing using different line but the same technique. Also, these stringers are proud 1/2" instead of flush with the frame faces - another experiment of mine. So far its working, but time will tell.
It's almost ready to tip over and finish the bottom lashings. If there's anything about lashing these pics don't show, let me know and I'll send you link of other explainers. Steve Chambers Laminating
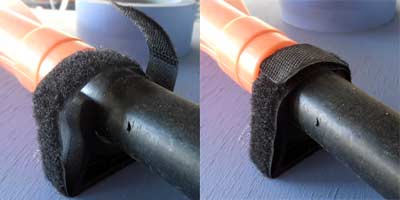
That's laminating a lee-board blank - see picture. Cover all the pieces with packaging tape or wax to avoid gluing them to the blank. I waxed the wedges to make 'em slide easier. Seth Secure Your PaddleWhen you want to secure an item, such as a spare paddle, oar, boathook or other round shaft object, in one of the rubber or spring clips such as these: Seadog Rubber Pole Storage Clips you can use one of the velcro straps, such as those that come with computer power supplies, to organize the cords. This will keep the item from accidentally coming loose and getting lost.
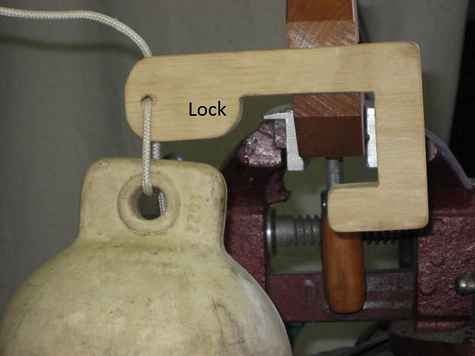
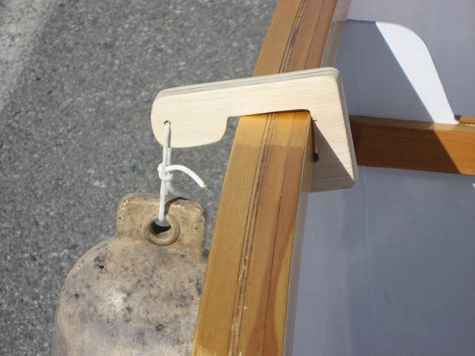
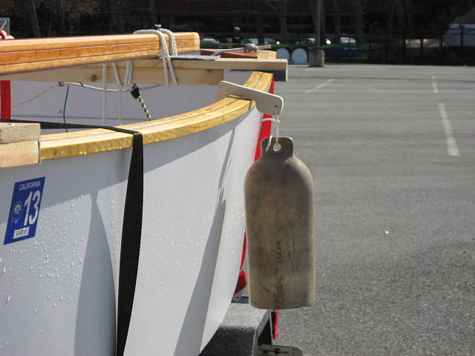
Chuck 'The Duck'. Dinghies and FendersFor me, fenders on dinghies never seem to work very well (especially when the dinghy is 6ft long). Either the fenders are too small to really do much good or they are too big and drag in the water. And there is never a good place to tie them on. To solve my problem I've done 2 things: - I made a hook to hang the fender on the gunwales;
Here are pictures of the fender hook in action.
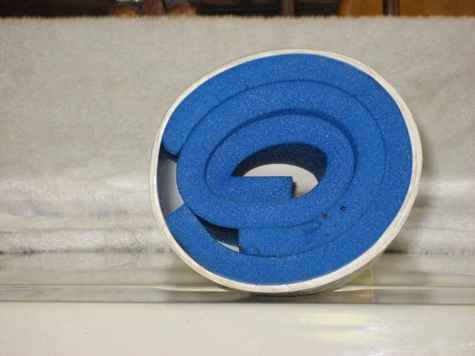
To install the hook, you raise the outside end up about 45 degrees, slip the hook under the inside gunwale and lower the hook/fender into place. The hooks are custom fitted to each boat. I start with a piece of cardboard and start cutting until I get the shape I need. The trick is to get the lock area (see top picture) the correct size and distance out from the inside hook so that it just clears the outside gunwale as you lower it into place. The lock's job is to keep the hook from slipping off the gunwales. For the short, fat fender I took an old fender I had in the junk box and cut the top portion off. Then I rolled up some foam from an old sleeping mat (for camping) and stuffed it into the fender. You can make it as hard or soft as you want by adjusting the amount of foam.
Project cost = $0. Ralph |

|