Many Duckworks readers would already know From Earth to Sky (FETS), at our Hyundai High School from the previous articles regarding one-man yachts in 2012 and 2013. FETS is one of many extracurricular programs where each of Hyundai's first graders works on his or her own projects on arts and science or sports activities. Three like-minded students, Seungji, Sungmin, and I, Seoyoon, formed a team in June to start a new science project in FETS. While going over which project we should choose, we considered some of other upperclassmen's works such as one-man cars and aircrafts. We wished to make something similarly big at first, but after taking into account the time we had, we finally decided to make the simplest and the lightest rowboat.
Honestly, we all thought it might not be that hard to make a small boat - we all spent quite a lot of time making a Lego boat during our childhood; what would be so different from that? However, even the simplest boat was not simple at all to build. Before making the actual boat, we needed to finish several preparatory trainings. First of all, to understand the scientific mechanism behind the rowboat, we made a model hydraulic system with a syringe through which we could learn the science behind hydraulics, Pascal's principle. In fact, we started from scratch, for example, drawing a blue print, cutting the wood, gluing them together, and assembling a hydraulic arm, cart, and hammer. Even though it took a long time and effort, we could understand the mechanisms behind the boat-making not through books but with our hands.
The next step was to build a model boat. It was a much bigger project than making the hydraulic machines. After all, we learned essential skills to build a rowboat like how to use an electric saw to cut the wood, to use a drill, and to attach two pieces of wood using epoxy. The whole process of making a model once more made us progress. After two weeks of training and designing the lightest and the simplest boat, we started making the final rowboat from June 16th.
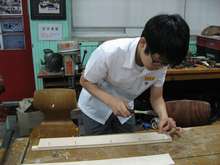
The first step of the big project: preparing materials we needed. There is no boat without wood. Therefore, on top of everything, we had to choose what kind of wood we would make a boat with. To make our boat as light as possible, we used 4mm Russian birch which enabled us to build a light but, at the same time, sturdy boat. Then, we drew the specific designs of each panels for the boat on the plywood and cut the big wooden panels into several pieces based on the drawings. The data regarding the process of boat-making and specific size for the panels were from Duckworks, which helped us tremendously and made our work much more efficient. We owe Duckworks for plenty of interesting information and useful facts, especially for providing the standard unit in centimeters, not inches.
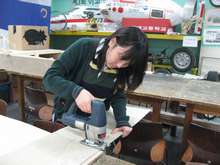
Next, the most important step: making a boat! After all the designing and dimensioning were done, the only task left in front of us was manual labor. Using the jigsaw was quite hard for us. My team had to work together to make the boat, especially when we were using dangerous electric tools. For example, two of us had to hold on the plywood while the other one was cutting the wood using thejigsaw. Collaborating with each other on every step on the boat and making process made me more committed and attached to the project. Cutting the plywood in straight lines was not that difficult but we had a hard time cutting the curves. Our counselor Ki Bok Koo helped us to make perfect curves for the wood used in the bottom of the boat. We all together had a great time.
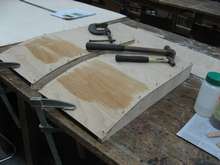
The next thing we had to do was framing the boat. Because the plywood we used was too light, we needed basic wooden frames in order to actually ride in the boat. Without the frames, the boat couldn't handle our weight. What we did first was framing the back of the boat. We used electric drills and bolts to fix the frame and the back board. Using the electric drill was quite difficult for us because it was heavy and hard to hold it still because of the vibration. After the drilling, we used epoxy around the bolts to make sure it would not fall off during our ride at the river.
s.JPG) |
 |
 |
s.JPG) |
s.JPG) |
s.JPG) |
s.JPG) |
s.JPG) |
 |
 |
s.JPG) |
s.JPG) |
 |
 |
s.JPG) |
s.JPG) |
s.JPG) |
 |
|
s.JPG) |
|
s.JPG) |
s.JPG) |
Then, many students came along to hold the boat and make the general figure of the boat. We could not hold on to the boat for a long time, so we used grips to hold it and also used bolts to fix it. After we used grips, we put some water on the bottom to make the boat keep its bent figure which later we fixed the bottom of the boat using bolts with the bent panels. Drilling the horizontal frame was more difficult than framing the back of the boat because we needed the frame to be perfectly horizontal so that the frame could disperse the force it takes in. While we drilled the screws in the boat, one or two people needed to look into the boat just in case the bolts were not drilled properly. Usually, people make the frames first and then fix in the frames, but because we were the beginners of the entire process, we did it backwards.
Next, we made the seats with 6 pieces of wood and made the paddles. We used Minn Kota, a 12V battery motor, for the driving force. However, when we went for an actual ride, we could not use a motor device, which led us to use paddles. During the final steps, we attached some glass fibers on the edge of the boat with epoxy in order to enhance the waterproofing functions of the surface. It took two days - a day for attaching the inside of the boat and another day for attaching the outside.
After finishing building the boat, one last task was to paint the boat. We did paint it twice to protect the wood from the water. Moreover, we varnished the inside of the boat to add extra gloss to the wood grain. The total weight of the boat fit for a person to sit inside was 18 kilograms. It was 17 before but after the painting, it became 18 kilograms.
Thanks to the perfect location of our school, which is only 10 minutes walking from Han River, we were able to hop in the special boat we made and ride it in person! Finally, a day before our last class, we went to Han River to ride the boat that we made. First, we transported the boat on a cart. Before we hopped into the boat, we poured wine on the head of the boat wishing our safe and exciting ride. Maybe thanks to the wine, nobody drowned and our boat floated well around on the river as we paddled; paddling was much more difficult than I expected! No wonder all the rowers have big biceps and shoulders!
Thanks to support from our principal Sun Hwan Kwon, Chairman Chung Ja Chang, and our teacher Ki Bok Koo watching for us, we could finish our project successfully.
|


l.JPG)
l.JPG)
l.JPG)
l.JPG)
l.JPG)
l.JPG)
l.JPG)
l.JPG)

l.JPG)
l.JPG)
l.JPG)
l.JPG)
l.JPG)
l.JPG)