| By
Rob
Rohde-Szudy - Madison, Wisconsin - USA
Cleaning Up
Two-Stroke Outboards
|
|
|
Ah, outboard motoring. The pearlescent
sheen of oil on water. The pall of blue-gray smoke.
The choking stench of half-burned petroleum. How I
love it. Well, I love it except for those parts. Fortunately,
I’ve come across some ways to reduce the pollution
associated with old two-stroke outboards.
Most of us know why we use these old motors, and
outboard guru Max Wawrzyniak has amassed an impressive
body of work on this topic in his book Cheap
Outboards. I won’t try to duplicate
his work except to say that late 1950s through early
1970s OMC outboards are inexpensive, available, very
easy to repair, and reliable when properly tended
to.
The disadvantages are pollution and inefficiency.
The late Robb White thought two-stroke oil was a
relatively innocuous pollutant in moderation, and
how the big engines are a much bigger problem than
little one-digit-horsepower jobs. While the later
is most certainly true, I’m not so sure about
the former. Two-stroke engines cough out not only
the oil, but also gasoline. If you’ve ever happened
to spill any substantial amount while refueling a
lawnmower, you know what I mean. Count on years of
dead grass in that spot. But old Robb was no fool.
He knew perfectly well that cleaner is better, and
encouraged me to pursue these ideas.
So it’s no surprise that those of us who are
too cheap or poor to use modern outboard motors get
a lot of criticism from those who pony up for 4-stroke
power. We all know that the two-stroke motors are
less efficient and pollute more. But we hear very
little about what we can do about it. This is no surprise,
of course, since such information doesn’t sell
new motors! Since I’m not involved in selling
new motors, I spent a bit of time cleaning up the
old one I could afford.
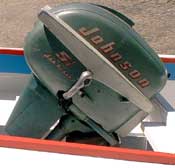
And it is an old one indeed. This is a 1954 Johnson
5.5 hp two-stroke outboard. Stylish, isn’t it?
 |
1954
Johnson
(click
images to enlarge) |
|
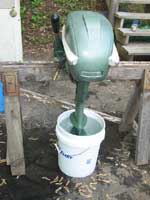
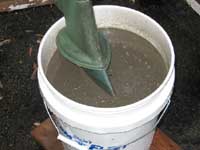
Baseline Emissions Testing
Stylish or not, something had to be done about the
emissions. I ran an informal test to get a baseline
and was positively revolted by the results. Here’s
the setup.
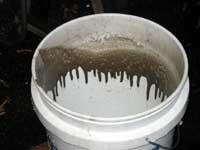
I hope you aren’t eating, because here are
some photos after idling 5 minutes and running 10
minutes at ¾ throttle – all in neutral.
This was after dumping the water and a lot of the
gunk.
I don’t know how much ecological harm the
above oil slick causes, but I thought it was just
too… well… icky, even without the stomach-turning
smell. It made me wonder if I could clean this thing
up in a meaningful way without spending too much money.
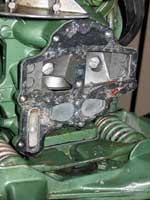
Gaskets and Tune-up
First the obvious. The motor needs to be in good
tune so it’s actually vaporizing the correct
amount of fuel to begin with, and igniting it efficiently.
Again, check out Max’s book. Gaskets are a commonly-neglected
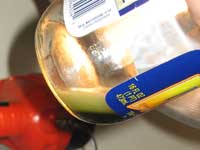
problem on these motors too. Check out this oil stain
I noticed inside my cowling.

Exhaust cover leak |
cowling stain
|
|
I bet it had been doing it for a while, but I hadn’t
really noticed. It was the exhaust port cover gasket,
which is hard to find for this motor. Fortunately
it’s easy to cut a new one from inexpensive
gasket material. Others have dealt with this by adding
a little gasket compound to the old gasket, then tightening
the screws after the compound cures.
Another commonly-neglected tune-up item is crankcase
compression/vacuum. Nothing works quite right if the
crankcase is leaky. I made a plate to fit over the
intake ports in place of the intake manifold. Two
hose barbs allow me to accurately measure the pressure
and vacuum in each crankcase. If the readings are
very different, new seals are in order. Good thing
mine were OK – it’s a relatively major
job to get to them.
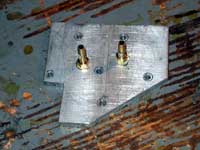
Test plate |
|
Now on to some modifications.
Crankcase Bleeders
This modification is relatively easy. In a two-stroke
engine, the fuel/oil/air mist is drawn through the
crankcase. Some of the oil condenses on the relatively
cool crankcase walls and runs down to the bottom.
If you leave it in there, it will be blown out whenever
it builds up too much, or when you open the throttle
further (increasing air flow). This small reservoir
of uncontrolled fuel will cause uneven operation and
fouled plugs.
So the engineers put in drains to get that oil out
of the crankcases. These bleed the oil through check
valves so the crankcase doesn’t lose any vacuum.
On each compression stroke it blows a little oil through
a small reed valve, then the reed valve closes to
avoid “diluting” the vacuum or sucking
the oil back in.
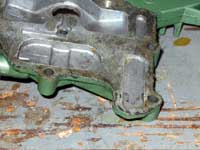
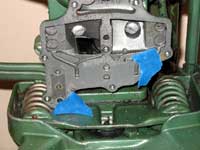
This is what it looks like:
The small reed valves on the lower left side of
the gasket mating surface are the bleeders. Here’s
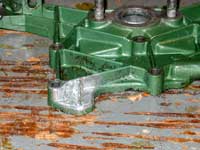
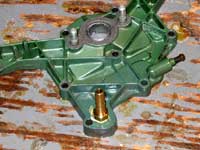
the side view:
The top two arrows point to the channels that drain
oil from the bottom of each crankcase. These go though
the upper and lower sides of the check valve assembly.
The lower arrow points to the outlet channel, which
runs to the base of the powerhead. There, the wasted
oil is discharged into the spent cooling water. That’s
right, it just spits the oil into the water. These
motors were designed in a very different time. Clearly
it would be good if we could clean this up!
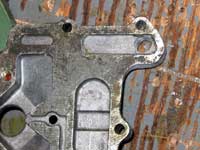
Fortunately, it’s easy to do. First, we need
a way to add a hose barb to the manifold. Unfortunately
there isn’t enough metal to tap into.
JB Weld to the rescue! A Dremel or similar tool
is by far the quickest way to take the paint off this
area. You were looking for an excuse to buy one anyway,
and it will help you with those fantasies of being
a dentist.
Once the paint is off, wash with a degreaser –
I use Spic-n-Span. Rinse and dry, obviously. A final
cleaning with acetone is not a bad idea when using
epoxy. Then add a little “dam” of masking
tape. This holds the JB Weld in place while it cures.
We will need an 11/32” hole for a 1/8”
pipe thread. But just in case, drill a pilot hole
first. Do this from the inside, and center punch before
drilling. You don’t want any unpleasant surprises,
like your hole overlaps the gasket mating surface.
My hole didn’t leave quite as much metal as
I would have liked, so I added more JB Weld. Now it
looks like this.
While you are mixing the JB Weld, you may as well
plug the bleeder drain. (Max would say to use hard-setting
gasket sealant in case you ever want to reverse the
process. But I don’t think it’s much harder
to drill JB Weld. And I can’t think why I would
want to go back to spitting oil into the lake.) Degrease
the metal and put a small dab in the hole. Flatten
it under a piece of masking tape and let it cure.
When cured, very carefully file it flush with the
rest of the surface. You may need to lap the entire
surface with a piece of plate glass and Crocus cloth
or #00 Emery. Just make sure that your modification
doesn’t prevent the gasket from sealing, and
even more important, that you don’t cut away
too much of the gasket mating surface! (In case you
were wondering, the other piece of tape is for Max's
"ditching the pressure tank" mod, as seen
in the book mentioned above.)
When all looks well, we enlarge our hole to 11/32”
and paint. I used Rustoleum spray primer and enamel.
When it dries we can cut threads. Watch carefully
so your threading doesn’t cut into the gasket
mating surface. Pipe thread is tapered, so you have
to start from the outside, and the hole gets wider
as you cut deeper. Remember to keep firm pressure
on the tap as you’re starting it, or your first
couple threads will get stripped.
If your engine really doesn’t have space for
1/8” pipe threading, you could always center
bore a 10-32 or even ¼” screw and use
it as a hose barb. It is very tedious to end-bore
a screw, since you have to stop and add oil often
to prevent the tiny drill overheating. It might also
be possible to JB Weld on a hose barb, but I think
a hole tapped at least partly in metal will resist
vibration better. This may be superstition. If you
do make a threaded hole, use the yellow Teflon tape
– the white stuff isn’t meant to resist
petroleum.
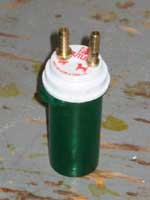
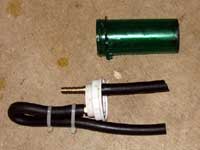
After putting the engine back together I clamped
a couple feet of hose to my excuse for a hose barb.
This line leads to a catch jar made from an empty
pill bottle. I used a green veterinary pill bottle
so it would match the engine. Such vanity.
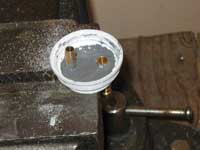
First I bored the lid to tightly fit two hose barbs.
One is double-ended. Once these were fitted, I clamped
them in a vice and added JB Weld to lock them in place.
(I don’t own stock in JB Weld or anything, by
the way. I just find it very convenient.)
Then I added hoses. This is how they should look.
The inlet is the double barb. We add a short section
of hose to make sure the waste fuel ends up in the
bottom of the bottle. The other barb is the vent.
It’s hose is zip-tied into an inverted “U”
shape to keep water from easily splashing into the
bottle.
We still need to mount the bottle somewhere. It
would be slick to mount it to the leg of the motor,
but I went with a simpler solution. It hangs by its
hose. Winter is a good time to come up with a better
bracket. I’m thinking it will screw to the back
of the exhaust “telltale” housing. But
if it tilts with the motor, be sure the vent faces
aft so you don’t dump the oil when you tilt
the motor up!
No matter how it is mounted, any oil collected in
this jar correlates exactly with pollution you prevented.
Over a one-hour run I burned less than a half-gallon
of fuel, but collected about 20 mL out the bleeders.
This may not seem like a lot, but remember this is
only one hour. It amounts to maybe a half cup over
6 hours of running. How much would this amount to
over an entire season? With a bigger motor? In any
case, it makes me feel a lot better about using a
two-stroke and it cost hardly anything to implement.
Some people will be thinking of piping this fuel
back to the tank. I wouldn’t. seems to take
on a little water in the crankcase, and this makes
the oil precipitate far too readily. Dispose of it
with your waste oil.
Next time we’ll look at using cleaner fuels
to further reduce these emissions.
Rob Rohde-Szudy
Madison, Wisconsin, USA
robrohdeszudy@yahoo.com
A version of this article
with fewer photos but further discussion can be
found in the October 1, 2006 Issue (Vol 24 - #10)
of Messing About In Boats.

Other Articles by Rob Rohde-Szudy:
|