| Send
items to chuck.leinweber@gmail.com
for inclusion here next month.
The Treasure Chest is a place to put those cool sailing,
cruising, motoring, boatbuilding or boating tips you have. Send
us your ideas... We just need a photo and a short description.
This time we have...
Inner Tube Glue Clamps
I use strips cut from old inner tubes for clamping odd shapes
or where lots of clamps are needed - like for clamping up a hollow
wooden mast built of staves. This trick only works when it's possible
to wrap the inner tube completely around a joint; it works great
for a masts and anything roundish. With some thought I've even
made it work for laminating the faces of flat pieces together.
The trick to that type of laminating is to use very long strips
of inner tube with some spacers laid over on the parts to be laminated
so that the whole spacer+laminate assembly can be wound up in
such a way that the band ends up forcing the glue faces together.
If there is any way the joint can be clamped with an inner tube
wrap I think the clamping action is better than a rigid clamp,
and it saves my shop's limited supply of nice wood and metal clamps
for setup and pattern work.
Any size rubber strip will work; the ones that get the most use
in my shop are about an inch wide and two feet long. On one 38
foot mast we used at least a couple dozen three to four footers....
might have been twice that many. We just kept adding them. To
clamp, I put glue onto the joints, roughly assemble whatever it
is, and then hold one end of the inner tube strip in place somewhere
on the assembly with my left thumb while looping wraps with my
right hand. The first couple of turns don't have much tension,
the trick being to lay the first wraps next to my left thumb so
that when I move my thumb out of the way the beginning wraps won't
slip. After I can move my thumb, the next few wraps have quite
a lot of tension. Finish with a couple of wraps with just enough
tension so that the bitter end can be tucked under and the whole
wrap will stay put.
This inner tube clamp will follow the joint, maintaining pressure
as the wood swells or contracts. It doesn't leave dents in the
wood when unwrapped, and clean inner tube won't stain the wood
- though in fairness I have seen it stain some glues. It's nice
not to have to wonder if a joint is completely set up before removing
the clamps. Just leave it clamped until ready to use.
Enjoy! Roger Loving
Michael Storer's Quick Canoes
I have been sailing one of Michael Storer's Quick Canoes this
season. First I used his Drop-in Canoe / Kayak Sailing Rig, then
I built a larger rig and finally, when wanting to try even more
sail but not wanting to build yet another rig, I combined the
two (both balanced lugs) to make a yawl. I already had line control
for the rudder so did not need to make a special tiller to by-pass
the mizzen mast. I solved sheeting for the mizzen by fastening
the sheet at the tack rather than at the clew. With 2:1 mechanical
advantage this works very well and the arrangement makes a boomkin
unnecessary.
Paul Helbert Tenth Legion, VA
Duct Tape (rather than Stitch) and Glue FAQ
In 1995 my son Ted and I built two Chesapeake Light Craft Cape
Charles kayaks. During the planning phases we read a letter to
WOODENBOAT suggesting that using duct tape rather than stitching
would be a more efficient method.
Here are some of the frequently asked questions about our experience:
Did the tape hold the seams together where the plywood is stressed?
Yes, the tape held very well. You have to make sure that the surfaces
are free of dust. Dust will coat the tape and keep it from sticking.
In the areas of stress, where a lot of pulling is needed the tape
was wrapped all the way around the hull and back onto itself.
The tape became a whole-hull clamp! We put some extra spacers
(or forms) in some places to keep the tape from "over deforming"
the hull. Even where the hull is stressed the most, tightening
the tape will never tear a hole in the plywood like an overtightened
wire loop will!
Was there any problem with getting the tape off? No, the epoxy
did not stick to the adhesive side of the tape. There was very
little adhesive left on the hull from the tape itself. A little
solvent took it right off.
Did the tape seal the seams well? You bet! In fact that is one
of the benefits of taping -- the seam doesn't leak during the
filleting process. When the tape is removed, the outside seam
is almost smooth enough to use in places -- it still needs fairing
over the whole length though.
Did you have to tape the seams with one long piece of tape? No.
The taping can be done in short increments. Some parts will be
easier than others and the length can be increased, but you can
work with whatever length you are comfortable with.
Should you use the cheapest or most expensive tape? It's up to
you. The cheap stuff has the strength but the adhesive sometimes
isn't so great. If you are bringing the tape around the hull and
back onto itself, (for clamping purposes) then the cheap works
as well as the expensive. To seal the seams, you have to have
good adhesion.
How much tape do you need? You can NEVER have too much duct tape
around. Buy a lot of rolls. Keep one left-over roll in the boat.
Put one in the car. Apply for Possum Lodge membership. If the
women don't find you handsome, they should at least find you handy.
How, exactly, did you tape a seam? Put the two panels in place.
Use 6-8" pieces of tape about every foot to hold them roughly
in position. Run tape along seam -- start from middle of boat
and work toward ends. Seal seam right over the small pieces. During
the sealing make sure that the panels are overlapped correctly.
Where there is need for more force to hold panels together, use
longer strips perpendicular to the seam, or go all the way around
the hull. Once you have a couple of tape loops around the hull
you will be able to turn it over for the filleting and 'glassing.
What's the best part of tape vs wire? Well, I keep hearing about
the problems with the wire after the fillet and glass has been
applied. What do you do? Heat the wire and pull it out? Clip off
the wires and leave them in? Sounds like two more ways to screw
up a job...... Heating and pulling a hundred or so wire stitches
doesn't sound like fun. Leaving the wires in means somehow smoothing
off the nubs left when they are clipped off..... oh good, not
just more sanding, but difficult sanding! Taking the tape off
was like unwrapping a present! Dropped the big ball of used duct
tape in the trash, wiped the hull with a little solvent to pick
up the adhesive here and there, and in 10 minutes we were ready
to get on with the outside fairing and 'glassing.
Bill Whalen, Crystal River Boat Builders
Stuck Screws
I have been working on my Birdwatcher for quite
some time and about two week's ago I put her in he water and she
leaked.... bad! The water came in from around the centerboard
case at the far aft end. So I took her home and got her off my
trailer (I have an overhead hoist) and blocked her up and started
taking out the trunk. I had driven screws up from the bottom of
the boat into the case logs. I epoxyed over the heads and that
is where the trouble started, getting the screws out. I tried
chiseling the epoxy off, I tried a router, I tried cussing and
nothing would work. Like a good husband I tried to enlist my sweet
wife to get under the boat and see what she could do or recommend.
Well that was a bust, so I sat and thought about it for a while,
and then a bright idea came to me.... how about a wood burning
tool to get the epoxy out of the screw heads. Now where to get
a wood burning tool!! Wifie Poo has a stencil burning tool with
a very fine tip, after much begging she consented to my using
same, with many threats of my quick to demise if I wrecked it.
The enclosed pictures show the tool and one of the extracted screws.
The tip on the tool is quite fine which is a help as you can get
into the head and melt out the material and once cleaned out I
used a brace and Phllips Bit to break the screw loose. Because
of the clearance under the boat, I finished the extraction with
a hand held screw driver. On all I took out about 9-10 screws
without a messed up head. For me this was a life saver and I hope
you will pass it on to your readership as I think it could be
a blessing to them too. Oh yea the wife and I are still talking.
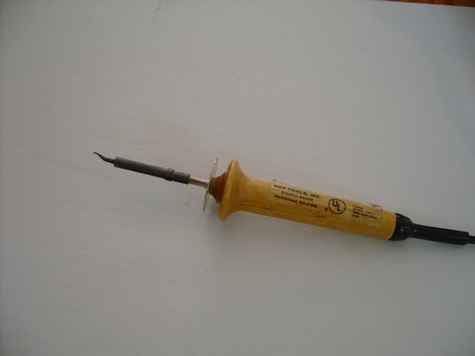
Bob And Susan Archibald
Coamings
I am mounting coamings on the anti-swamp side decks of our skiff.
Having a small shoulder on the coaming enabled me to get the goopy
board set and clamped without sliding all around. I have attached
a diagram of how I got both boards with a shoulder out of a 1
x 2.5" board. The teak coaming is glued and will be screwed
to the 3/4 inch fir frame. I lapped the coaming over the cuddy-top
about two inches. A second project, the Bufflehead hull in the
background, is now ready for Kevlar on the inside.
The coaming ends in a thumbcleat that looks sort of like an old
Caddy fin. This may come in handy for loose-footed lug sheets,
stern rodes and starting conversations.
Stacy D. Smith
Balance Beam and Gloves
I was reading through the fine recent article on balance beam
epoxy measurements and had two tweaks that I have found to work
well.
One, on the balance beam, I used a straight flat piece of solid
wood as opposed to plywood, and after the screws were installed,
just used a block plane to take off a few slivers until it balanced
out without a second weight to fine-tune the balance. With different
humidity levels, it sometimes goes off again, but a couple of
passes with the plane puts it back where it should be.
Two, I have found that nitrile "housework" gloves work
better for me than the thinner disposable types. Thicker material
weight, less likely to tear, generally better protection, almost
as good dexterity. A quick wipe off with a paper towel after use
keeps epoxy from building up and cracking the material. The cloth
lining makes them more comfortable, and they will last a good
while, I think long enough to make them work out almost as cheap
as the disposable ones.
Brian
Epoxy Pumps
Normally, epoxy pumps deliver the same amount whether in resin
or hardener – this means for a 2:1 mix, you will need two
squirts of resin for each squirt of hardener. On my personal epoxy
pumps, I have added a spacer to the hardener pump which keeps
it from going past half way down. It is made from a 1” long
piece of ½” PEX tubing that has been cut the long
way so that it will snap around the shaft – I have attached
a photo sequence to give you an idea.
Chuck
Paint
I have a tip on touch up paint. Since opening a paint can repeatedly
ends up with a dried up unsealable mess I went to one of the dollar
stores and got 10 very small plastic containers for $1.00 and
put an ounce or so of paint in about 4 of them then resealed the
quart can (or whatever) to save for later. When one of the little
ones gets messy or dried up you just toss it and next time get
another.
Gene Lueg
Go to Your Tent
Lots of newbies reading Duckworks might be stopped cold by lack
of a place to build. No problem .. I built in a Sears screened
tent in my back yard, replaced by a pole & tarp 'garage tent'
(which is still there four years later).
It worked for me and the cost was pretty reasonable Wanderer
would never have happened without them.
As buddy Steve Bosquette says: "You can build a boat, sure
you can!" Glad you're keeping up the great Duckworks work.
Bob Throne
Paint
When painting a boat sometimes it's hard to see if I'm getting
a good second or third coat coverage of the same color. So sometimes
I'll tint the first coat with a little of another color, say white
base with a couple drops of blue then the second coat of white
will be easy to see if it is covering the pale blue first coat.
Tom Raidna
Water Ballast Measurement
I want to use the area under the floor on my new boat as water
ballast but couldn't figure how to measure the volume. I had the
line drawn with a laser so Howard said to fill it up with water
and measure it. We did and dam if it didn't work. 14 five gallon
buckets filled it. 70 gallons and I pulled the cork and drained
it out
David Lucas, Lucas Boatworks and Happy Hour Club
(941) 704-6736
******
|