Since the launch of my own John Welsford Pathfinder
late last summer, I have taken a bunch of day trips to some remote
coastal areas of Newfoundland. Each time we ventured out and loaded
the boat we required a small shopping list of items not to forget
to take, typical for day trips that involve at least one cooked
meal on a beach or aboard. But Murphy’s Law rears its head
and something gets left behind from time to time. One such trip
involved cooking up some bacon and beans with no frying pan. I
won’t get into details, but the paper was removed from the
bean can, held with a pair of pliers, and the beans were held
in a cup while the bacon fried... It got the job done. The missing
frying pan brought to light an issue I have tried my best to minimize
over the years by having lists of things to take on camping trips.
With the Pathfinder on the water, a long term solution was needed
for the constant packing and repacking of gear, kitchen gear to
be more exact. It’s the list of all the kitchen items needed
on a boat trip regardless of length, as well, a place to do the
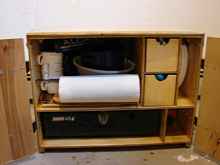
cooking and eat afterward. A Chuck box was required. Many designs
can be found on the internet (for a price) and in many styles
and sizes. But a small open sailboat has space limitations and
the box shouldn’t be a size and weight that causes it to
be intentionally left behind. The Pathfinder needed one that was
compact enough to fit under the deck but large enough for all
the essentials. No legs are required since it would get used within
the boat, and sitting on the beach would be high enough anyhow.
I set to designing one and went through different styles as I
finalized the idea into a buildable box. Having access to the
drawers and other kitchen items while cooking was essential, basic,
tough and efficient was the goal.
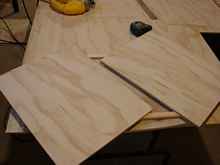
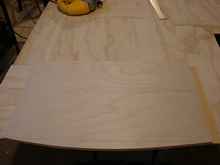
I rummaged through the scrap pile in my workshop and found enough
plywood to do the job though not the exact thickness I had drawn
in the plan. It’s mostly of 5/16” thick plywood with
½” plywood top. ¼” ply was originally
in the plan but the ¼” thick plywood I had was all
warped and would have been a pain to work with.
 |
With minor adjustments, all the parts were cut
and sanded. |
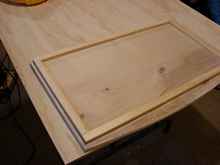 |
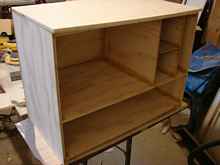
The top had a perimeter strap glued in place
as a backing block for when the sides and back are attached. |
The sides and back sections had backing blocks glued to the lower
side for attaching the bottom panel.
Those pieces were glued together with a generous amount of epoxy
glue backed up with brad nails until the glue kicked off.
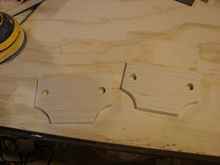
The drawer ends and bottom were made from 3/8” pine and
1/8” ply sides glued to that.
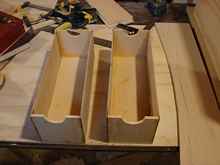 |
Drawer ends |
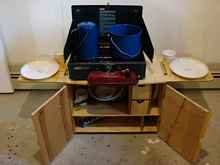
The front doors are made from ½” plywood and a
pine overlapping strap as a closure piece. It all was given another
sanding and all the corners were rounded off before several coats
of varnish were added.
The door arrangement does the job but I couldn’t think of
a better way to close up the front. A drop door would interfere
with a person cooking on the stove that will sit on top of the
box. Not to mention the floor space it would take up. A simple
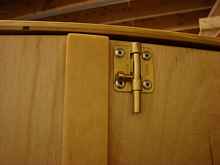
slider bolt type latch was mounted to one door latching to the
box top to keep both doors closed.
I removed the bolt latch that was to go in the front, it didn’t
work well.
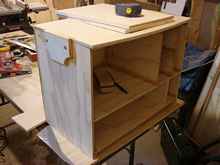
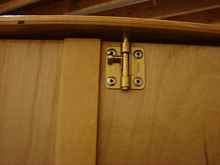
The strap hinges were riveted in place since the plywood was
thin and I didn’t want nuts and bolts that would eventually
loosen.
 |
The strap hinges were riveted in place. |
Washers were put on the backs of the rivets to prevent them
from passing through the wood. Rope handles at the ends are simple
and naturally fall to the side when not in use not to mention
light weight.
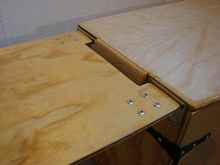
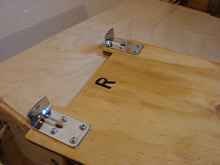
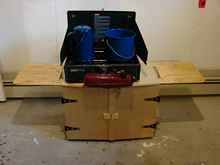
The side shelves are made from 3/8” plywood and have a
stainless steel table bracket riveted to the bottom side. The
matching bracket is riveted to the box.
It took as much time to apply the varnish as it did to actually
build the thing and the hardware and varnish was a bigger cost
than the wood, which in this case was only left over bits that
have a new purpose other than cluttering up my workshop. Empty
it weighs in at about 20lb and full of gear weighs about 47lb.
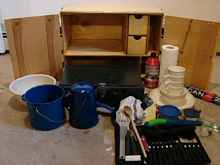
Here’s a list of what is stuffed into my Chuck box and
accessible while cooking:
(1) Colman camp stove with full tank of fuel
(1) litre of camp fuel (brings total cook time on high to over
6 hours)
(1) frying pan (large enough for 4 eggs) iron or Teflon coated
(1) large pot
(1) small pot
(1) large kettle
(4) plates (plastic)
(4) mugs (plastic)
(4) bowls (plastic)
(4) forks (stainless)
(4) knives (stainless)
(4) spoons (stainless)
(1) multi use cutting knife
(1) bread knife/long blade knife
(1) can opener/knife combo (swiss army)
(1) rubber spatulas
(1) Large mixing spoons (wood/plastic)
(1) butane lighter
(1) roll paper towels
(lot) various spices
(1) plastic safe cutting board
(1) muli use deep bowl for mixing and washing dishes
(1) bottle of dish liquid
(2) packs waterproof matches
(1) roll aluminum foil
(3) small containers for coffee, sugar, teabags and other basic
items.
A nice little project to make use of your scrap plywood and will
keep your list short when heading out on the water for a weekend.
All in all I figure I spent 8-10 hours building it spaced out
over a bunch of evenings or stolen moments before supper. It can
also serve as a seat for 2 adults when not in use. I’ll
try out the box this spring and see how it goes, if I have any
large issues there will certainly be a version 2.0 built.
I attached a file for anyone who wanted to build one of their
own and the measurements and thicknesses can be easily modified
to suit your type of stove and wood at hand. Reinforcement blocks
can be added if you plan not to use epoxy for gluing.
 |
Drawings |
Download dxf file
(chuck box 2010.dxf 1.8mb) or pdf
file (242kb).
*****

|