| Part One - Part Two - Part Three - Part Four - Part Five
Modifications
I had done a few things to get the boat ready for the trip. Some I did for last years' unsuccessful sail. Having learned from my mistakes in 2010, I added to and refined some of my preparations for the
2011 attempt. My approach to my preparations on the boat were to not do any major modifications to the boat as I wanted to keep the boat class legal for some planned light racing against some other Day Sailers as well as camp cruising the boat.
In 2010 I had added two sets of reefing points to the main sail. Those that had sailed the Texas 200 before recommended at least two sets of reef points for the normally high winds that can be expected. In
2010 I did not have a jiffy reefing system in place, so putting in and taking out reefs was difficult especially since I was single handing the event that year. For 2011 I added hardware to the boom for both sets of reef points. As it turned out, with the high winds we started with the sail reefed on the second set of points and remained that way for the whole trip.
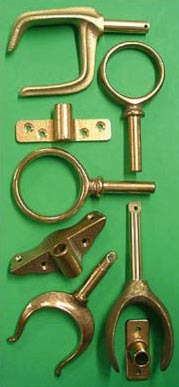
To make handling the jib easier I added a downhaul. In 2010 I did not have a downhaul for the jib and had difficulty when trying to bring down the jib in a narrow channel. One of the hanks jammed on the forestay and I was unable to go forward to fix the problem. My downhaul for this year was rigged by attaching a small block on the bow and running a 3/32" line thru two small fairleads to the cockpit. The end of the line I attached to the hank near the head of the sail and ran the line through the other hanks. This system worked very well when we needed to get the jib down, especially in the high winds we had. It kept us from having to get on the fore deck. Pulling the jib sheets tight kept the sail on the deck until we could get it secured.
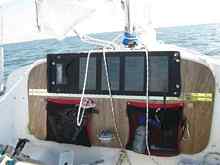
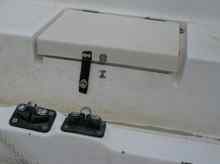
In 2010 I built new hatch covers. In the spring while getting ready for the event I capsized my boat. I wish I could say it was a "test" capsize, but unfortunately it wasn't. The boat stayed on its' side and I eventually got it righted after swimming the boat into shallow water. I had the covers off the cuddy cabin and none of my gear came out, but it made me think about what would happen with a fully loaded cabin. I wanted to be able to keep the hatch covers in place, but still have access to things I needed. I decided to make new covers with a hinge. I placed the hinge across the length of the cover. This would allow the cabin to be sealed and still provide access without having to remove the hatch covers. On the back I placed latches to secure the hatch to the boat. On the hinged upper part of the cover I put attachment points for a solar panel.
On the lower part I attached two bags to hold lines, VHF radio, sunscreen, etc. I also put a compass mount on the lower part. In 2011 I also added drink holders on each side of the bags.
It was after capsizing that I found out that the previous owner of the boat had removed about 90% of my flotation. I filled the flotation tanks with "pool noodles". I also added foam inside the upper
2-feet of the mast and attached a small water bottle to the top of the mast. The water bottle my not prevent the mast going under, but might slow things down until better flotation can get there. I also sealed holes in the mast where old hardware had once been attached. My mast is not original to the boat. The previous owner said it was a Day Sailer I mast, so it is probably older than the boat.
For the 2010 event I installed oarlocks so that I could use oars as auxiliary power instead of an outboard motor. I placed the oarlocks on line with the mainsheet. To install the oarlocks I put a 4- inch inspection port on the inside of the cockpit rail. If I did it over, I would have used 5 or 6-inch inspection ports instead of the 4-inch ones that I used. I made a rowing seat that would sit on the centerboard trunk and span across the seats. I used a 1-inch thick board, 12-inches wide. Each end of the board had small legs to make the seat sit level. I also placed wood on the board near the center to keep it in place on the centerboard trunk. The Day Sailer rows well. When rowing, I raise the boom using my topping lift enough to clear my head. I put the centerboard down a little to prevent side slippage. I have 7-foot oars, but 8 to 8-1/2-foot are preferable. When the rowing seat is not in use, I found that I could store it near the stern by jamming it in the drainage groove at the base of the cockpit seat.
I had planned for the 2011 event to store some tools and my old set of stays inside the space in the cockpit rails accessed by the 4-inch inspection ports. This didn't happen, but we found the space a good place to put empty water bottles.
For additional storage this year I put two 6-inch inspection ports inside the cuddy cabin. My plan was to store some of the 14 gallons of water we were carrying below the cuddy cabin deck centered on the keel. I anchored a bag below the deck to keep the weight from shifting and to make it easier to access the extra water when it was needed. I also thought we could store some water in bags along the centerboard trunk. Because we were unable to load the boat as originally planned, these two storage areas did not get used. I plan to try to use them in the future however. I was hoping that storing some of the water along the keel would provide additional ballast.
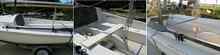
For the 2010 event I had planned to sleep on the boat. The Day Sailer II cockpit does not have any good way to sleep in it. The cuddy cabin was packed full, not an option. Looking at the problem I decided to make "bed boards" as a sleeping platform to be set up in the cockpit. I developed several different designs on my computer that I thought might work. The simplest solution I came up with was to use two 3-feet x 12-inch boards, hinged together in the middle with folding legs. The 2x4 legs that I made were set up to fold inward to store better. In use however, with legs that folded inward I had problems with them folding up while in use even though I tried locking them in place. For the 2011 event I modified the bed boards to have the legs fold to the outside. I also replaced the
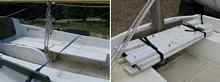
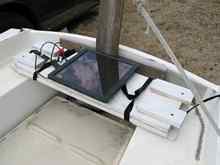
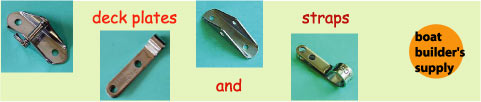
2x4's with 1x4's to reduce weight. With the legs folding to the outside I could tie a line between the legs to lock them in place. For this years' event I had planned to use a tent and sleep on shore, but wanted to carry the boards just in case I wanted to sleep on the boat. Last year the boards were stored in the cockpit while under sail. This year I decided to store the boards in the stern with straps. I added strap attachment points in the stern on each seat. I placed the boards across the seats in the stern creating a rear deck area similar to a Day Sailer I. On one of the boards I place four screws with wing nuts to the underside. These screws would face up when the boards were folded. I attached a 5W solar panel to the boards. This panel went to a rechargeable battery pack (secured below the boards), which was connected to a small electric cooler. The panel itself could not power the cooler, but running through the battery it ran very well. We did not use the cooler much as planned however. The panel was used for recharging the VHF radio. As a further refinement of the bed boards, I plan to make two separate boards, the length of which will be equal to the width (about 4-feet) of the cockpit in the stern. The legs will fold the same as current modification. With two separate boards I can have sleeping surfaces on each side of the centerboard trunk. I can get enough extra length by using the rowing seat up against the cuddy cabin.
| |
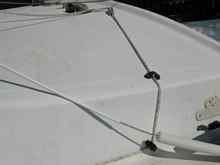
Stored Bed Boards with Solar Panel |
To get the fenders out of the way and free up storage space I planned to tie them along the sides of the boat. They would act as additional flotation and as rescue lines in case of capsize. I also added a lock down strap to the ice box in the seat. Early in 2010 while practicing for the Texas 200 I capsized the boat. My ice box cover tore off the latch I had put on it and the contents spread out over the water. I added a strap that I could undo easily for the 2011 event. It worked well.
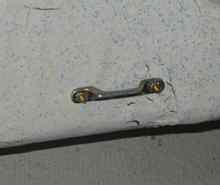
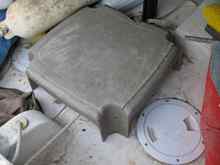
On the inside of the cuddy cabin I added some harness staples to use as attachment points for straps to secure some items that I didn't want to bounce around. The last item I made was a cover to protect the centerboard control lines from everything being stored in the cuddy cabin. The last thing I wanted to occur while on the trip was for equipment or provisions to cause the control lines to jam. A cover also allowed us to not lose much needed storage room in the cuddy cabin. To make the cover I bought a small plastic foot stool from Home Depot. I cut the legs down enough to cover the control lines. I drilled a couple holes in it to tie lines to hold it in place.
For meals, I brought a small propane stove to cook with. I had planned meals that we could make easily. I wanted to bring food that wouldn't need a constant supply of ice as we might not always have a source of ice. I brought beef jerky (that I made) and some vegetables to make a quick hot meal with in the evenings. I had made meals like this while living off horseback for several days to a week
(historic re-enacting) before, except I used a campfire instead of a stove. Unfortunately the winds were so strong and without a way to protect the stove, it wouldn't stay lit. What work for horses, didn't work for sailing. I also packed energy bars for use when under sail. I brought fresh fruit, oranges and apples. We also had some smoked sausage, cheese, corn tortillas, and some packaged meals. Next year more thought needs to go into the food.
Conclusions
My thoughts on the capabilities of using the Day Sailer for camp cruising and events like the Texas
200 are that it is very suitable. It is a tough little boat and handles and sails well in the conditions we encountered. The boat never let us down. Personally I prefer a two person crew sailing the boat as an extra pair of hands in an emergency is always good to have, but a skilled sailor can single hand the event. There were several boats on the Texas 200 that were single handed. I know I may have missed some things to improve the boats capabilities, but I feel that I found several of them. |